ManageLM Documentation
Manage your Linux and Windows servers with natural language — securely, instantly, at scale.
Overview
ManageLM is a remote server management platform. Instead of SSH-ing into servers and running commands manually, you describe what you want in plain English and ManageLM takes care of the rest.
You are running the self-hosted version. The portal runs on your own infrastructure via package installer or Docker.
You are using the SaaS version hosted by ManageLM.
- Portal — The control plane (this web app). Manages accounts, agents, skills, and bridges communication.
- Agent — A lightweight daemon on each managed Linux or Windows server. Receives tasks, uses an LLM to interpret them, executes commands, and reports back.
- Claude — Connects via MCP (Model Context Protocol) to the portal. You talk to Claude, Claude talks to your servers.
How It Works
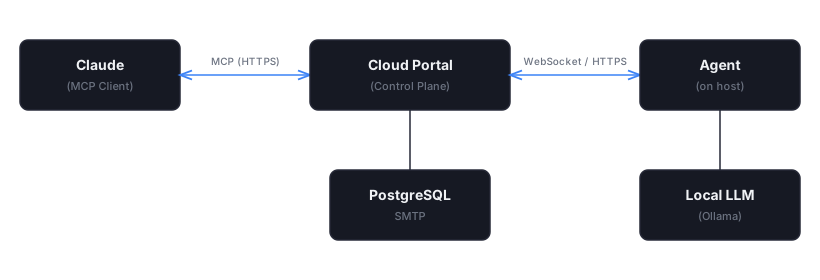
- You ask Claude to do something on a server, e.g. "Restart nginx on web-01".
- Claude calls a tool on the portal that maps to the agent's assigned skills.
- The portal forwards the task to the target agent.
- The configured LLM (local Ollama/LM Studio, or a cloud provider) interprets the task and generates the shell commands.
- Commands are validated against the skill's allowlist before execution — only explicitly permitted commands can run.
- Results flow back through the agent → portal → Claude → you.
What you can do
Just describe what you need in plain English. Here are examples across skills:
| Category | Example prompt |
|---|---|
| Services | "Restart nginx on web-01 and show me the last 20 log lines" |
| Packages | "Update all packages on production servers" |
| Users | "Add SSH access for Charly on user deploy on pocmail" |
| Security | "Run a security audit on all servers and email me a summary" |
| Access | "Who has sudo on production servers?" |
| Activity | "Run an activity audit on dev and show who logged in today" |
| Files | "Add a server block for api.example.com to nginx on web-01" |
| Firewall | "Open port 8080 on staging servers" |
| Containers | "List all running Docker containers on docker-01 and show which ones use more than 1GB memory" |
| Certificates | "Check TLS certificate expiry on all web servers" |
| Backups | "Show me the last backup status for every agent and which ones are failing" |
| Database | "Show the slow query log for MySQL on db-01" |
| Monitoring | "Which servers have disk usage above 85%?" |
| Multi-server | "Check if chrony is running on all servers, install it where it's missing" |
| LLM | "Pull llama3.2 on the Ollama server and test it with a simple prompt" |
These are not templates — you can phrase requests however you want. The agent interprets intent and adapts to each server's OS (Linux or Windows), package manager, and configuration.
Quick Start
From zero to managing a server with natural language — in under 10 minutes.
What You'll Need
- A Linux server (Ubuntu, Debian, RHEL, Rocky, Alma, Fedora, etc.) or Windows Server you want to manage
- Root/sudo access (Linux) or Administrator access (Windows)
- Python 3.9+ and curl installed (Linux), or Python 3.9+ and PowerShell 7+ (Windows)
- A web browser to access the ManageLM portal
- Create an account — Register on the portal and verify your email.
-
Configure the LLM — Go to Settings → Account. Choose Local LLM (install Ollama and run
ollama pull qwen3.5:9b) or Cloud LLM (enter a provider API key). -
Import Skills — Go to Agent Skills → Catalog and import the skills your agent will need. Start with
system,files,services,packages, andusers. - Install the agent — Click Add Agent in the dashboard, copy the install command, and run it on your server.
- Approve the agent — The portal detects the enrollment automatically. Verify the hostname and click Approve.
- Assign skills — Click on the agent, scroll to Assigned Skills, and assign the skills you imported.
- Connect Claude — Copy the MCP connector details from Settings → MCP & API into Claude Desktop or Claude Code.
- Run your first task — Ask Claude: "Show me the system info on web-01", or use the portal's Run Task button directly.
Create an Account
- Navigate to the portal and click Register.
- Enter your first name, last name, email, and password.
- Check your email for a verification link and click it.
- Log in to the portal. You're now the owner of your account.
Install an Agent
Agents are installed on any Linux or Windows server you want to manage. The install is a single command.
- Log in to the portal and go to My Agents.
- Click Add Agent.
- Optionally select one or more groups. The agent is automatically placed in the site you have selected in the sidebar (or stays unassigned if you're viewing "All sites" — see Sites).
- Copy the install command and run it on your server:
Linux
curl -fsSL "https://your-portal/install.sh?token=..." | shThe Linux installer will:
- Check prerequisites (Python 3.9+, curl)
- Download agent files to
/opt/managelm/ - Install Python dependencies
- Enroll the agent with the portal
- Wait for your approval
- Set up a systemd service that starts automatically
Windows
On Windows, the portal provides a PowerShell install script. Copy it from the Add Agent modal (Windows tab) and run it in an elevated PowerShell session. The Windows installer performs the same enrollment steps and registers the agent as a Windows service.
Approve the Agent
After the install script runs, the agent appears in the portal as pending approval.
- The portal's Add Agent modal will automatically detect the new enrollment and show an approval prompt.
- Verify the hostname and click Approve.
- The agent receives its access token and connects via WebSocket.
- A green Connected indicator appears in the agent list.
You can also approve agents from the agent list by clicking the Approve button on any pending agent.
Set Up the LLM
Each agent uses an LLM to interpret tasks and generate commands. Configure from Settings → Account.
Option 1: Local LLM (Recommended)
Install Ollama or LM Studio for full data privacy — your commands and data never leave your infrastructure. The LLM can run on the agent server itself or on a dedicated machine accessible by your agents.
# Install Ollama
curl -fsSL https://ollama.com/install.sh | sh

# Pull a recommended model
ollama pull qwen3.5:9b
Ollama listens on http://localhost:11434 by default. If Ollama runs on a separate server, set the LLM API URL to its address (e.g. http://llm-server:11434) in Settings → Account.
Recommended local models
ManageLM agents need an LLM that reliably follows structured output formats (<cmd> tags, <done/> markers). For IT agent workloads — generating shell commands, managing services, parsing logs — models with strong instruction following perform best. On consumer GPUs we recommend Mixture-of-Experts (MoE) models as the preferred default: gemma-4-26b-a4b (Gemma 4, 3.8B active) and qwen3.6:27b-a3b (Qwen 3.6, 3B active). Both deliver near -dense quality at a fraction of the per-token cost, and Gemma 4 adds native multimodal support and a 256K-token context for large log / config analysis. Dense models (Gemma 4 31B, Qwen 3.6 27B, Qwen 3.5 35B, Mistral, Llama 3.3) remain the recommended choice on high-end hardware where the extra VRAM and throughput are available.
All VRAM figures below assume 4-bit quantization (Q4), which is the default for Ollama/LM Studio and keeps quality within ~2–5% of full precision while cutting memory by roughly 60%. Add 1–3 GB of overhead for the runtime, KV cache, and typical context — more for long contexts on dense models.
CPU-only servers (not recommended)
| Model | Size | RAM | Notes |
|---|---|---|---|
| qwen3.5:9b | 9B | ~7 GB | Best balance of speed and accuracy for CPU-only servers. |
| qwen3.5:4b | 4B | ~4 GB | Lightweight option for constrained servers or simple skills. |
| gemma-4-e4b | E4B (4B effective) | ~5 GB | Gemma 4 edge model — native multimodal (text, image, audio, video), 128K context. Runs on modest CPU or 8 GB class GPU. |
| ministral-3:8b | 8B | ~6 GB | Mistral’s edge model with strong function calling and 128K context. Good alternative to qwen3.5:9b when Mistral’s instruction style fits your skills better. |
GPU servers (min 16–24 GB VRAM)
| Model | Size | VRAM | Notes |
|---|---|---|---|
| qwen3.6:27b-a3b | 27B MoE (3B active) | ~17 GB | Qwen 3.6 Mixture-of-Experts — ~3B active parameters give near-4B latency with quality close to a dense 27B. Strong tool-use and structured output for agent skills. Fits RTX 3090/4090. |
| qwen3.5:35b-a3b | 35B MoE (3B active) | ~22 GB | Qwen 3.5 Mixture-of-Experts — larger expert pool than the 27B variant for higher peak quality, while keeping ~3B active parameters for near-4B latency. Fits 24 GB GPUs (RTX 4090, A5000). |
| gemma-4-26b-a4b | 26B MoE (3.8B active) | ~18 GB | Mixture-of-Experts — only 3.8B active parameters at inference, so tokens-per-second are close to a 4B model while quality is close to a 26B. 256K context (memory stays modest: ~18 GB at 4K → ~23 GB at 256K). Fits RTX 3090/4090. |
| gpt-oss:20b | 20B MoE (3.6B active) | ~13 GB | OpenAI open-weights Mixture-of-Experts — strong tool-use and structured output with very fast tokens-per-second. Different model lineage from Qwen/Gemma/Mistral, useful as a second opinion or fallback. Fits comfortably on 16 GB GPUs. |
| mistral-small3.2 | 24B | ~16 GB | Mistral’s small model with strong function calling and instruction following. |
| ministral-3:14b | 14B | ~10 GB | Mid-tier Mistral model — fast tokens-per-second on consumer GPUs (RTX 3080/4070+) with solid tool-use. Leaves headroom for long contexts or parallel skills. |
containers or kubernetes, and qwen3.5:9b for simple skills like system or users. This optimizes both quality and throughput.
Option 2: Cloud LLM
Use an external cloud provider instead of running a local LLM. Supported providers:
| Provider | Example models |
|---|---|
| Anthropic (Claude) | claude-opus-5, claude-sonnet-5, claude-haiku-4-5 |
| OpenAI (ChatGPT) | gpt-5.6-sol, gpt-5.6-terra, gpt-5.6-luna |
| Google (Gemini) | gemini-3.7-flash, gemini-3.6-flash, gemini-3.5-flash, gemini-3.5-flash-lite |
| xAI (Grok) | grok-4.6, grok-4.5, grok-4.3 |
| Groq | llama-3.3-70b-versatile, llama-3.1-8b-instant, openai/gpt-oss-120b, openai/gpt-oss-20b |
| Mistral | mistral-large-3-25-12, mistral-medium-3-5-26-04, mistral-small-4-0-26-03, ministral-3-14b-25-12 |
| DeepSeek | deepseek-v4-pro, deepseek-v4-flash |
| OpenRouter | anthropic/claude-opus-5, anthropic/claude-sonnet-5, anthropic/claude-haiku-4.5, openai/gpt-5.6-sol |
| Together AI | meta-llama/Llama-3.3-70B-Instruct-Turbo, deepseek-ai/DeepSeek-V4-Pro, deepseek-ai/DeepSeek-V4-Flash-0731, openai/gpt-oss-120b |
| Fireworks AI | accounts/fireworks/models/llama-v3p3-70b-instruct, accounts/fireworks/models/llama-v3p1-405b-instruct |
| Perplexity | sonar, sonar-pro, sonar-reasoning-pro, sonar-deep-research |
Select the provider and model from the dropdown, enter your API key, and click Test to verify the connection before saving.
LLM Access Mode
In self-hosted mode, you can choose how agents access the LLM:
- Direct (default) — Each agent calls the LLM directly. The API key is sent to the agent.
- Proxied — Agents route LLM calls through the portal. The API key stays on the portal server and is never sent to agents. This is useful for centralized key management or when agents should not have direct network access to the LLM provider.
Set the access mode from Settings → Account using the Direct / Proxied toggle. Agents with per-agent LLM overrides always use direct access regardless of this setting.
Assign Skills
Skills define what an agent is allowed to do. Without skills, an agent can only perform read-only operations.
- Go to Agent Skills in the sidebar.
- Click Catalog to browse the built-in skills.
- Import the skills you need (e.g. "Systemd Service Management", "Package Management").
- Navigate to your agent's detail page.
- In the Assigned Skills section, click the skill buttons to assign them.
Built-in Skills (31 total)
Skills are available for both Linux and Windows agents. On Linux, skills use shell commands (bash); on Windows, skills use PowerShell-based equivalents. The skill catalog includes platform-appropriate commands for each OS.
| Skill | What it can do |
|---|---|
base | Core read-only utilities (file reading, search, system info, resource usage, network diagnostics). Auto-assigned to all agents. |
system | System info, performance, hostname, timezone, kernel, reboot. |
files | Create, read, write, move, copy, delete files. Permissions, compression, upload/download. |
services | Start, stop, restart services. Systemd on Linux, Windows Services on Windows. Cron jobs, timers, scheduled tasks, process management. |
packages | Install, update, remove packages. Linux: apt, dnf, yum, pacman, zypper, snap. Windows: Chocolatey, winget, MSI. |
users | Create/manage system users, groups, SSH keys, and sudo access. |
network | Configure interfaces, routes, DNS, diagnose connectivity and ports. |
firewall | Manage firewall rules. Linux: UFW, firewalld, iptables, nftables. Windows: Windows Firewall (netsh/PowerShell). |
storage | Disks, partitions, filesystems, LVM, RAID, mounts, and swap. |
security | Auditing, hardening. Linux: fail2ban, SELinux/AppArmor, SSH config. Windows: Windows Defender, BitLocker, Group Policy, Windows Firewall. Intrusion detection. |
certificates | SSL/TLS certificates, Let's Encrypt, CAs, Java keystores, trust stores. |
logs | View, search, and analyze system and application logs (read-only). |
monitoring | System health, resource usage, disk/network I/O, service checks. |
containers | Docker, Podman, Buildah, images, volumes, networks, Compose. |
webserver | Nginx, Apache, Caddy, Tomcat — sites, configs, SSL, reverse proxy. |
webapps | Node.js, Python, PHP, Ruby, Java apps — PM2, Gunicorn, Supervisor. |
database | MySQL, PostgreSQL, SQLite — queries, schemas, users, backups. |
nosql | MongoDB, Redis, Elasticsearch — data operations, backups, clusters. |
git | Git repositories — clone, pull, push, branches, deployment workflows. |
backup | Backup and restore with rsync, tar, cron — files, dirs, databases. |
dns | BIND, Unbound, dnsmasq — zones, records, resolver configuration. |
email | Postfix, Dovecot, queues, aliases, DKIM, SPF, spam filtering. |
vpn | WireGuard, OpenVPN, IPsec — tunnels, peers, keys. |
virtualization | KVM/QEMU, libvirt, LXC/LXD, Proxmox, Vagrant. |
kubernetes | Pods, deployments, services, Helm, scaling, troubleshooting. |
proxy | Squid, Varnish, HAProxy — reverse proxy, caching, load balancing. |
messagequeue | RabbitMQ, Kafka, NATS, ActiveMQ — queues, consumers, messages. |
filesharing | NFS, Samba/SMB, FTP/SFTP, WebDAV. |
ldap | OpenLDAP, FreeIPA, SSSD — directory services, centralized auth. |
automation | Ansible, Terraform, cloud-init — infrastructure as code. |
llm | Ollama, vLLM, llama.cpp — local LLM server and model management. |
services skill on Linux can only run systemctl and journalctl; on Windows, only Get-Service, Restart-Service, etc. The agent rejects any command not on the list. An agent with no skills can only run read-only commands.
Choose Your Interface
ManageLM is not tied to a single tool. You can manage your servers from Claude, ChatGPT, your terminal, the web portal, VS Code, Slack, or n8n — pick whatever fits your workflow.
| Scenario | Claude MCP | ChatGPT | Shell | Portal | VS Code | Slack | n8n |
|---|---|---|---|---|---|---|---|
| Natural language tasks | ✓ | ✓ | ✓ | ✓ | ✓ | Slash cmds | Structured |
| Multi-step reasoning | ✓ Best | ✓ | — | — | ✓ | — | Workflows |
| Scheduled & automated tasks | Via portal | Via portal | ✓ Cron | ✓ Built-in | — | Webhooks | ✓ Native |
| Security audits & reports | ✓ | ✓ | ✓ | ✓ | — | ✓ | |
| Fleet operations | ✓ | ✓ | ✓ | ✓ Bulk select | ✓ | ✓ | ✓ |
| CI/CD & scripting | — | — | ✓ Best | ✓ API | — | Alerts | ✓ Best |
| Team collaboration | Per user | Per user | Per user | ✓ RBAC + audit | Per user | ✓ Shared channels | ✓ Shared |
| Offline / air-gapped | ✗ | ✗ | ✓ | ✓ Self-hosted | ✗ | ✗ | ✓ Self-hosted |
Connect Claude
ManageLM integrates with Claude via the Model Context Protocol (MCP). Claude sees your servers as tools it can call.
There are two ways to connect Claude to ManageLM. Pick based on whether Claude can reach your portal directly:
- Custom Connector (OAuth) — simplest. Claude calls the portal from Anthropic's cloud. Requires the portal to be publicly reachable (e.g.
app.managelm.comor any self-hosted portal exposed on the public Internet). - Local bridge (
mcp-remote) — for portals on a private network (VPN, intranet, behind a firewall). A small Node.js process runs on your machine and tunnels MCP calls from Claude to the portal. Works for any portal your laptop can reach.
Option A: Custom Connector (OAuth)
Available on every Claude plan (Free is limited to one connector). Uses OAuth 2.0 with PKCE, the standard MCP authentication method.
- Go to Settings → MCP & API in the portal — you'll need the four fields shown there: Name, Remote MCP URL, OAuth Client ID, OAuth Client Secret.
- In Claude Desktop: Customize → Connectors → Add custom connector. Paste the four fields and save.
- On Claude Team plans, the org admin adds the connector once under Organization Settings → Connectors → Add → Custom → Web (on claude.ai), and each member then enables it under Customize → Connectors with their own ManageLM credentials.
Option B: Local bridge (mcp-remote)
Requires Node.js installed locally. The same JSON snippet works for both Claude Desktop and Claude Code — only the config file location differs.
- Go to Settings → MCP & API in the portal, expand MCP Connector (JSON), and copy the snippet (it embeds your credentials).
- Paste it into the relevant config file:
- Claude Desktop on macOS:
~/Library/Application Support/Claude/claude_desktop_config.json - Claude Desktop on Windows:
%APPDATA%\Claude\claude_desktop_config.json - Claude Code: use
claude mcp add, or paste the same snippet into the project's.mcp.jsonor your user-level Claude Code config.
- Claude Desktop on macOS:
- Restart Claude Desktop (or reload Claude Code).
The snippet looks like this:
{
  "mcpServers": {
    "ManageLM": {
      "command": "npx",
      "args": [
        "-y",
        "mcp-remote",
        "https://your-portal/mcp",
        "--header", "X-MCP-Id: your-client-id",
        "--header", "X-MCP-Secret: your-secret"
      ]
    }
  }
}
macOS gotcha: apps launched from Finder or the Dock don't inherit your shell PATH, so plain npx may fail with "command not found". If that happens, replace "npx" with its absolute path (run which npx in a terminal to find it).
What Claude sees
Once connected, Claude gets one tool per skill slug (e.g. system, services, files). Each tool takes two parameters:
target— Agent hostname, group name, site name, or"all".instruction— Natural language description of the task.
For example, Claude calls the services tool with target: "web-01" and instruction: "restart nginx", or with target: "Frankfurt" to fan out to every agent in that site.
Claude also gets built-in meta-tools:
get_agent_info— Get detailed info for a single agent (OS, version, health, LLM status, assigned skills, recent tasks)get_agent_skills— See what an agent can do (assigned, group-inherited, and unassigned skills)list_available_skills— Discover catalog skills not yet imported into your accountget_account_info— Check your plan, usage limits, and current consumptionlist_team_members— List account users with roles, permissions, and registered SSH public keyssearch_agents— List your servers (status, OS, health metrics, LLM readiness, groups, site); filter by health metrics, OS, status, group, site, or free textsearch_inventory— Search system inventory across all agentssearch_security— Search security audit findings across all agentssearch_ssh_keys— Search SSH keys: registered profile keys + deployed keys on servers with identity mappingsearch_sudo_rules— Search sudo privileges across all agentssearch_certificates— Search x509/TLS certificates discovered on host disks by certificate scans (managed or not)run_security_audit— Trigger a security audit and wait for resultsrun_inventory_scan— Trigger an inventory scan and wait for resultsrun_access_scan— Trigger an SSH & sudo access scan and wait for resultsrun_certificate_scan— Trigger a certificate scan and wait for resultsrun_activity_scan— Trigger an activity scan and wait for resultsget_task_status— Check on a running taskget_task_history— View recent commands on a serverget_task_changes— View file changes made by a taskanswer_task— Answer a question from an interactive taskrevert_task— Revert file changes made by a tasksend_email— Send yourself a report or summary email
Note: The tool list is fetched at connection time. If skills are added or removed during a session, Claude won't see the changes until you reconnect (restart Claude Desktop or re-open Claude Code).
Run Tasks
You can run tasks in two ways:
Via Claude (MCP)
Just describe what you want in natural language:
- "Restart the nginx service on web-01"
- "Install htop on all servers in the production group"
- "Check disk usage on db-01"
- "Show the last 50 lines of the postgresql log on db-01"
Via the Portal UI
- Click on an online agent in the dashboard.
- Click the Run Task button.
- Select a skill from the dropdown.
- Type a natural-language instruction describing what you want.
- Click Execute.
Task results appear in the Command History section on the agent detail page and in the Request Log page.
Agent CLI Tools
Three on-host commands ship with the agent and talk to the local daemon over a Unix socket — no network, no portal round-trip. They reuse the same skill gate, command validator, and kernel sandbox as portal tasks, and work offline whenever the local LLM is configured. All three are installed in /opt/managelm/bin/ (Linux) or C:\ProgramData\ManageLM\bin\ (Windows) and also exposed on the PATH.
root / LocalSystem on the managed host. They bypass portal user identity (no per-user RBAC) but still go through the skill's allowed-commands validator and the kernel sandbox, and every task is forwarded to the portal's audit log with source shell.
managelm-shell — Interactive terminal
A natural-language REPL on the managed server. Type what you want, the agent auto-routes it to the best skill, runs it through the sandbox, and streams the answer back.
# Interactive REPL
managelm-shell

# One-shot
managelm-shell -c "install htop and verify"

# Force a specific skill
managelm-shell
> @services restart nginx- Auto skill routing — the daemon picks the right skill from your phrasing; use
@skillto override. - Multi-step planner — complex requests are auto-decomposed into sequential steps across skills and a numbered execution plan is shown before running.
- Streaming output, tab completion, command history, elapsed time, and rich markdown rendering.
- Follow-ups — type
> …to continue the previous conversation with full context. - Changeset & rollback — file writes are snapshotted;
changeslists them,rollback #Nreverts. - Interactive tasks — the LLM can pause and ask for information only you can provide (domain, password, licence key) and resume with the answer.
- Linux commands marked interactive run in a PTY with the local LLM driving stdin.
Shell tasks show up in the Audit Log (Agent Activity tab) and webhooks just like portal tasks.
managelm-fixit — Diagnose & fix one file
Point it at any misbehaving file. The agent classifies the content, picks the right skill, diagnoses the issue, and proposes a full-file replacement as a colored diff. Apply on y, reject on N.
# Diagnose, show diff, y/N to apply
managelm-fixit /etc/nginx/nginx.conf

# Diagnosis only, no diff
managelm-fixit --explain /etc/postfix/main.cf

# Auto-apply without prompting
managelm-fixit --yes /var/www/app/config.yaml

# Force a skill and add a hint
managelm-fixit @webserver -c "502 after upgrade" /etc/nginx/nginx.conf- Content-based routing — the skill is chosen from the file's content, not its path, so it works on any text file (configs, scripts, code).
- Atomic writes with owner, group, and mode preserved; rolled back automatically if the post-fix validator fails.
- Same changeset log as shell tasks —
managelm-shell→rollback #Nreverts applied fixes. - Non-zero exit codes distinguish nothing to fix / proposed but not applied / applied / error, suitable for CI or pre-commit hooks.
managelm-review — Read-only review
Where fixit writes, review only reads. Point it at a file or a directory and get a short summary plus a list of findings grouped by severity. Nothing is written to disk.
# Review a single file
managelm-review /etc/ssh/sshd_config

# Review a directory (walks recursively, skips .git, node_modules, …)
managelm-review ./src/

# Only warning + critical
managelm-review --severity warning ./src/

# JSON for CI
managelm-review --format json ./src/- Findings carry a line number, severity (info / warning / critical) and category (security, bug, style, perf, maintainability).
- Directories are walked safely: noisy dirs skipped, symlinks not followed, hard cap at 20 files, confirmation above 5.
- Exit code
1when findings are present at or above the severity threshold — drop it into a pre-commit hook or CI stage. - Ideal companion to
fixit: review a directory, then fixit the files that matter.
Inside a Terminal Console
Two more tools work only where there is a browser at the other end — inside a Terminal Console. Run either over plain SSH and it says so rather than doing something surprising.
managelm-copy /var/log/syslog     # send a file to your browser's downloads
managelm-copy /etc/nginx          # a folder arrives as nginx.zip
managelm-copy app.conf web-01:/etc/   # or straight to another server
managelm-sync ./conf   web-01:/etc/app/   # keep a folder in step

managelm-edit /etc/nginx/nginx.conf   # open it in an editor over the terminal
See Moving files in and out and Editing a file.
Quick Reports
Quick reports are one-click diagnostic commands available on the Agent Assets page. They let you run common checks on any online agent without writing instructions.
How it works
- Open the Agent Assets page.
- Each agent card shows small icon buttons below the OS info line — one per available report.
- Click an icon to run the report. A modal opens showing a spinner while the agent executes.
- When complete, the modal displays the LLM summary (a readable interpretation) and the raw terminal output.
- Click Copy to copy both summary and output to your clipboard.
agents permission. Reports only appear for skills that are assigned to the agent (directly or via a group).
Available reports
Nine built-in skills include quick reports. Each report runs a pre-built instruction on the agent:
| Skill | Report | What it checks |
|---|---|---|
system | System Summary | Hostname, OS, kernel, uptime, load, memory and disk usage |
system | Top Processes | Top 10 processes by CPU and memory |
services | Service Inventory | All services with status and enabled state (systemd on Linux, Windows Services on Windows) |
services | Failed Services | Services in failed state |
packages | Available Updates | Packages with pending updates |
users | User Accounts | All users and groups with UID, GID, home, shell |
network | Listening Ports | All listening TCP/UDP ports with their process |
security | Security Overview | Listening ports, SSH config, fail2ban status |
containers | Container Status | All containers with name, image, status, ports |
storage | Disk Usage | Disk usage for all mounted filesystems |
logs | Recent Errors | Errors and warnings from the system journal (Linux) or Windows Event Log (last 30 min) |
Active task indicators
Agent cards on both the My Agents dashboard and the Agent Assets page display a red badge with a spinning icon when the agent has tasks currently running. The badge shows the number of active tasks (pending, sent, or executing).
Portal UI Guide
| Page | Purpose |
|---|---|
| My Agents | Dashboard showing all agents, their status, LLM info, skills, active task indicators, and a 7-day task activity chart. Add, approve, search, and bulk-manage agents. |
| Agent Detail | Configure an agent: display name, LLM settings, tags, groups, assigned skills, member access. Run tasks and view command history. |
| Agent Assets | Visual server map with agents organized into collapsible zones — by group, tag, site, subnet or operating system, whichever you pick (the choice is remembered) — click-to-expand agent cards with 24h metrics and cloud provider metadata, quick report buttons, security audit, system inventory, SSH & sudo access, certificate discovery, activity audit, service dependencies, scheduled tasks, and bulk select operations. |
| Agent Skills & Rulesets | Import skills from the built-in catalog, create custom skills or rulesets, or import/export skill JSON files. Two tabs: Skills (per-skill commands and prompts) and Rulesets (cross-skill policy text). Attachment counts on each row reflect the active site when one is selected. |
| Agent Groups & Sites | Two tabs: Groups (logical organization — e.g. "production", "staging" — carry skills, rulesets, SIEM, and member access) and Sites (physical/logical location — datacenters, offices — carry an optional Local LLM endpoint and feed the global site filter). See Sites for the full picture. |
| Users & Roles | Invite team members, assign roles (admin/member), and configure granular permissions. |
| Monitors | Service monitors — track availability and response time of 43 service types (HTTP, TCP, DNS, SMTP, databases, message brokers, VPNs, and more). Sparkline charts, status badges, alert toggles, categorized catalog, test-before-create. |
| Certificates | Certificate management — issue, renew, and revoke TLS certificates via internal CA or Let's Encrypt. Deploy to agents automatically. CRL generation. Daily auto-renewal sweep. |
| Credentials | Credential rotation — generate and rotate passwords, SSH keys and Entra client secrets on a schedule, then deliver them to a vault, a file your scripts read, an application's own database, a local account on other hosts, the Windows registry or a pipeline. Local accounts, LDAP, Active Directory, Entra, databases and Redis. |
| Keystore | KSM Keystore — RSA, EC, post-quantum ML-DSA, AES and HMAC keys held by the portal and used by applications on your servers through a PKCS#11 module, without the key ever reaching the host. Per-application credentials, Unix account allowlists, certificates served over PKCS#11, and a per-day record of what every key was used for and what was refused. |
| System Backups | System Backups — end-to-end encrypted filesystem backups to your own S3 storage (OVH, AWS, R2, B2, Exoscale, Wasabi, Scaleway, Hetzner, DigitalOcean, Google Cloud, Infomaniak, MinIO/Ceph, or any S3-compatible endpoint). Streaming downloads, restore to any agent, detach-on-delete, optional service quiesce for consistent database snapshots. |
| Pentests | Automated penetration testing for public-facing agents using nmap, nuclei, testssl.sh, ffuf, subfinder. Credit-based scans with domain verification. Results feed into the Compliance page. Pro/Business plans. |
| Compliance | Compliance framework mapping — automatically projects security audit and pentest results onto CIS Level 1, CIS Docker, SOC 2, PCI DSS, ISO 27001, NIS2, NIST CSF, and HIPAA. Drift detection with in-app and email alerts. Per-framework evidence PDFs. |
| Connectors | External integrations split into three kinds: Hosting Integration (Azure, AWS, Google Cloud, VMware, Proxmox, OpenStack — credentials, test connections, sync resources, browse discovered hosting inventory with agent matching), SIEM Integration (Splunk HEC, Elasticsearch _bulk, generic JSON webhook — agents forward task-completion events directly to the destination, per-agent or inherited from an agent group), and Notifications & Ticketing (Slack messages, ServiceNow and Jira tickets — per-category routing for monitor / cert / backup / security / threat / report / pentest / agent / task events with severity-aware defaults). |
| Audit Log | Four-tab viewer of everything that happened in your account: Agent Activity (task log per agent with AI summary in the expanded row, Changes-only toggle, and PDF export — replaces the standalone Reporting page), Threat Alerts, Admin Actions, and Geolocation (world map of admin connection origins, when GeoIP is configured). Account-wide visibility requires the logs permission; otherwise the view is scoped to the agents you are assigned to. |
| Settings | Profile (name, timezone, System Username), Security (passkeys, MFA, SSH public keys, verified domains, sessions), MCP & API (credentials, IP whitelist, API keys, webhooks), PKI & CA (internal CA setup, Let's Encrypt account, DNS-01 providers, certificate defaults), S3 Backups (provider, bucket, credentials, orphan cleanup), Account (plan, LLM defaults, danger zone). |
Skills
Skills are the core security and capability model. Each skill defines:
- Operations — Named capabilities (e.g.
restart,install,list) that describe what the skill can do. - Allowed commands — The exact shell commands the agent can execute (e.g.
systemctl,apt). - PowerShell modules (Windows skills) — Whole PowerShell modules the skill may use, instead of naming every cmdlet. Granting
Hyper-Vallows that module's cmdlets; the agent expands the module on the host and adds its cmdlets to the allowed list. Core modules such asMicrosoft.PowerShell.Managementare refused — they would grant the whole system. - System prompt — Instructions for the LLM on how to perform operations.
Management Hints
Each skill assignment (on an agent or a group) supports management hints — free-text contextual instructions passed to the LLM alongside the task. Use hints to provide server-specific or group-wide context that helps the LLM do its job:
- Custom paths: "PostgreSQL 16 data dir is /data/pg16, config in /etc/postgresql/16/"
- Port overrides: "Nginx runs on port 8080 behind HAProxy"
- Conventions: "Always use sudo -u postgres for database operations"
- Environment notes: "This is a staging server. Safe to restart services during business hours."
Hints can be set at two levels:
| Level | Where to set | Scope |
|---|---|---|
| Per-agent | Agent detail → expand skill → Management Hints | This skill on this specific agent |
| Per-group | Agent Groups → expand skill → Management Hints | This skill on all agents in the group |
Direct per-agent skill assignments take priority over group-inherited ones (including their hints).
Skill Definition Example
Below is an example of a Linux skill definition. Windows skills follow the same structure, listing PowerShell cmdlets in allowed_commands and whole modules in allowed_modules.
{
  "description": "Manage systemd services",
  "operations": [
    {
      "name": "restart",
      "description": "Restart a systemd service"
    },
    {
      "name": "status",
      "description": "Get status of a service including recent logs"
    }
  ],
  "allowed_commands": ["systemctl", "journalctl"],
  "system_prompt": "You are a Linux sysadmin..."
}
Operations are instruction-based — each operation has only a name and description. They describe capabilities for documentation and AI context, not structured parameter schemas. The agent LLM interprets the user's natural-language instruction to determine what commands to run.
Skill Combinations
Many real-world management tasks span multiple skills. Each skill controls a specific domain — when an operation touches several domains, you need all the relevant skills assigned to the agent.
Foundation skills
These five skills are used by almost every management workflow. Consider assigning them to all agents as a baseline:
| Skill | Why it's foundational |
|---|---|
system | System info, hostname, timezone — needed to understand what you're working with. |
files | Read/write config files, set permissions — almost every change touches a file. |
services | Start/stop/restart daemons, manage cron — most installations end with a service reload. |
packages | Install software — any new capability starts with installing a package. |
users | Create accounts, manage SSH keys, sudo — many services need a dedicated user. |
Common multi-skill workflows
Below are typical management tasks and the skills they require. Each example shows what you'd ask Claude and which skills are involved.
Create a new system user with SSH access
"Create user deploy with a home directory, add their SSH key, and set them up with sudo access for systemctl"
| Step | Skill needed |
|---|---|
| Create user account and group | users |
| Create home directory and set ownership | files |
| Add SSH authorized key | users |
| Configure sudoers entry | users |
Skills: users + files
Install and configure Nginx with SSL
"Install nginx, create a site for example.com with Let's Encrypt SSL, and open port 443 in the firewall"
| Step | Skill needed |
|---|---|
| Install nginx package | packages |
| Create site config file | webserver |
| Obtain SSL certificate via certbot | certificates |
| Enable the site and reload nginx | webserver |
| Open ports 80/443 in the firewall | firewall |
Skills: packages + webserver + certificates + firewall
Deploy a Node.js application
"Clone the repo from GitHub, install dependencies, set up a PM2 process, and configure nginx as a reverse proxy"
| Step | Skill needed |
|---|---|
| Create app user and directory | users + files |
| Clone the Git repository | git |
| Install Node.js and npm dependencies | webapps |
| Start the app with PM2 | webapps |
| Create nginx reverse proxy config | webserver |
| Set up SSL certificate | certificates |
Skills: users + files + git + webapps + webserver + certificates
Set up a PostgreSQL database server
"Install PostgreSQL 16, create a database and user for my app, configure backups, and open port 5432 only from 10.0.0.0/24"
| Step | Skill needed |
|---|---|
| Install PostgreSQL packages | packages |
| Start and enable the service | services |
| Create database and DB user | database |
| Edit pg_hba.conf for network access | files |
| Set up a pg_dump cron job | backup |
| Open port 5432 for the subnet | firewall |
Skills: packages + services + database + files + backup + firewall
Docker Compose deployment
"Create a docker-compose.yml for my app stack, start it, and check the container logs"
| Step | Skill needed |
|---|---|
| Create project directory and compose file | files |
| Start compose stack | containers |
| View container logs | containers |
| Open ports in firewall (if needed) | firewall |
Skills: files + containers + firewall
Security hardening
"Harden SSH (disable root login, key-only auth), set up fail2ban, and configure the firewall to allow only SSH and HTTPS"
| Step | Skill needed |
|---|---|
| Edit sshd_config | security |
| Restart sshd | services |
| Install and configure fail2ban | security |
| Set firewall rules (allow 22, 443 only) | firewall |
| Review auth logs | logs |
Skills: security + services + firewall + logs
Set up WireGuard VPN
"Install WireGuard, generate keys, configure a tunnel to 10.0.1.0/24, and open UDP port 51820"
| Step | Skill needed |
|---|---|
| Install WireGuard package | packages |
| Generate keys and create config | vpn |
| Enable IP forwarding (sysctl) | network |
| Open UDP 51820 in firewall | firewall |
| Start and enable the WireGuard service | services |
Skills: packages + vpn + network + firewall + services
Skill assignment strategies
Use agent groups to assign skill sets by server role, so you don't have to configure each agent individually:
| Server role | Recommended skills |
|---|---|
| Web server | system, files, services, packages, users, webserver, certificates, firewall, logs, monitoring |
| App server | system, files, services, packages, users, webapps, git, logs, monitoring |
| Database server | system, files, services, packages, database, backup, firewall, storage, logs, monitoring |
| Docker host | system, files, services, packages, containers, network, firewall, storage, logs, monitoring |
| Minimal / read-only | system, logs, monitoring (no write skills — agent can only read) |
webserver. A web server doesn't need database. Fewer skills = smaller attack surface.
Policy Rulesets
Rulesets are short markdown policy snippets attached to agents (directly or via groups). Every attached ruleset applies to every task on that agent, regardless of which skill runs.
Where management hints are advisory context scoped to a single skill ("PostgreSQL data dir is /data/pg16"), rulesets are cross-skill constraints that stay in force for the whole task ("Never restart services between 09:00 and 18:00 UTC", "Never edit files under /etc/pam.d without prior approval"). The prompt includes an explicit refusal rule: if a request would violate a listed policy, the agent refuses instead of executing.
Managing Rulesets
Go to Agent Skills → Rules. Each ruleset has:
- Slug — stable identifier (e.g.
change-window,pii-handling). - Name — display label.
- Content — markdown policy text, capped at 4 KiB per ruleset.
Attaching Rulesets
| Level | Where | Scope |
|---|---|---|
| Per-agent | Agent detail → Rulesets | This agent only |
| Per-group | Agent Groups & Sites → Groups tab → Rulesets | All agents in the group |
Rulesets accumulate across attachments — an agent gets the union of everything attached directly plus everything inherited from every group it belongs to (deduplicated by ruleset id). Changes push to affected agents immediately over WebSocket; no restart required.
skills permission (same gate as creating custom skills).
Agent Groups
Groups let you organize agents logically (e.g. by environment or role) and apply policy in bulk.
- An agent can belong to multiple groups.
- Groups can be used as MCP targets (e.g.
target: "production"runs the task on all agents in the group). - You can control which team members can see which groups via user group access.
- Skills assigned to a group are inherited by all agents in that group (shown as read-only "(via group)" on the agent detail page).
Create and manage groups from the Agent Groups & Sites page (Groups tab). Assign agents to groups from the agent detail page or the groups page. Sites live next to groups under the Sites tab on the same page — groups carry policy (skills, rulesets, SIEM), sites carry physical/logical location.
Group-level skill configuration
When assigning skills to a group, you can configure per-skill settings that apply to all agents in the group:
- Management hints — Contextual instructions injected into the LLM prompt. Use for group-wide conventions (e.g. "All webservers use /var/www as document root. Nginx config in /etc/nginx/sites-enabled/").
- LLM model override — Use a specific model for a skill across all agents in the group.
Click the chevron next to a skill in edit mode to expand the configuration panel.
Sites & Datacenters
Sites give every agent a physical or logical home — a datacenter, office, branch, or cloud region. They're a different axis from groups: groups are policy bags (skills, rulesets, SIEM, member access), sites are about where the server lives. Most teams won't create any sites and that's fine; they're optional and only worth turning on once a fleet spans multiple locations.
What sites do
- Filter every list page — A small site selector appears in the sidebar (only when at least one site exists). Picking a site narrows Agents, Agent Assets, Monitors, Backups, Certificates, Pentests, Audit Logs, Compliance, Activity, and the Dashboard to that site. "All sites" turns the filter off. The selection persists per-browser.
- Carry an optional Local LLM endpoint — A site can hold its own LLM API URL, model, key, engine, and num_ctx. Every agent in the site automatically inherits it — no need to configure each agent to point at the local LLM appliance.
- Scope team member access — You can grant a member access to all agents in a site, mirroring how groups grant access. Combines (OR) with their direct-agent and group grants.
- Work as MCP / API targets and filters — Tool calls accept a site name as
target, and search tools acceptsiteas a filter alongsidegroup.
LLM resolution chain
The LLM endpoint an agent uses is resolved field-by-field in this priority order:
| Priority | Source | When to use |
|---|---|---|
| 1 (highest) | Per-agent override (Agent detail → Edit) | One agent needs a specific endpoint |
| 2 | Per-site override (Sites tab → expand row → LLM) | One LLM appliance close to a whole datacenter's worth of agents |
| 3 | Account default (Settings → Account) | Default for everything else |
| 4 | Local default (http://localhost:11434, llama3.2) | Nothing configured |
An explicit URL anywhere in the chain bypasses Trial LLM and Proxied LLM — if you point a site at a local appliance, agents in that site go direct.
On the agent edit page the toggle reads "Inherit from site" when the agent's site has its own LLM, otherwise "Inherit from account". The "Currently:" line shows the resolved endpoint regardless of source.
Creating and managing sites
Sites are admin-only. From the Agent Groups & Sites page (Sites tab):
- Click New Site and give it a name (e.g. "Frankfurt", "AWS us-east-1", "HQ Office").
- Expand the row to assign agents (multi-select), grant member access (multi-select), or set the optional Local LLM.
- Each row shows live counts: agent count, member count, plus per-feature badges (
X mon,X bkp,X certs,X pt) when those features are enabled. - Move existing agents between sites with the Move to site… bulk action on the My Agents page.
- Newly approved agents inherit the currently-selected site automatically (or stay unassigned if "All sites" is selected).
- Deleting a site detaches its agents (sets
site_idto NULL); nothing is lost.
Detached resources under a specific-site filter
Some resources can become "detached" when their agent is deleted — backups (S3 data survives) and certificates (the cert remains until expiry for the CRL). Under "All sites" or "None", detached items are visible. Under a specific-site filter, they hide — they don't belong to any specific site, so a site view doesn't include them. Switch back to "All sites" to see and reassign or delete them.
Site vs group at a glance
| Group | Site | |
|---|---|---|
| Concept | Policy bag | Place |
| Membership | Many-to-many | One-to-one (an agent is in 0 or 1 site) |
| Carries skills / rulesets | Yes | No |
| Carries SIEM destination | Yes | No |
| Carries Local LLM defaults | No | Yes |
| Filters the sidebar selector | No | Yes |
Secrets
Each agent has a local secrets.txt file (/opt/managelm/secrets.txt on Linux, C:\ManageLM\secrets.txt on Windows). This file stores sensitive values that commands might need.
# Example secrets.txt
DB_USER=myapp
DB_PASS=s3cret
API_KEY="my-api-key"$DB_PASS), never the actual values. Secrets never leave the server.
LLM Configuration
The LLM is configured from Settings → Account:
- Local LLM (Recommended) — Ollama or LM Studio, running on the agent server or a dedicated LLM host accessible by your agents. Full data privacy.
- Cloud LLM — External provider (Claude, ChatGPT, Gemini, Grok, Groq, Mistral, DeepSeek). Select from a dropdown, pick a model, and enter your API key. Use the Test button to validate the key.
For both Local and Cloud LLM, you can choose the access mode:
- Direct — Agent calls the LLM directly (default).
- Proxied — Agent routes LLM calls through the portal. The API key stays on the portal and is never exposed to agents.
Configuration hierarchy
LLM settings can be overridden at multiple levels (highest priority first):
| Level | Where to set | Use case |
|---|---|---|
| Per-skill override | Agent detail → expand skill → LLM Model Override | Use a specific model for complex skills |
| Per-agent override | Agent detail → Edit → "Override for this agent" | Agent needs a different LLM (local or cloud) |
| Per-site override | Groups & Sites → Sites tab → expand site → "Override for this site" | One LLM appliance close to all agents in a datacenter (see Sites) |
| Account default | Settings → Account | Default for all agents |
The per-skill config panel also includes management hints for providing contextual instructions to the LLM.
Per-agent overrides offer Local LLM or Cloud LLM options and always use direct access. Agents inherit from the account default unless explicitly overridden.
Default values if nothing is configured:
- LLM API URL:
http://localhost:11434(Ollama default) - LLM Model:
llama3.2(we recommendqwen3.5:9b— see model recommendations)
Users & Roles
ManageLM supports team collaboration with role-based access control.
Roles
| Role | Access |
|---|---|
| Owner | Full access. Cannot be removed. One per account. |
| Admin | Full access. Can invite users, manage permissions, edit settings. |
| Member | Limited access based on permissions. Only sees assigned agents and groups. |
Member Permissions
| Permission | Grants access to |
|---|---|
agents | Approve, delete, configure agents and assign skills. Does not grant a terminal console — that is not a permission at all, but a grant made per server |
groups | Create, rename, delete groups and assign agents |
skills | Create, import, edit, and delete skills |
logs | View task logs and MCP activity |
reports | Run and view security audits, system inventory, SSH/sudo access scans, activity audits, compliance dashboards |
connectors | Create and manage hosting connectors (AWS, Azure, GCP, VMware, Proxmox, OVH…) for resource discovery and SIEM forwarding |
hosting | Act on the infrastructure a hosting connector exposes — start, stop, reboot and snapshot VMs. Separate from connectors, which only covers configuring the integration itself |
monitors | Create, edit, delete service monitors; toggle alerts; run ad-hoc tests |
certificates | Issue, renew, revoke, and deploy TLS certificates (Internal CA + Let's Encrypt) |
backups | Configure backups, run on-demand, restore snapshots, manage account S3 settings |
pentests | Launch penetration tests (active attack scans against public agents) |
credentials | Create, edit, rotate, test and delete managed credentials and their delivery targets |
Several of these gate changing things rather than seeing them: every member can view Monitors, Certificates, Backups and Credentials read-only, and the permission unlocks the buttons. Credential pages never show a secret — there is none stored to show.
Disabling a user
Each user has a toggle beside the delete button. Disabling blocks sign-in and immediately cuts everything that person currently holds — browser sessions, API keys they created, MCP connections — while keeping the account itself, along with their group access, site grants and SSH keys. Re-enable them and they carry on where they left off.
Prefer it to deletion when you are responding to something rather than off-boarding: deleting a user takes all of that with them. The Panic Button disables every member at once.
You cannot disable yourself, and the account owner can never be disabled — there always has to be a way back in.
MCP Visibility
All users (including owners and admins) only see agents via MCP that are:
- Explicitly assigned to them (agent detail → Assigned Users), or
- In a group they have access to (Users → user group access).
This ensures MCP access is always explicitly granted, regardless of role.
Skill Restrictions
For delegated admin members, you can optionally restrict which skills they can invoke by maintaining a per-member allowlist. On the Users & Roles page, expand the Skill Restrictions row under a member's permissions and click Edit to add skills to the member's allowlist.
- Empty allowlist — no restriction; the member can invoke any skill the target agent carries.
- One or more skills listed — the member may only invoke the listed skills. The skill must additionally be assigned to the target agent (directly or via a group) at invocation time.
baseand any skill flagged asrequiredare systematically allowed regardless of the allowlist — they underpin every other skill, so the picker filters them out (listing them would be redundant) and the enforcement layer always allows them as a safety net.- The allowlist applies wherever the member can launch a task — chat modal, MCP, follow-ups, and resumed tasks. The chat modal's
autoskill option is hidden for restricted members because it would otherwise pick a skill at runtime and bypass the allowlist. - Owners and admins are exempt — the editor is hidden for them.
- On the Agents and Agent Groups & Sites pages, out-of-allowlist skills render faded with a red restricted badge for members whose allowlist doesn't cover them. The fade is a visual hint only — admins can still edit, remove, or configure those skills as usual.
- Local
managelm-shellsessions on the host and portal-initiated scans (security, inventory, SSH/sudo, activity) are exempt — they aren't user-initiated skill calls.
Use permissions to gate management actions (creating agents, editing groups) and skill restrictions to gate operational ones (running sensitive skills on agents). Rejected tasks return the same error as “skill not assigned to agent”, so a restricted user can't tell whether the skill is missing or simply forbidden for them.
Site Admin Grants
For delegated members, you can optionally grant admin permissions on specific sites — on top of (not in place of) any global perms the member already holds. On the Users & Roles page, expand the Site Admin Grants row under a member and pick one or more sites.
- Empty list — no extra grants; the member only has whatever global perms you ticked above.
- One or more sites listed — for each listed site, the member gains the elevatable admin perms on that site, even when they don't hold the matching global perm. Global perms always apply globally, regardless of this list (it never narrows).
Which permissions can be elevated: the seven that act on individual agents —
agents, monitors, backups, certificates, pentests, reports, logs.
Not elevatable: groups, skills, connectors — these manage account-wide catalogs that have no per-site axis, so only the global perm can grant them.
The terminal console is not on this list and cannot be site-granted. It is handed out one server at a time, in that server’s Assigned Users list or on a group.
Read access is independent of these grants. A member still sees every agent they're assigned to (directly or via group / site member access); grants only affect write/admin actions on those agents.
- Cross-agent operations (a monitor or backup copied to several agents, a certificate bound to several agents) require coverage on every involved agent — either via the global perm (which covers all) or via grants on every agent's site.
- Detached resources (backups or certificates whose agent has been deleted) are reachable only to global-perm holders — site grants need a real site to anchor on.
- Moving an agent between sites needs coverage on both the source and target site (grant-only users can't move agents into sites they don't admin).
- Owners and account admins are global by definition — they bypass every site check, and the grant editor is hidden for them.
Enforcement is uniform across the portal UI, the API, and the MCP scan tools. Action buttons, agent pickers in “New Monitor”, “New Certificate”, “New Backup”, “New Pentest”, the copy-to-agents modals, bulk action toolbars, and per-row management buttons all filter to agents the member can actually admin (global perm or matching site grant).
Inviting Users
- Go to Users & Roles.
- Click Invite User.
- Enter their name and email, select a role, and set permissions.
- They'll receive an email with an invitation link.
Passkeys & MFA
ManageLM uses WebAuthn passkeys for multi-factor authentication. The rule is simple: having a passkey is having MFA — there is no separate on/off switch.
- Register a passkey from Settings → Security → Passkeys. Your first passkey activates MFA and shows your recovery codes — save them; they're shown only once.
- After password login you're prompted for the passkey. Passkeys also work for passwordless login from the login page.
- Register multiple passkeys (e.g. fingerprint + security key) and name them. Removing your last passkey turns MFA off and clears your recovery codes.
Require MFA for all users (account owners)
Owners can enforce MFA account-wide from Settings → Security → Passkeys & MFA with Require MFA for All Users. When on, every member must clear a second factor at login:
- Members with a passkey are challenged for it.
- Members without a passkey yet receive a single-use 6-digit code by email each login — a bridge so nobody is locked out — until they register a passkey, after which they use it automatically.
The same applies when connecting MCP clients: a connector login with a passkey does the passkey step; without one, the emailed-code page appears.
SSH key as MFA fallback (account owners)
Owners can also enable SSH Key as MFA Fallback in the same section. When on, any member who has registered an SSH public key may sign the login challenge with their SSH private key as a recovery alternative to their passkey (portal login only).
API Keys
API keys allow programmatic access to the portal API for automation and integrations.
- Go to Settings → MCP & API.
- Enter a name, select permissions (any subset of the ten member permissions: Agents, Groups, Skills, Logs, Reports, Connectors, Monitors, Certificates, Backups, Pentests), and optionally set an expiration (30, 90, 180, or 365 days).
- Click Create Key and copy the key (starts with
mlm_ak_). It's only shown once.
Use the key in the Authorization header:
Authorization: Bearer mlm_ak_...Each key's effective permissions are the intersection of the key's permissions and the creating user's permissions. If a user is later downgraded, their keys lose access accordingly. Expired keys are automatically cleaned up.
Disabling a key
Each key has a toggle beside the delete button. Disabling stops the key working immediately but keeps it, so you can switch it back on with one click instead of re-provisioning whatever holds it — a plugin, an n8n workflow, a GPT Action. A disabled key shows a Disabled badge and its toggle turns amber.
Use disable when you are not sure a key is compromised, and delete when you are. The Panic Button disables every key at once.
A key also stops working if the user who created it is disabled — a key is only as live as its owner.
OAuth App Credentials (OpenAI GPT, etc.)
For integrations that require OAuth 2.0 (like OpenAI GPT Actions), set OAUTH_APP_CLIENT_ID and OAUTH_APP_CLIENT_SECRET in your .env file. These identify the application — each user still authenticates individually with their own ManageLM credentials. See the Self-Hosted Docker guide for details.
Security Model
Defense in depth
- Command allowlist — Skills define exactly which commands an agent can run. Enforced in code, not prompts.
- Destructive command guard — Even for allowed commands, the agent blocks catastrophically dangerous argument combinations:
rmtargeting protected root directories (/,/etc,/usr, etc.),ddwriting to block devices,mkfs,--no-preserve-root, andfind -delete. - Kernel sandbox (opt-in, Linux only) — Landlock + seccomp-bpf confine command subprocesses at the kernel level. Even if a command passes all Python-level checks, the kernel blocks writes outside allowed paths and dangerous syscalls.
- Read-only by default — Agents with no skills (or skills with empty allowlists) can only run safe read-only commands.
- Outbound-only connections — Agents connect to the portal. No inbound ports needed.
- Ed25519 task signing — Every task dispatched to an agent is cryptographically signed. Agents verify the signature before execution.
- Secrets isolation — Secrets stay on the server. The LLM only sees variable names, never values.
- Hash-only storage — Passwords, tokens, and API keys are stored as hashes.
- Rate limiting — Login, registration, and password reset endpoints are rate-limited.
- IP whitelist — Optional CIDR-based IP whitelist for MCP connections.
- Execution limits — Max 10 LLM turns per task, 120s timeout per command, 8000 char output limit.
Always-allowed commands (read-only)
The base skill is auto-assigned to every agent and provides a broad set of read-only commands:
cat head tail less more ls tree grep egrep fgrep find locate wc sort uniq
awk sed cut tr diff comm column paste tac xargs file stat md5sum sha256sum
sha1sum readlink basename dirname realpath uname hostname whoami id uptime
date timedatectl lsb_release arch nproc getconf dmesg last lastlog w who
df du free lsblk lscpu lsmem vmstat iostat top ps pgrep lsof fuser
ip ss netstat dig nslookup host ping traceroute curl wget nc
echo printf which type test true false yes seq sleep cd pwd
Even if the base skill is somehow missing, agents fall back to a minimal safe set: cat head tail ls grep find wc sort echo printf test true false cd pwd which.
Sandbox
The sandbox confines the commands an agent runs, so that even a command which passes every check above cannot do more than it is allowed to. There are two ways in:
- Per skill (Linux) — opt-in, disabled by default, three independent layers: a privilege drop (run-as user), filesystem path confinement (Landlock), and a syscall blocklist (seccomp-bpf).
- Read-only AI Access (Linux and Windows) — a switch on the agent or a server group that denies the AI every write on that host. See below.
How it works
When enabled on a skill, every command runs inside the sandbox. The agent itself stays unrestricted — only the command is confined. Commands pass through these layers in order:
- Injection blocking — rejects shell tricks like
$(…), backticks,eval. - Binary allowlist — the command must be on the skill's
allowed_commandslist. - Destructive argument guard — blocks combinations like
rm -rf /,dd of=/dev/sda. - Privilege drop — the command runs as the configured system user, not as root.
- Filesystem confinement (Landlock) — restricts which paths the command can read, write, and execute from.
- Syscall blocklist (seccomp-bpf) — blocks dangerous kernel calls (
mount,reboot,ptrace, etc.).
Run as user (privilege drop)
Drops privileges to a system user (e.g. apache, mysql, postgres) before executing each command. The agent itself runs as root to manage the host, but with run-as enabled the skill's commands inherit only the target user's permissions — so a misuse of a database-admin skill can't, for example, write to /root.
Fail-closed: if the configured user does not exist on the host, every command for that skill fails with a clear error rather than silently running as root.
Landlock (filesystem confinement)
Restricts which filesystem paths the subprocess can read, write, and execute from. Uses Linux Landlock LSM (requires kernel 5.13+).
| Access | Default paths | Purpose |
|---|---|---|
| Read | / (everything) | Commands can read system state |
| Write | /etc, /var, /tmp | Config edits, logs, temp files |
| Execute | / (everything) | allowed_commands is the binary gate |
Everything outside the configured write paths is read-only at the kernel level — no userspace bypass possible. File uploads also enforce write paths via Python-level path validation using the same config.
seccomp-bpf (syscall filtering)
Blocks dangerous syscalls that no legitimate agent task should need. Returns EPERM (not kill) for graceful error handling.
| Category | Blocked syscalls |
|---|---|
| Filesystem root | mount, umount2, pivot_root, chroot, move_mount, fsopen, fsconfig, fsmount, fspick, open_tree |
| System control | reboot, kexec_load, kexec_file_load |
| Kernel modules | init_module, finit_module, delete_module |
| Swap | swapon, swapoff |
| Exploit primitives | ptrace, bpf, userfaultfd, perf_event_open |
| System identity | settimeofday, clock_settime, sethostname, setdomainname |
Read-only AI Access
A switch on an agent — or on a server group, where it applies to every agent in it and cannot be turned off host by host. When it is on, the AI can inspect that server as thoroughly as ever and cannot change it.
It is enforced by the operating system rather than by asking the model nicely. On Linux every command runs under Landlock with no writable path except /tmp, behind a syscall filter that also blocks the ways a file can be changed without being written to — its permissions, owner, timestamps and extended attributes — along with mounting, rebooting and loading kernel modules. On Windows every command runs with a low-integrity token: Windows checks integrity before it checks permissions, so the command cannot write to anything — not even where its own account has full control. File edits are refused outright, and so are file uploads through the files skill.
The model is told, so it spends its turns answering rather than discovering the wall: a task that would need a change comes back with what would need to be done instead of a string of failed attempts. Claude sees the flag too, on the server list and in the task result.
What it does not affect
Everything you drive from the portal yourself — restarting a service, rotating a credential, installing a certificate, syncing SSH keys, restoring a backup, a Panic Button containment action. None of those involve the AI, and all of them still work on a read-only server.
Enabling the sandbox
- Open the Skills page and edit a skill.
- Go to the Sandbox tab.
- Toggle any combination of Run as user, Landlock, and seccomp-bpf.
- Fill in the system user, write paths, or blocked syscalls as needed.
- Click Save.
The sandbox is pushed to agents automatically on save. Agents on kernels older than 5.13 (Landlock) or 3.17 (seccomp) gracefully degrade — those layers are skipped with a log warning. Run-as requires the agent to run as root (the default).
Skill configuration (JSON)
{
  "sandbox_run_as": "apache",
  "sandbox_landlock": {
    "read_paths": ["/"],
    "write_paths": ["/etc", "/var", "/tmp", "/opt/myapp"],
    "exec_paths": ["/"]
  },
  "sandbox_seccomp": ["mount", "reboot", "ptrace", "init_module", "..."]
}
Each key is independent — use any combination. Absent key means that layer is off. Catalog skills include recommended sandbox templates that you can use as a starting point.
Requirements
- Run as user: agent must run as root (systemd default); the target user must exist on the host.
- Landlock: Linux 5.13+ with Landlock LSM enabled (default on most modern distros).
- seccomp-bpf: Linux 3.17+ with
CONFIG_SECCOMP_FILTER=y(enabled by default). - Architecture: x86_64 and aarch64 supported.
- No kernel config needed — no kernel modules and no extra packages.
Encryption at Rest
Every secret the portal stores is encrypted with AES-256-GCM under a single master key, ENCRYPTION_KEY. That covers cloud connector credentials, agent signing keys, LLM API keys, the SMTP relay password, the S3 backup secret, webhook signing secrets, and PKI private keys (internal CA, Let's Encrypt account, DNS provider credentials).
.env, which is not regenerable.
Each stored value carries a short identifier of the key that encrypted it, so the portal can always tell which key opens a given row. That is what makes the key replaceable without downtime.
Rotating the encryption key
Because values are tagged with their key, a rotation does not have to be atomic. The portal reads old and new keys side by side, so it keeps working while secrets are still being moved — you can sit in that state for as long as you like and finish when it suits you.
ENCRYPTION_KEY during a rolling restart. A node that has restarted writes secrets a node that has not restarted cannot read. Update every node's .env first, then restart.
- Set
ENCRYPTION_KEYto the new key andENCRYPTION_OLDto the outgoing one, in the.envof every node. Both files must match —ENCRYPTION_OLDis what lets a node still read secrets on the old key, and a matchingENCRYPTION_KEYis what lets the move finish. - Restart the nodes. Each logs both key identifiers at startup, so you can confirm they agree before continuing.
- Run the rewrap tool on one node and let it finish:
It shows what it will do, asks for confirmation, then reports progress per category. A value it cannot read is skipped and named rather than stopping the run, and re-running is always safe — it picks up wherever it left off.bin/recrypt # move every stored secret onto the new key bin/recrypt --dry-run # show what would move, write nothing bin/recrypt --audit # check no encrypted column is unaccounted for - When it reports nothing left on a retired key, remove
ENCRYPTION_OLDeverywhere and restart. Until then, every startup tells you how many secrets still need it.
If a secret keeps failing to move, its stored value is corrupt — re-enter it in the portal and it is rewritten under the current key.
Email threat-action links are signed with the same key and are accepted from either key during a rotation, so links already sitting in an operator's mailbox keep working until the old key is removed.
Terminal Console
The Terminal Console gives you an interactive shell on a managed host, in the browser. Open it from the terminal icon on any online agent in Agents or Assets, or from the console list; it opens in its own window, one per host.
The browser never talks to the agent. Keystrokes go to the portal, the portal forwards them to the agent over the connection it already has, and output comes back the same way — so the agent still listens on nothing and no port has to be opened.
root on Linux, the service account on Windows — and, unlike a task, it does not go through a skill’s allowed-commands validator, the kernel sandbox, or the change journal. Nothing typed in a console can be reverted from the portal — the one exception being a file changed with managelm-edit, which does go through the change journal.
Who can open one
One thing, and it is per server: the Console grant on that server. Turn it on beside SSH Root and Sudo Root, either in the server’s Assigned Users list (agent detail) or on a group the server belongs to — a group grant reaches every server in it.
There is no Console permission and no role shortcut. An account owner needs the grant exactly as a member does, and being assigned to a server is not enough on its own: an assignment lets someone chat with a host and read its tasks, which is a different thing from a root shell on it.
Revoking closes a console that person already has open, within a minute — turn the grant off on the server, turn it off on the group that reached it, unassign them, or disable the user, and the shell goes with it. A running root shell cannot be quietly downgraded, so revocation ends it outright.
API keys and MCP tokens cannot open a console. It is a person at a keyboard, so it requires a signed-in browser session.
Passkey required, every time
A passkey is confirmed at the moment the console opens, even though the same passkey was used to sign in. That is what stops a stolen session from becoming a root shell. There is no way to skip it: an account with no passkey enrolled cannot open a console at all — add one under Settings → Security first.
Idle screen lock
After 10 minutes without a keystroke the screen locks: output stops being forwarded and input is refused until you confirm your passkey again. Your work is not lost — the shell keeps running, and output produced behind the lock is replayed when you unlock. Locking is enforced by the portal, not drawn over the page, so it holds even if the browser is tampered with.
Terminal chatter the browser sends on its own (focus changes, mouse reports) does not count as activity — only real typing holds the lock open.
While the screen is locked nothing new may leave the server through it: a managelm-copy or a managelm-edit that starts behind the lock is refused and says why at the prompt. An editor that was already open is left alone, with whatever you had typed in it, because nothing can be saved from behind the lock either.
The console list
/console/ is a page of its own: every console you may open, and nothing else. It is meant to be bookmarked — open the bookmark, sign in if your session has gone, and pick a host. Unlike a link to one shell, it keeps working when a server is rebuilt or when today’s work is on a different machine.
Each row shows the server’s name and address, its platform and operating system, its site, its tags and the agent version, with a bookmark of its own in the corner for a link straight to that shell. A server that is offline, or whose agent is too old to have a console, is still listed — with the reason — because a host being down is usually why you are looking. Clicking one opens the console in its own window; the list stays where it is, so the next host is one click away. When your servers are organised into sites, the list is grouped by site.
The list keeps itself up to date — a server that goes down, or comes back, changes on the page within seconds, so a list left open in a window stays true without a reload.
The list shows what you may open. It is the same test the console itself applies — the Console permission, plus your assignment to that server — so it is a shortcut to what you already have, never a way in.
Moving files in and out
Drag a file onto the terminal and it is copied to the server, into whatever directory the session is standing in — cd somewhere else and the next file goes there instead. Drop a folder and the whole tree is copied, keeping its shape. A file that would land on top of one already there is renamed rather than overwriting it (report (1).pdf), and a folder dropped onto one of the same name merges into it.
On Windows there is no equivalent of the live directory, so files land at the root of the system drive (C:\), which is also where a Windows console opens. Dropped files there are locked to administrators, so a certificate or a configuration file is not left readable by everyone with an account on the machine.
To take a file the other way, run managelm-copy in the console and it downloads in your browser:
managelm-copy /var/log/syslog
managelm-copy /etc/nginx          # a folder arrives as nginx.zip
managelm-copy *.conf              # several at once
It only works inside a portal console — that is where the browser is. Run it over plain SSH and it says so.
Copying straight to another server
Name a server at the end and the files go there instead of to your browser. The two machines never talk to each other — everything passes through the portal — so this works between servers that cannot reach one another at all:
managelm-copy nginx.conf web-01:/etc/nginx/
managelm-copy /etc/nginx  web-01:/opt/        # a folder goes as a tree, not a zip
managelm-copy a.conf b.conf web-01:/etc/      # several at once
The server is named by its hostname or the name shown in ManageLM, in any case you like; quote it if that name has spaces ("Web Server 01:/tmp/"). Nothing is overwritten on the far side — a name already taken gets the next free one.
Keeping a folder in step: managelm-sync
managelm-sync makes a folder on another server match one on this host, sending only what is new or has changed:
managelm-sync ./site-config web-01:/etc/app/
managelm-sync /etc/nginx web-01:/etc/nginx/ --dry-run
managelm-sync ./dist web-01:/var/www/site/ --delete
The destination is made to match the folder rather than to contain it: syncing ./conf to /etc/app puts conf’s files directly in /etc/app. Run it twice and the second run sends nothing, because a file’s modification time travels with it. “Changed” means a different size or time — the same quick check rsync makes — so it never has to read a file it is not going to send.
By default it only adds and replaces: a file you deleted here stays on the destination, and the run tells you how many such files it left alone. --delete removes them, and because that is the one thing here you cannot undo, it prints every file it would remove and asks before doing any of it. --dry-run shows the whole plan without touching anything, and the receiving server refuses a --delete outright in a directory like / or /etc, where a mistyped destination would be a restore from backup rather than a mistake.
Between Linux and Windows
Both work in either direction. Paths keep their shape, so a folder copied from Windows arrives as a tree on Linux and the other way round, and names Windows will not accept are adjusted on the way in. For a Windows destination, forward slashes are easier than backslashes from a Linux shell:
managelm-copy app.conf  win-01:C:/inetpub/wwwroot/
managelm-sync ./dist    win-01:C:/inetpub/wwwroot/
There is no limit on how big a file you can drop onto a console. On the hosted service transfers run at about 1 MB per second, so a large one takes a while and a small one is instant; a self-hosted install is limited only by its own network. A transfer shows its progress along the top of the terminal, and closing the console stops it.
Coming the other way there is a ceiling of 1 GB, because your browser has to hold the file before it can save it. A bigger one is refused straight away rather than after the wait — move it with scp instead.
If the screen lock falls while a file is on its way out, the transfer is stopped rather than finished — a download that completed itself would land on a machine you have walked away from. What had already crossed is on the timeline, marked interrupted. A managelm-copy that starts while the screen is locked is refused for the same reason, and says so at the prompt.
Editing a file
To change a file without leaving the browser, run managelm-edit in the console and it opens in an editor over the terminal:
managelm-edit /etc/nginx/nginx.confSaving does not close the editor. Ctrl+S writes the file to the server and you carry on typing, the way any editor behaves; the header says what the save did until you change something again. Closing the panel is what ends the edit and gives your prompt back, and the shell then reports the net change across every save you made. Closing with unsaved typing asks first.
A file is written back with the permissions and ownership it had, so a config a service owns still belongs to it afterwards. The command waits while the panel is open — the shell behind it is parked on it.
Ctrl+S saves, Ctrl+Q or Esc closes, Ctrl+D downloads a copy, and Ctrl+C at the prompt closes it too — anything already saved stays saved.
Beside Save is a download button, which puts what is currently in the editor into your own downloads — a copy of the file before you change it, or of your version when a save has been refused. It is your browser writing to your machine, so it works whether or not the file was ever saved.
It is meant for the config file you came to fix, not for development: it opens one text file at a time, up to 64 KB, and refuses anything binary. For a whole workspace on a host, point an editor at it over SSH instead — ManageLM already syncs the keys.
Over a plain SSH login it opens your own editor instead. There is no browser to draw a panel in, so the file is put in a private scratch copy, $VISUAL or $EDITOR (or whichever of editor, vim, vi, nano is installed) is handed the terminal, and what you save is written back through the same path a browser save takes. Quit without saving and nothing is touched. Run it with sudo there — the agent socket is root-only:
sudo managelm-edit /etc/ssh/sshd_configThat is the whole reason to use it rather than vi: the file is replaced atomically keeping its owner and mode, the change is journalled and revertable, and it is reported to the portal. vi gives you none of that.
An edit can be undone. A file inside a tracked directory (/etc and its neighbours) becomes a change like any other, so managelm-shell lists it under changes and rollback #N puts it back. Elsewhere a .bak copy is written beside the file before it is replaced. That makes the editor the one thing in a console that is reversible — nothing typed at the prompt is.
If the file changes on the server while you have it open, the save is refused rather than applied: you would be writing over somebody else’s change with a copy of what the file used to be. Nothing is lost — the panel stays up with your version in it.
$EDITOR over SSH — recording is optional, so a change to a server should not exist only inside a replay somebody may have switched off.
Bookmarks
Every console has its own address, so the bookmark button in the terminal header hands you two links: this console, and the console list. No browser lets a page create a bookmark for you, so the button copies the link and shows it ready to be dragged to your bookmarks bar — press Ctrl+D (⌘D on a Mac) and it is saved.
A bookmarked console asks you to sign in first if you are not, then lands on the server you asked for. The link carries no authority of its own: the permission, the assignment and the passkey are all still checked when the shell is opened, and no server name appears in the address.
Closing a console
The × in the terminal header ends the session. A console the portal opened in its own window is closed — the window exists only to hold that shell. A console you opened yourself, from a bookmark or a pasted link, is a tab of yours to keep: that one goes to the console list instead, so the next host is one click away.
Session lifetime
- Sessions are not resumable. Closing the tab, navigating away or losing the connection ends the session and the shell with it.
- Clicking the console button again for a host you already have open focuses that window rather than starting a second session on it.
- The agent reaps a shell that has been idle for an hour, so nothing is left running on the host if a browser disappears.
Ask the assistant
Under the terminal there is an input where you can ask about what is on screen — why a command failed, what a log line means, what to check next. Your question goes up together with the last of your terminal, so you do not have to paste or explain anything: it already sees what you see.
The assistant answers in words, and sometimes offers one command. It runs nothing itself — it has no shell and no access to the host, and a suggested command does nothing at all until you act on it:
- Run types the command into the terminal and presses Enter for you.
- Insert types it onto the prompt and stops there, so you can read it, edit it, or think again before running it.
The assistant uses the same LLM the agent already uses for tasks — per-agent, per-site, or your account default — so a model on your own network works, and there is nothing extra to configure. Questions are answered one at a time per console, and Stop ends an answer in progress.
What is sent is the last of what was displayed (about 8 KB), never your keystrokes — so a password typed at a sudo prompt, which the shell does not echo, is not part of it. Obvious secrets that were printed, such as token= lines or a private key, are masked before the text leaves your browser. The conversation lives only in that window and disappears with the session; nothing is stored.
The panel collapses when you click back into the terminal, and Ctrl+Shift+A jumps to it from the shell.
What gets recorded
Opening and closing a console are both written to the Audit Log — who, which host, from which address, how long it lasted and how it ended. Both also fire as console.opened and console.closed to webhooks and notification connectors, so a root shell on a production host can reach your SIEM or chat channel as it happens.
Acting on a command the assistant suggested is recorded too, as console.ai_command — the host, the command, and whether you ran it or only inserted it. What a model proposed and what a person chose to run are different things, and the Audit Log records the second.
Requirements
- The agent must be online and running ManageLM 1.5.0 or newer. The console button is hidden for older agents.
- The account must have at least one passkey enrolled.
Graphical Desktop
The Graphical Desktop gives you a full Windows desktop on a managed host, in the browser. Open it from the monitor icon that sits beside the terminal icon on any online Windows agent in Agents, Assets or the Consoles launcher; it opens in its own window, one per host.
There is nothing to install — not on your machine, not a plugin, not an RDP client. The desktop is drawn on an ordinary web page. And there is nothing to open on the server: the connection travels out through the link the agent already holds, exactly as the terminal console does, so the host still needs no inbound port and no VPN.
Who can open one
The same Console grant, on that same server — there is no separate Desktop permission, grant or switch to find. Turn Console on for someone beside SSH Root and Sudo Root, in the server’s Assigned Users list or on a group, and on a Windows host they get both icons: a terminal and a desktop. On Linux they get the terminal alone.
A passkey is confirmed when the desktop opens, the same step-up the console requires, and for the same reason: a stolen session must not become an administrator desktop. Revoking Console closes a desktop that person already has open, within a minute.
Signing in without a password
You are never asked for Windows credentials, and none are stored. Windows will not reveal an existing account’s password to anybody — so rather than reuse one, the agent keeps an account of its own on the host, MANAGELM, and gives it a fresh random password at the start of every session. That password is handed straight to the RDP gateway and is never sent to your browser.
The account it uses is called MANAGELM — the same name the agent’s own system account carries on a Linux host. An agent updating from an earlier build removes the account that build used, along with its profile, so a host is never left carrying a privileged account nothing looks after any more.
Between sessions the account is disabled and its password scrambled to a value nobody — not you, not the portal, not the agent — ever learns. So there is never a usable standing credential on the host, but the account itself stays, which is deliberate: its Windows profile survives, so only the very first connection waits for a profile to be built, and it gives you one stable name to recognise in the host’s own user list and audit events instead of a different one each time. Removing the agent deletes the account and its profile.
On an ordinary server or workstation it is a local administrator of that one machine, with no rights anywhere else. On a domain controller there is no such thing as a local account, so it is necessarily a domain account with administrative rights on the controller — added to Administrators rather than Domain Admins, which keeps it off every member server, but it is still domain-wide. Open a desktop on a controller only if that is what you intend.
If Remote Desktop is switched off
A freshly installed Windows refuses Remote Desktop until it is turned on. Rather than fail, the window says so and offers Enable Remote Desktop and connect. That switches on the Remote Desktop listener and nothing else — no firewall rule is opened, because the connection arrives over the agent’s own outbound link on the machine’s loopback address, not from the network. The setting stays on afterwards.
One desktop at a time
A host serves one desktop session at a time. Because every session signs in as the same account, Windows would reconnect a second person into the first person’s session rather than giving them their own — two operators would silently share one screen. A second attempt is refused with a clear message instead. The terminal console is unaffected: shells and a desktop can be open on the same host together.
Moving a file onto the desktop
Drag a file onto the desktop and it is copied onto the desktop of the session — it appears among the icons you are looking at, ready to open. Drop a folder and the whole tree is copied, keeping its shape. Nothing is installed in the session to make this work, and the file never touches anything but the host you dropped it on.
It lands on the desktop of the MANAGELM account the session is signed in as, wherever Windows keeps that — a desktop redirected by group policy or moved into OneDrive is followed rather than guessed at. If a brand-new account is still building its profile the file goes to the root of the system drive (C:\) instead, which is where a Windows terminal console’s drops land.
There is no limit on how big a file you can drop. On the hosted service transfers run at about 1 MB per second, so a large one takes a while and a small one is instant; a self-hosted install is limited only by its own network. A transfer shows its progress along the top of the window, and closing the desktop stops it. Files that arrive this way appear on a recorded session’s timeline, like a terminal console’s.
Copying a file back to your browser
A Copy to Browser folder sits on the desktop of the session. Copy a file into it — drag it there, or right-click and Send to — and it downloads in your browser, then disappears from the folder. Copy a folder in and it arrives as a single .zip. There is nothing to type and nothing to install: a desktop has no prompt, so this folder is the gesture that stands in for the terminal console’s managelm-copy.
It is an outbox, not a place files pile up. What reaches your browser is taken out of the folder, so anything still sitting in it has not been sent — and the window says why. A file the browser cannot take stays put: a download has to be held in memory before it can be saved, so 1 GB is the ceiling in that direction, where dropping a file onto the desktop has no limit at all.
Whatever is already in the folder when you open a desktop is left alone. The account and its profile survive between sessions, so a file somebody left behind stays where it is rather than arriving in the next person’s browser unasked; copy it in again if you want it. Copies out appear on a recorded session’s timeline, exactly as files coming in do.
Session lifetime
- Ten minutes without a mouse or a keystroke ends the session, the same window after which a terminal console locks its screen, and for the same reason: a browser left open on an administrator desktop is the same exposure as a stolen session. Nothing is lost — the Windows session stays on the host with every window as you left it, and the panel offers to take you straight back into it behind a fresh passkey. A desktop painting a progress bar counts as idle: only your own mouse and keyboard hold it open.
- Sessions are not resumable. Closing the window or losing the connection ends the session, and the account is disabled again as part of that.
- Clicking the desktop button again for a host you already have open focuses that window rather than starting a second session.
- The window resizes the remote desktop to fit, so making it bigger gives you more desktop rather than a scaled picture. A host that will not change resolution — a Windows sign-in screen never does — keeps its own, and the window resizes to match it instead.
What gets recorded
Opening and closing a desktop are both written to the Audit Log — who, which host, from which address, how long it lasted and how it ended — and both fire as desktop.opened and desktop.closed to webhooks and notification connectors, beside the console’s own events.
Requirements
- A Windows host with the agent online. There is no minimum agent version: an agent too old to serve a desktop says so when you try. Copying files out through the Copy to Browser folder needs agent 1.6.0 or newer — on an older one the folder simply does not appear, and everything else works as described.
- The account must have at least one passkey enrolled.
- The portal must have a guacd gateway configured (
GUACD_SERVER_HOST). On Docker the compose files run one as a sidecar and set the variable for you; on a package install you installguacdyourself with the system package manager (apt install guacd/dnf install guacd) and point the portal at it — the installer does not bundle it. Without it the desktop icon is not shown at all, and the terminal console is unaffected.
Admin Sessions
Console, desktop and direct SSH sessions can be recorded and replayed. For the portal's own consoles nothing is installed on the server to make this work — the portal already relays every byte you see, so it records what it is already carrying. Direct SSH logins are recorded by the agent on the server itself, since those never pass through ManageLM.
Turning it on
Recording is decided per server, not account-wide: open a server and switch on Record Admin Sessions, or set it on a group to cover every server in it. A group can only switch it on — an individual server cannot turn it back off — which is what makes it usable as a policy rather than a preference. Servers being recorded carry a REC badge in the Agents list, and the operator sees one in the console window too, so nobody is recorded without knowing.
Recordings are written to your own S3 bucket — the one configured under Settings → Account & LLM → S3 Storage, shared with system backups. They are encrypted before they leave your infrastructure, so the bucket holds nothing readable, and ManageLM keeps no copy. Without storage configured nothing can be recorded, and the session opens as normal.
Direct SSH logins
The same switch also records people who connect straight to the server with ssh, without going through ManageLM. It works by putting the recorder in front of the keys ManageLM manages for that server, so those logins are captured on the host and uploaded to the same bucket a few seconds after the session ends. They appear in the same list, marked SSH, with an Account column showing which local account was used — root and charly are different sessions even when the same person opened both, and the list tells them apart.
Attribution comes from the key that opened the session, not from the account, which is what lets a shared root login still name the person — provided that key is one ManageLM manages.
What this does not cover, and it is worth knowing before relying on it:
- Only keys ManageLM syncs to the server. A key an administrator added by hand, or a password login, is not recorded — and a copy of a managed key added outside the block ManageLM maintains will be used in preference to the managed one, and that session is not recorded either.
- Only sessions with a terminal. File transfers (
scp,sftp,rsync) and one-off commands (ssh server somecommand) have no screen and pass through untouched — they are not recorded and not locked. Asking for a terminal is what counts, not whether you also sent a command:ssh -t server bashgets one, so it is recorded and locked like any other login. - Only Linux servers.
- Not a barrier. Someone with root on the server can stop the recorder; this is an audit trail for people acting in good faith, not a containment boundary. If you need a session that cannot go unrecorded, make the portal console the only way in and stop syncing keys for interactive use.
Recording never costs anyone their access: if it cannot start for any reason, the login proceeds unrecorded — unless you have switched on Refuse sessions that cannot be recorded, which turns that into a refused login instead.
Replaying
Recorded sessions are listed under Audit Logs → Console Sessions, newest first, with the operator, the server, the account the session ran as (a desktop names the throwaway administrator it signed in with), how long it lasted and how big it is. The buttons above the list narrow it to Terminal, Desktop or SSH. Expand one to replay it in place: play and pause, drag the scrubber, and change speed on a terminal replay. Long pauses where nothing happened are shortened, so the replay is the session's activity rather than its wall clock. Beside the player a timeline lists the moments worth jumping to — when the session started and ended, when the screen locked itself and was unlocked again, any command the console assistant proposed with whether it was run or only inserted, every file that moved in or out, and every file edited with managelm-edit. Each kind has its own colour, so a long session can be read at a glance. A transfer that did not finish is listed as interrupted, with how much of it had crossed.
Open Viewer takes the replay into its own window, sized to the terminal the operator actually had and resizing with it as the session resizes, so it plays back at its true size instead of scaled into a row. Download gives you the file: a terminal or SSH recording is an asciinema cast (.cast), which plays with asciinema play on any machine and needs nothing from us — useful for handing a session to an auditor who has no portal account. A desktop recording is a Guacamole instruction stream (.guac), Apache Guacamole’s own recording format; guacenc, which ships with guacamole-server alongside the guacd you already run, turns it into an ordinary .m4v video. Both come out decrypted — what sits in your bucket is encrypted, and only ManageLM holds the key.
A terminal replay is real text, not video: you can select and copy from it.
What is and is not kept
- Output, never keystrokes. What the session displayed is recorded; what was typed is not. Passwords typed at a
sudoorsshprompt are not echoed to the screen, so they are not in the recording either. - An SSH recording appears a few seconds after the session ends, not while it runs — it is written on the server and handed over once complete. Console and desktop sessions are recorded as they happen.
- Sessions where nothing happened are not kept. Open a console, see the prompt, close it — there is nothing to replay, so no recording is stored. The audit log still records that the session happened.
- A console records even the parts the operator did not see. Output that arrived while the screen was locked is kept and marked, so a reviewer sees what a job printed while nobody was watching.
- An SSH session does not. While a direct SSH login is locked, nothing is recorded — keeping what the lock deliberately covered would defeat the point of covering it. The recording marks where the lock began and how long it lasted, so the gap reads as a lock rather than as a recording that failed.
Retention
Settings → Security → Admin Sessions sets how long recordings are kept before they are deleted from your bucket automatically. The maximum is your audit log retention: a recording should not outlive the audit entries that say who opened the session and who replayed it.
The same panel has Refuse sessions that cannot be recorded. Off (the default) a server set to record still opens its console when storage is unreachable, and the gap is written to the audit log — an object-storage outage does not become a console outage. On, the session is refused instead, for teams that need the recording to be a guarantee.
Locking an idle session
Settings → Security → Admin Sessions → Lock idle sessions after is one number, anywhere from five minutes to an hour, and it governs every kind of admin session. A session left untouched for that long locks itself. Set it to Off and they stop locking, with one exception noted below for desktops.
A shell left open on an unattended laptop is the same exposure as a stolen session, and the passkey you gave at the start buys nothing if walking up to the machine an hour later is enough. What “lock” means depends on the session, because the three are not the same thing:
- Terminal console — the screen is covered and the keyboard stops reaching the shell. Your work keeps running; whatever it printed while you were away is replayed when you come back. A passkey unlocks it.
- Desktop — the session closes rather than being covered. Nothing is lost: the Windows session stays on the server with every window where you left it, and reconnecting signs straight back into it. A desktop always closes after an hour idle, even with the setting Off — it holds a live sign-in on the server, so it is not left open indefinitely.
- Direct SSH — the terminal clears and stops accepting input, and your scrollback is cleared with it. Your ManageLM password brings it back, along with anything that printed while it was locked. Your work keeps running. Applies to Linux servers reached with a key ManageLM manages.
Idle means no typing. Output does not count — a command printing to a screen nobody is watching is exactly the case worth locking.
If the lock cannot be lifted — ManageLM is unreachable, or the agent on the server is down — the session stays locked and says so, rather than telling you the password was wrong. Press Ctrl-Q to end the session and log in again; a fresh login depends on neither, so this never leaves you locked out of the server. Nothing you were running is lost.
Existing accounts start at ten minutes, which is what the terminal console has always used, so nothing that already locked stops locking. Turning it on takes effect on your servers within moments; setting it back to Off does the same.
Who can watch
Replaying a session needs the same reach as opening one. Account admins and holders of the Audit permission see every recording in the account; everyone else sees only recordings from servers where they hold the Console grant — watching a shell and opening one are the same secret. Watching a recording is itself written to the audit log, and recordings cannot be read with an API key at all.
Security Audits
ManageLM includes a built-in security audit and compliance engine that scans your agents for misconfigurations, vulnerabilities, and hardening issues. Audits run read-only on the agent and are fully deterministic — no LLM required.
How it works
- Trigger — From the Agent Assets page (per agent), the Compliance dashboard (fleet-wide), or via MCP.
- Scan — The agent runs a set of read-only checks on the host.
- Report — Each finding includes a severity, an explanation of the risk, a suggested fix, and a mapping to compliance frameworks (CIS, PCI DSS, HIPAA, ISO 27001, NIS2, NIST CSF, SOC 2). A compliance score (0–100) reflects the overall posture. Installed packages are also matched against known vulnerabilities (see below).
- Results — Findings appear in the Agent Assets audit view and the Compliance dashboard. You receive an in-app notification when the audit completes.
Server context
Each compliance rule has separate severity ratings for public and private servers:
- Public (internet-facing) — stricter ratings. SSH root login = critical, missing firewall = critical.
- Private (internal network) — relaxed ratings. SSH root login = low, missing firewall = low, missing SELinux = low.
What is checked
| Check | What it inspects |
|---|---|
| SSH & RDP config | Root login, password vs. key authentication, retry limits, X11 forwarding, RDP Network Level Authentication. |
| Listening ports | Open TCP and UDP sockets on all interfaces. |
| Firewall | Host firewall status and rules (UFW, firewalld, nftables, iptables, or Windows Firewall profiles). |
| User accounts | Login-enabled users, UID 0 / local administrators, guest account, service accounts. |
| Password policy | Minimum length, complexity, lockout threshold. |
| Windows hardening | UAC enabled, cleartext credential storage disabled (WDigest), automatic login disabled. |
| File permissions | World-writable files, SUID binaries, shadow file readability. |
| Password hashing | Password hashes flagged if they use weak algorithms (MD5 or older). |
| Patch posture | Pending security updates, automatic-update service enabled, pending reboot after kernel or library updates. |
| Installed packages | Full package inventory feeding the vulnerability scan. |
| Authentication events | Failed login attempts in the last 24 hours. |
| Audit & event logging | Audit daemon (Linux) or Advanced Audit Policy (Windows); PowerShell script-block logging. |
| Endpoint protection | Mandatory access control (SELinux / AppArmor) or Windows Defender antivirus including signature freshness. |
| Time synchronization | System clock synchronized via NTP. |
| Kernel hardening | IP forwarding, ICMP redirect handling, reverse-path filtering, ASLR, SUID core dumps. |
| Brute-force protection | Fail2ban status and active jails. |
| TLS/SSL | Weak protocols (SSLv3, TLSv1.0/1.1) and weak ciphers (RC4, DES, NULL, EXPORT, MD5) rejected on all listening services. |
| Certificates | TLS certificate expiry with days remaining. |
| SMB hardening | SMB signing required, legacy SMB1 protocol disabled. |
| Network exposure | LLMNR (legacy name resolution) disabled on Windows. |
| Disk encryption | BitLocker protection on OS and fixed data volumes (Windows). |
| Scheduled tasks | System and per-user cron jobs. |
| SSH authorized keys | SSH key-based access across all users. |
| Docker | Privileged containers, socket exposure, containers running as root. |
| Vulnerability scan | Installed packages matched against known CVEs (see next section). |
Vulnerability scanning
As part of every security audit, ManageLM checks each agent's installed packages against a public vulnerability database and reports any known CVEs that apply to the installed versions. Nothing to install, nothing to configure.
- Coverage — All major Linux distributions (Debian, Ubuntu, Red Hat, Rocky, AlmaLinux, SUSE, openSUSE, Alpine, and others) plus language package managers (Python, npm, Go, Rust, Ruby, Java, .NET, PHP).
- Actively exploited — Vulnerabilities listed in CISA's Known Exploited Vulnerabilities catalog are automatically marked Critical and flagged as "KEV — actively exploited".
- Compliance impact — CVE findings contribute to the agent's compliance score and feed the patch-management controls of CIS, NIST CSF, NIS2, SOC 2, ISO 27001, and PCI DSS.
- Fix suggestions — Each finding includes the package name, installed version, CVE ID, a link to the advisory, and the exact upgrade command for the host's package manager.
Severity levels
| Level | Meaning |
|---|---|
| Critical | Immediate action required — actively exploitable or dangerous misconfiguration. |
| High | Significant risk — should be addressed promptly. |
| Medium | Moderate risk — recommended to fix. |
| Low | Minor issue or informational finding. |
| Pass | Check passed — no issue found. |
Findings
Each finding includes:
- Category — The area being checked (e.g. SSH, firewall, filesystem, users).
- Title — A short description of the check.
- Explanation — Details on what was found and why it matters.
- Remediation — A recommended fix for the issue.
Automated remediation
You can select one or more findings and click Remediate to have the agent automatically fix them. This requires:
- The Security & Hardening skill to be assigned to the agent.
- The agent to be online.
Remediation creates a task that uses the security skill and the agent's LLM to intelligently apply the recommended fixes. The agent backs up configuration files before making changes and validates them before restarting services.
PDF export
Click the Security button at the top of the Agent Assets page to download a fleet-wide security audit report. The PDF includes a summary bar with issue counts by severity, detailed findings with explanations and remediation steps, and a list of passed checks.
Use the Scheduled Tasks popover in the Agent Assets toolbar to set the audit schedule for the whole fleet at once (Daily / Weekly / Monthly), so the report you export always reflects fresh data. Reports are exported on demand — ManageLM does not email them.
Scheduled audits
You can configure automatic recurring audits per agent. Open the Security Audit modal and use the schedule selector in the top-right corner to choose a frequency:
- Manual only — No automatic scans (default).
- Daily — Runs once every 24 hours.
- Weekly — Runs once every 7 days.
- Monthly — Runs once every 30 days.
The scheduler checks every 15 minutes and triggers audits for agents that are overdue. Agents that have never been scanned are prioritized. A yellow badge (D, W, or M) appears on the agent card to indicate an active schedule.
Constraints
- Only one audit can run per agent at a time.
- Each agent stores its latest audit result. Previous results are archived to history (max one per day, configurable retention via
AUDIT_HISTORY_RETENTION_DAYS). - The agent must be online to start an audit (manual or scheduled).
- The
agentspermission is required to start audits, trigger remediation, and change the schedule. All authenticated users can view results.
Service Monitors
Monitor the availability and response time of services running on your agents. Monitors run directly from the agent's network, so they can check internal services (localhost, LAN) as well as public endpoints.
How it works
- Create — Open the Monitors page and click Add Monitor. Pick a type from the catalog (48 types across 10 categories), select an agent, and configure the check parameters.
- Check — The agent runs the check locally on the configured schedule (1m, 5m, 15m, 30m, or 1h). Two kinds of check are supported: network probes (TCP, UDP, HTTP, DNS) and resource checks (filesystem, memory, CPU, process, custom command).
- Report — The agent only sends results to the portal on status transitions (up→down, down→up) and as periodic summaries, not on every check.
- Alert — When alerts are enabled, an email is sent to all users assigned to the target agent after a configurable number of consecutive failures (default: 3). A recovery email is sent when the service comes back up. Wording adapts per flavor: network monitors talk about a service being “down”; resource monitors talk about a “critical condition”.
Service catalog
The monitor catalog defines 48 types organized in 10 categories:
| Category | Services |
|---|---|
| Web | HTTP / HTTPS, REST API, HAProxy, Squid Proxy |
| Network | TCP Port, Ping (ICMP), DNS, NTP |
| SMTP, IMAP, POP3 | |
| Database | MySQL / MariaDB, PostgreSQL, SQL Server, Redis / Valkey, MongoDB, Elasticsearch, Memcached, ClickHouse, InfluxDB, Cassandra, CouchDB |
| Messaging | RabbitMQ, Kafka, NATS, MQTT |
| File Sharing | FTP / SFTP, SMB / CIFS, NFS, AFP, MinIO / S3, WebDAV |
| Remote Access | SSH, RDP, WinRM, OpenVPN, IPsec / IKEv2 |
| Infrastructure | LDAP / LDAPS, Kerberos, Docker API, Consul, Vault, etcd |
| Monitoring | Prometheus, Grafana, Zabbix |
| System | Filesystem Usage, Memory Usage, CPU Usage, Process Running, Command / Script |
Each entry maps to one of the agent's check types: tcp, udp, http, dns (network), or filesystem, memory, cpu, process, command (resource). TCP and HTTP support an SSL/TLS toggle for TLS handshake validation and optional certificate expiry warnings (works with self-signed certificates). Resource checks use warning/critical thresholds (e.g. 80 %/90 % memory) instead of binary up/down.
Custom command / script monitor
The Command / Script type runs an arbitrary shell command on the agent and maps the result to a monitor status. It exists for the cases the built-in checks don't cover — application-specific health endpoints, SaaS API probes, custom Python or Bash check scripts, plugins from your existing monitoring stack, etc.
Convention — Nagios-compatible exit codes:
| Exit code | Status | Meaning |
|---|---|---|
0 | OK (up) | Service is healthy |
1 | Warning (degraded) | Service is degraded but functional |
2 | Critical (down) | Service is in a critical state |
| other | Critical (down) | Treated as critical so a misbehaving script never silently reports OK |
Output format: stdout up to the first | is the user-facing detail, shown in the test modal and the “Last error” column when the status isn't OK. Anything after | is parsed as Nagios-style perfdata label=value[unit] ...; the first numeric value goes into the metric column, so charts work out of the box. Stderr is appended to stdout when it adds information.
Example — an existing Nagios plugin:
check_disk -w 80% -c 90% /
# stdout: DISK OK - free space: / 412 GB (84% inode=99%);| /=87GB;90;100;0;512
# exit:   0
# → status = up, value = 87 (the first perfdata number)
Example — a custom one-liner:
curl -fsS http://localhost:8080/healthz | grep -q '"ok":true' && echo "API healthy" || (echo "API failing" && exit 2)Configuration:
- Command — the shell command line. Pipes, redirects, wildcards, and environment variables work as expected (the command runs through the platform's default shell).
- Timeout — hard-kill timeout in seconds (default 30, max 300). The agent kills the process and reports “Command timed out” if the command doesn't finish in time, so a misbehaving script can't park the schedule loop forever.
root on Linux, SYSTEM on Windows). There is no skill gate — whoever has the monitors permission can have the agent run anything the agent can run. Treat command monitors with the same care you'd treat task execution: only grant monitors to operators you'd trust to open a shell on the host.Alerts
Each monitor has an alert toggle and a configurable consecutive failure threshold (default: 3).
- Down alert — Sent when the monitor reaches the failure threshold. Emails all users assigned to the target agent (direct access + group access + admins/owners). In-app notification and webhook (
monitor.down) also fired. - Recovery alert — Sent when the monitor comes back up after being down. Same recipients. Webhook:
monitor.up. - Manual refresh — The Refresh button triggers immediate checks on all monitors but does not fire alerts (prevents false alerts from manual testing).
Test before creating
The Test button in the create/edit modal sends an ad-hoc check to the agent and shows the result immediately (up/down, response time, error) without creating or saving the monitor.
Data & charts
- Response time sparkline — Each monitor in the list shows a mini chart of recent response times (from hourly rollup data).
- Detail modal — Click a monitor to see uptime percentages (24h, 7d, 30d), a full response time chart, and the status change timeline.
- Infrastructure badges — Agent cards in the Agent Assets page show a monitor status badge (e.g. “3/3 up” or “1 down”).
Permissions
- All authenticated users can view monitors, statuses, charts, and history.
- The monitors permission (or admin/owner role) is required to create, edit, delete monitors, and toggle alerts.
- The permission toggle appears in Users & Roles under “Admin permissions”.
MCP integration
One MCP tool is available for AI assistants:
search_monitors— List all monitors (no args) or filter by status (down), service type (mysql), agent name, site, or free text.
Per-Plan Limits
The number of monitors per account is limited by your plan (Free: 20, Pro: 100, Business: 200, Enterprise: unlimited). The Monitors page shows your usage against the limit. The Add Monitor button is disabled when the limit is reached.
Certificates & PKI
Manage TLS certificates for your agents directly from the portal. Two certificate sources are supported:
- Internal CA — Create or import an RSA-4096 Certificate Authority. Issue leaf certificates (ECDSA P-256, RSA-2048, or RSA-4096) signed by your CA. A CRL is automatically generated and served at a public URL.
- Let's Encrypt — Register an ACME account and issue free, publicly-trusted certificates. Two challenge types are available:
- HTTP-01 (default) — The agent handles the challenge automatically on port 80. Requirement: the agent must be reachable on inbound TCP port 80 from the internet.
- DNS-01 — The portal creates a DNS TXT record via your configured DNS provider. Works with any agent (public or private) and supports wildcard certificates (
*.example.com). Configure DNS providers in Settings → PKI & CA → DNS-01 Providers. Supported providers: Cloudflare, DigitalOcean, Hetzner DNS, OVH.
Setup
- Configure a CA or LE account — Go to Settings → PKI & CA. Create a new internal CA, import an existing sub-CA, or register a Let's Encrypt account. Optionally add DNS-01 providers for DNS-based certificate validation.
- Set defaults — Configure default certificate validity (14–365 days), key type (ECDSA P-256, RSA-2048, RSA-4096), and renewal window (7–90 days before expiry).
- Issue certificates — Go to Certificates, click New Certificate, pick a target agent, and fill in the common name, file paths, and optional SANs.
Certificate Lifecycle
- Issue — The agent generates a keypair and CSR locally — the private key never leaves the agent. The portal validates the CSR, signs it with the internal CA (or submits it to Let's Encrypt via ACME), and sends only the signed certificate back to the agent over WebSocket. The agent writes the cert and key to disk and restarts the target service — a restart rather than a reload, because several servers re-read their configuration without re-opening the certificate files. Name the service as
docker:nameto restart a container instead, for a server that runs in one with the certificate directory mounted in. Certificates created before this behave the same way: their stored command was converted on upgrade, so nothing needs re-entering. - Renew — Manual via the Renew button, or automatic via the daily renewal sweep. Renewal generates a fresh keypair and CSR on the agent, signs a new certificate, deploys it, then revokes the old one. For LE certs, the old certificate is also revoked on Let's Encrypt's side.
- Revoke — Marks the certificate as revoked and updates the CRL. For LE certs, the revocation is also sent to Let's Encrypt's ACME endpoint. Revoked internal CA certs can be reactivated; LE revocations are permanent.
- Delete — Soft-deletes the certificate (must be revoked, expired, or failed first). The serial stays in the CRL until the certificate's natural expiry date, then is purged by the daily sweep.
CRL & Public Endpoints
The portal serves two public endpoints (no authentication required):
/pki/<crl_id>.crl— DER-encoded CRL signed by the internal CA, served with a 7-day validity./pki/<crl_id>.cer— DER-encoded CA certificate for trust chain installation.
Both URLs are embedded in issued certificates as the CRL Distribution Point and Authority Information Access extensions.
Auto-Renewal Sweep
A daily background task handles certificate lifecycle:
- Expires certificates whose
not_afterhas passed. - Renews active certificates that are within the renewal window and whose agent is online.
- Purges soft-deleted certificates whose serial has naturally expired, and stale failed/pending rows older than 7 days.
- Sends notifications (in-app, email, webhook) on renewal success or failure when alerts are enabled.
Permissions
- CA and LE account management is restricted to the account owner.
- The certificates permission (or admin/owner role) is required to issue, renew, revoke, and delete certificates.
- All authenticated users can view certificates, their status, and deployment details.
Per-Plan Limits
The number of certificates per account is limited by your plan (Free: 10, Pro: 50, Business: 100, Enterprise: unlimited). The Certificates page shows your usage against the limit. The New Certificate button is disabled when the limit is reached.
MCP Tools
search_pki— List all ManageLM-managed (PKI) certificates (no args) or filter by status, source, agent name, site, or free text.
Credential Rotation
ManageLM can own the lifecycle of a credential: generate a new value, set it wherever the account lives, and deliver it everywhere it is consumed — on a schedule or on demand. On by default; turn it off under Settings → Optional Features if you do not use it.
Switching a key off, and alerts
Each key has two switches on the Keys list. Enabled is a reversible way to stop a key without destroying it: switch it off and it disappears from what applications can see and every operation on it is refused, from the very next call. Nothing else changes — its grants, its name and the key itself are all still there, so switching it back on restores what was there before. Reach for this rather than Delete during an incident: deletion is final. Alert decides whether that key's events reach webhooks and notifications; with it off, the events are still recorded, they just do not leave the portal.
Running the same application on several hosts
The copy button beside an application in a key's list replicates it onto other hosts — same name, same account allowlist, the same keys granted, and the same credential. One application deployed to twenty servers is one secret in your configuration management, not twenty to distribute, so there is nothing new to write down.
Each copy is still its own registration: you can disable, rotate or delete one without touching the others, and the activity log tells you which host did what. A host that already has an application of that name is skipped rather than failing the whole copy, and a Windows host is skipped when the application has an account allowlist, because Windows cannot report the calling account.
Who can see and change them
Every member can read the Credentials page — names, accounts, hosts, schedules and rotation history — the same as Monitors, Certificates and Backups. That is safe precisely because no value is stored to leak. The credentials permission unlocks the buttons: creating, editing, rotating, testing and deleting. API keys are stricter and need the permission even to read.
What can be rotated
- Local password — an account on one of your servers. Three kinds, all through the same credential and decided by the host, not by you:
- A Linux account — anything the host resolves, so LDAP, SSSD and NIS accounts count as well as ones in
/etc/passwd. - A local Windows account — the machine's own, in its SAM.
- An Active Directory account, when the agent runs on a domain controller. A DC keeps no ordinary local accounts — promotion moves them into the directory — so the name you give there is the domain account, and it is reset in AD. No bind account and no LDAPS certificate are involved: the agent is a LocalSystem service, and on a DC that identity already holds the right to reset a password.
- A Linux account — anything the host resolves, so LDAP, SSSD and NIS accounts count as well as ones in
- SSH key — a machine-to-machine keypair. ManageLM generates the pair (Ed25519 by default; RSA and ECDSA are available for targets that cannot take it), installs the public half on the servers the key may reach, and delivers the private half where it is needed.
- LDAP password — an LDAP or Active Directory account password.
- DB password — a PostgreSQL, MySQL/MariaDB, SQL Server, Oracle, MongoDB, Redis/Valkey or Couchbase account password.
- Entra secret — a client secret on a Microsoft Entra application registration.
- Entra password — a cloud-only Entra user account's password.
Targets
A credential has one list of targets, added from a single form. They answer one question — where does this credential take effect:
A password is defined in one place — the account the credential names — and delivered from there. It has no authorized-key list, which is an SSH idea: to give a second account the same password, add an Account on agent target, and to hand the value to software that reads it, deliver it to a file, a database or a vault.
- Authorized key (SSH keys only) — the account may be reached with the key, including the account that holds it. An SSH credential needs both: an authorized key says who accepts it, and a file or vault target is where the private half goes — without one the key is generated and lost, so the form offers to put it in a file on the host you named. The public key is added to its
authorized_keysinside a ManageLM-managed block, leaving any other keys alone. - File on agent — the value is written to a file for a script to read, with the owner, group and mode you choose. A path may start with
~/, meaning the home of the account that owns the file — the agent resolves it on the host, since a home is not always/home/<name>. The mode may be written600or0600, and it may not grant access to others — a credential every account on the host can read defeats delivering it to a specific one, and the agent refuses those modes too. The file contains the value and nothing else, so$(cat …)is all a script needs. It may live under/etc: the agent withholds a credential file's contents from its change history, recording only that the file changed. On Windows there is no group or mode — the file is restricted with an explicit ACL instead, granting read to the account you name while SYSTEM and Administrators keep full access and inherited permissions are removed. - Pattern in file — updates a config file your service already reads, replacing just the password inside it. You give a regular expression with one capture group around the value, for example
password\s*=\s*(\S+).^and$match line by line, so^password = (.*)$means that line. Everything else in the file is left exactly as it was, and the file keeps its own permissions. The pattern must match exactly one place: none means nothing would be updated, several means ManageLM cannot tell which one you meant, and both are reported when you add the target rather than during a rotation. ManageLM checks it against the real file straight away and shows you the line it will change, with the password masked. In the change history only that value is hidden — the rest of your config still appears as normal. - Script on agent — hands the new value to a script you already have on the host, for anything ManageLM does not deliver itself: pushing the password into an application's own API, updating an appliance, re-registering a service. The script must exist and be executable before you add the target — ManageLM checks that straight away, and refuses one that every account on the host could rewrite, since it runs with the agent's privileges. It receives the value on standard input and in
$MANAGELM_CREDENTIAL_VALUE, alongside$MANAGELM_CREDENTIAL_NAME,$MANAGELM_CREDENTIAL_USERNAMEand$MANAGELM_CREDENTIAL_KIND. Arguments are optional, and writing{value}in one passes the value there as well — convenient for a tool that expects a flag, but every account on the host can read another process's arguments while it runs, so prefer standard input where you can. No shell is involved: the script is executed directly. It may run as a named local account rather than root, and it must exit 0 — anything else is a failed delivery, reported with what the script wrote on stderr. - Field in database — writes the value into an application's own configuration table, for software that keeps the credential it uses in a database rather than a file. You choose the database connector and give the
UPDATEthat finds the row, with{value}where the new secret goes — for exampleUPDATE settings SET value = {value} WHERE name = 'ldap_bind_password'. Leave{value}unquoted: it is passed as a parameter, not pasted into the text. The statement must change exactly one row; none or several and nothing is written at all, which ManageLM checks by running it once with a throwaway value and rolling it back the moment you add the target. One row serves every instance of the application that reads it, so there is nothing to repeat per server. Value format covers software that stores the secret encoded or hashed rather than as-is; the choices are grouped by whether the application presents the credential or only verifies it, because a hashed bind password authenticates to nothing. The value itself can be written plain, hex-encoded or base64, and each digest comes in three spellings — raw writes the digest bytes themselves and needs a binary column (bytea,VARBINARY,BLOB), while hex and base64 write their text form into an ordinary column. The dry run that checks yourWHEREalso checks that the column accepts the shape you picked. You may also name a host and services to restart once the row has changed — most software reads its configuration only at startup, so without that the row is correct and the running process is not. - Windows registry — writes the value into a registry value under
HKEY_LOCAL_MACHINE, for a Windows service that keeps its configuration there rather than in a file — the credential it uses to reach a database, a share or an API. You give the key without the hive, for exampleSOFTWARE\Acme\App, and the value name; the key must already exist, which ManageLM checks on the host the moment you add the target, and the value is created if it is not there yet. A 32-bit application on a 64-bit host reads its own view, so name the key as it really is —SOFTWARE\WOW6432Node\…. Windows hosts only, and the host list shows only those. Value format works exactly as it does for a database field, for software that stores a digest rather than the password itself; a raw digest is written asREG_BINARYand everything else as a string. Note that a key underHKLM\SOFTWAREcan be read by any local account unless its own permissions say otherwise — ManageLM writes the value and leaves the key's permissions as it found them. - Account on agent — sets the password of a local account on another host to the same value, so one account can carry one password across several machines with no directory in between. A credential for
charlyondevtakescharlyonweb1,web2and so on, and every rotation sets them all. The account must already exist, and it need not be named the same as the credential's own —charlyon one host andcharly.roharton another is fine. Available on password credentials of any kind: a local account, an LDAP or Active Directory account, a database role or an Entra user password can all be mirrored onto local accounts this way. You may also list services to restart once the password is set, since anything still holding the previous one keeps failing until it reconnects. Two credentials cannot both manage one account — whichever rotated last would be the only one whose value still worked — so ManageLM refuses the second and names the credential that already has it. Not offered for SSH keys, where the authorized-key target answers the same question, nor for Entra client secrets, which Entra generates to its own rules and a host may well reject as a password. There is no overlap: the moment the new password is set, the old one stops working on that host. - Password vault — the value is stored as an item in a vault connector: HashiCorp Vault or OpenBao, AWS Secrets Manager, AWS SSM Parameter Store, Azure Key Vault, Google Cloud Secret Manager, CyberArk Conjur, Delinea Secret Server, Doppler, 1Password Connect, Akeyless or Infisical. Kubernetes Secrets and GitLab CI/CD variables are offered alongside them: not a secret store, but the same delivery question — a pipeline using a rotated credential has to receive the new value. Add one under Connectors → Vaults. The value is stored the way each vault expects it, so it reads back the way its own tooling would return it — the password itself, not a wrapper around it.
Every target on a host — both file kinds and a script — can name services to restart: a comma-separated list, restarted there once the new value has landed and any script has finished. A restart, not a reload: a service that opened its connection at startup is still holding the old password, and re-reading its configuration will not change that. Write an entry as docker:name to restart a container instead of a system service — a containerised application picks up a new secret only when its container is replaced. If a restart fails, the delivery is reported as failed — the file is written, but what reads it has not picked the value up yet.
At least one target is required. A value generated and delivered nowhere is simply lost, so ManageLM refuses to rotate without one.
Setting one up
- Grant the Credentials permission to whoever should manage them. The feature itself is on by default — if it was switched off, turn it back on under Settings → Optional Features.
- For an LDAP, database or Entra credential, add the connector first — under Connectors → Directories for LDAP, Active Directory and Entra, or Connectors → Databases for PostgreSQL, MySQL, MS SQL Server, Oracle, MongoDB, Redis/Valkey and Couchbase.
- On the Credentials page choose New Credential, pick the type, and name the account it belongs to.
- Add your targets, then set the generation options and the rotation interval (default 30 days), and create it.
With an interval set, the first rotation runs automatically within the hour — which does change the account's password. Leave the interval empty for manual-only, and nothing changes until you press Rotate.
Where an SSH private key goes
An SSH credential already names the account and host that hold the key, so it does not ask again: leave Private key path empty and the key lands in that account's own .ssh, written the way ssh-keygen would — the directory created at 0700 if it does not exist, the private key 0600 and the public key beside it at 0644, all owned by the account. The filename follows the algorithm you picked (id_ed25519, id_rsa or id_ecdsa), because those are the only names ssh looks for with no -i and no configuration.
The path can be changed later on the credential, or on the target itself — they are the same thing, and clearing the field puts it back to the account's .ssh. A file is delivered with the owner you name and that account's own group unless you name a different one.
Set the path when a job reads the key from somewhere specific — a cron that connects out with ssh -i /etc/backup/id_ed25519, say. The file is still 0600 and owned by the account you named; no public key is written beside it, since nothing there is looking for one. Anything more (a different owner or group, a vault as well) is a target like any other.
Changing one afterwards
Everything the form shows can be edited later, including what the credential rotates: the account and host of a local credential, or the connector and distinguished name of a directory one. A mistyped DN, an account moved to another OU, or a service relocated to another host is a correction — not a reason to delete the credential and rebuild its targets.
Two things do not change. The type is fixed, because it decides which fields exist at all, and a connector can only be swapped for one of the same kind — a directory for a directory, a database for a database. Moving between them would change what the account name even means.
Changing what a credential rotates clears its rotation state: the rotation on record happened against the old account, and leaving "last rotated" on screen would claim the new one already holds that value. The rotation history is kept — it records what happened.
How the value is generated
For everything except an Entra application secret, ManageLM generates the value:
- Password length — 12 by default. The floor of 8 exists for targets that cap password length, not as a recommendation.
- Complexity — Mixed case, digits and symbols by default, with narrower profiles for targets that reject punctuation or fold case. Each profile is a superset of the one below it, and the generated value always contains at least one character from every class in the profile you pick — so a narrow profile genuinely cannot emit a wider character.
- Key type (SSH only) — Ed25519 unless a target cannot take it: an sshd older than OpenSSH 6.5, or a policy mandating RSA or a NIST curve.
An Entra application secret is the exception: Entra mints it and returns it once, so there is no length or complexity to choose. An Entra user password is generated here like any other, and does honour both.
Before you rotate: what uses this account?
The mechanics of rotation are the easy part. What makes one safe is knowing what depends on the credential first — and neither a passwd entry nor a directory record can tell you that. ManageLM does not ship a separate scanner for it, because your agents already answer questions about their own hosts: ask "what would break if I change the password for svc_app on these servers?" and each agent looks at its own running services, unit files, cron entries and configuration. That reaches places a fixed list never could — a compose file, a CI credential, an application's own settings table.
History
Expanding a credential shows its last five rotations — outcome, when, and what failed — with View all for the rest. An entry marked redeliver is ManageLM having caught up the targets that missed an earlier rotation, without changing the password again. A rotation record never holds the value. History is kept for 90 days by default (CREDENTIAL_RETENTION_DAYS on self-hosted installs).
How a rotation behaves when something goes wrong
There is deliberately no rollback. Restoring a password is not possible — ManageLM never knew the old one — and would not help if it were. Recovery is automatic: if some targets took a new password and others did not, ManageLM retries just the ones that missed it over the next few minutes, with the same password, so the targets that already have it are left alone and their services are not restarted again. If that does not fix it, the whole rotation is retried with a fresh value, up to five consecutive attempts. You are alerted once ManageLM has given up, rather than for a target that comes back on its own a few seconds later. What differs is how much is at risk in between:
- SSH keys and Entra secrets can exist in two valid copies, so the new one is put in place alongside the old, delivered, and only then is the old one withdrawn. Existing access keeps working at every step.
- Passwords — local, LDAP/AD, database and Entra user — have exactly one value. From the moment the account changes until delivery finishes, part of your estate does not know the new password, so a partial delivery is reported prominently and the value is still delivered rather than lost.
Scheduled rotations do not start at all while a host they need is unreachable — the server, a target account's host, or a host receiving a file. An offline machine is not a failed rotation, and for a password there is no overlap window, so starting one that cannot be delivered would change the account and then have nowhere to put the result.
LDAP and database rotations can also verify themselves by signing in as the account with the new password — "the server accepted it" and "the account can use it" are different claims. For a database that check is a real connection, exactly what the consuming application will do. Turn verification off for an account that is not meant to sign in.
MCP Tools
search_credentials— List every managed credential (no args) or filter by state, type, agent or site. Answers "what is due to rotate", "what failed and why", "which credentials touch this host". It returns information about credentials, never their values: ManageLM holds a new secret only for as long as it takes to deliver it and stores it nowhere, so there is nothing to look up.
Requirements and limits
- LDAP and Active Directory writes are made by an agent with a route to the directory, so a domain controller on a private network never has to be reachable from the portal. You choose that agent on the connector, not on each credential: it describes how the server is reached rather than whose password is rotated, so every credential on the directory uses it. Active Directory requires
ldaps://. - Test on the connector performs a real bind from that agent and tells you if the URL, TLS or bind account is wrong — before any credential exists. Test on a credential goes one step further and confirms the target account is there. The same pair applies to the database connectors.
- How an LDAP password is written is not a setting: Active Directory accepts only a
unicodePwdwrite, and every other directory takes the standard password-modify operation, where the server hashes the value under its own policy — so history, complexity and minimum age keep working. If your server is Active Directory, create it as an Active Directory directory rather than an LDAP one; a rotation that hits this says so. - The bind account needs the right to reset the target's password; ManageLM never needs the current one.
- Credential files may live anywhere, including
/etc. The agent keeps their contents out of its change history: a file ManageLM writes in full is recorded only as having changed, and in a config file it patches, just the rotated value is hidden — the rest of your configuration still appears in the history as normal. - On Windows the host decides which write is correct. A member server or workstation gets
Set-LocalUser, which reaches its own accounts only. A domain controller getsSet-ADAccountPasswordagainst the directory: the agent runs as LocalSystem, and on a domain controller that account is a member of the domain's Administrators, so no bind account, connector or LDAPS certificate is involved. Name a domain account on a member server and it will not be found — nothing on that host can reset it — and the error says so, pointing at a domain controller's agent or an LDAP credential. - A domain account flagged user must change password at next logon is refused before anything changes. A reset does not clear that flag, so the account would take the new password and then refuse every non-interactive use of it — and with no old value to restore, that cannot be undone afterwards. Clear the flag, then rotate.
- Deleting a credential stops ManageLM managing it. A password already set on a host is left alone; an SSH key is removed from every target, so anything still using it loses access.
Databases
- The write is made by an agent with a route to the server, chosen on the connector, so a database on a private network never has to be reachable from the portal. PostgreSQL, MySQL/MariaDB, MS SQL Server, Oracle, MongoDB, Redis/Valkey and Couchbase are supported. SQL Server rotates a server-level login — the thing that has a password — not a database user; the administrative account needs
ALTER ANY LOGIN. Oracle is the one engine with no bundled driver: the agent drivessqlplus, so an Oracle client (Instant Client plus the SQL*Plus package) must be installed on that agent, and the user is named exactly as the database stores it — Oracle folds an unquoted name to upper case, so an account created assvc_appisSVC_APP. Couchbase is reached over the Cluster Manager REST API on port 8091 (18091 with TLS), not the data port, and only local users can be rotated — one backed by LDAP or SAML has no Couchbase-side password. - Use TLS encrypts the connection, and Verify TLS certificate — greyed out until TLS is on — decides whether the server's certificate is checked against this host's trust store. Turn verification off for a self-signed certificate, which is what MySQL generates for itself on first start; a rejected certificate says so and names the setting. With TLS off the connection really is unencrypted, so use it only on a network you trust.
- The administrative account needs the right to change another role's password (
CREATEROLEor superuser on PostgreSQL); it never needs to know the current one. - A MySQL identity is
user@hostand the same name can exist several times with different hosts, so give the host part — for examplesvc_app@10.%. - A Redis or Valkey account is an ACL user, which is server-wide — name it on its own, with no database or host part. The user must already exist: Redis creates one on any name it does not recognise, disabled and with no permissions, so a typo would otherwise report success while leaving the real account untouched. Redis 6 or newer, and any Valkey. The administrative user needs the
aclcommand to make the change andconfigto save it — an ACL change is only in memory until it is written, and a rotation that could not save it says so rather than leaving you to find out at the next restart. Test Connection tells you which file this server saves ACLs to before you rotate anything. - A MongoDB user belongs to the database it was created in, so name both — for example
appdb.svc_app. Two databases can each hold their ownsvc_app, and they are different accounts. The connector's own Authentication database is a separate setting: it is where the administrative account lives, almost alwaysadmin. That account needsuserAdminon the database being rotated, oruserAdminAnyDatabase. - MongoDB Atlas is not supported. Atlas manages its database users through its own Admin API and refuses the ordinary password change, so point this at a MongoDB you run yourself. On a replica set the change is made on the primary — ManageLM follows the set's own answer about which node that is, so naming any member is enough.
- PostgreSQL writes the statement, password included, to its server log when
log_statementisallorddl. MySQL removes credentials from its logs; PostgreSQL does not. Check that setting before rotating against a server whose logs are shipped somewhere. - Connections already open keep working until they are recycled, so a problem can surface later rather than at rotation time. Name the consuming service in Services to restart on the file target so it is restarted as part of the rotation.
Entra
- An application secret needs
Application.ReadWrite.OwnedBy(or.All) on the app registration ManageLM authenticates as. - An Entra user password additionally needs
User-PasswordProfile.ReadWrite.Alland a directory role on that service principal — Privileged Authentication Administrator to reset an administrator, a lesser role for ordinary users. The Graph permission on its own returns a permission error; this is the usual cause. - Entra user passwords apply to cloud-only accounts. An account synced from on-premises Active Directory keeps its password in AD — rotate it with an LDAP credential and let it sync.
Per-Plan Limits
Switching a credential off, and alerts
Each credential has two switches on the list. Enabled stops it rotating — the schedule skips it and Rotate now is refused — while keeping its targets, its schedule and its history, so switching it back on resumes exactly where it was. Alert decides whether its rotation results reach webhooks and notifications; the rotation still happens and is still in the history either way.
Skipping one destination
Each destination in a credential's Targets list has its own switch. Turning one off stops the next rotation deploying to it, without deleting it and losing how it was configured. The usual reason is a host that is off for maintenance or being decommissioned: while every destination has to be reachable for a rotation to run at all, a destination that is switched off is not counted, so one retired server no longer blocks the credential from rotating. The list column shows how many are on out of the total, and turns amber when any is off.
One thing to know before switching off a password destination. A rotation changes the password at the source first and then delivers it. A destination that is skipped therefore keeps the old password, which will no longer work — and nothing is recorded as an error, because the rotation did what you asked. The portal says so before it happens. An SSH key is different and safe: the old key is not withdrawn until the new one has been published, so a skipped host simply does not receive the new key.
A credential whose destinations are all switched off is not rotated at all, rather than having its password changed and delivered nowhere.
The number of managed credentials per account is limited by your plan (Free: 10, Pro: 50, Business: 100, Enterprise: unlimited). The Credentials page shows your usage against the limit. The New Credential button is disabled when the limit is reached. Every credential counts, whatever its state — one whose last rotation failed still occupies a slot until you delete it.
KSM Keystore
The Keystore holds private keys in the portal and lets applications on your servers use them without ever having them. An application loads a standard PKCS#11 module, asks it to sign or decrypt, and gets the answer back — the key itself stays in the portal. On by default — though it does nothing until you create a key and register an application, and managing either needs the Keystore permission. Turn it off under Settings → Optional Features if you do not use it.
What it is for
Signing and decryption, not TLS termination. Every operation is a round trip to the portal. That is nothing for a code signature, a document, a JWT or an S/MIME message, and far too much for a busy web server — a full TLS handshake is one private-key operation, so a server doing hundreds of connections a second would be doing hundreds of round trips a second. TLS server certificates belong in Certificates & PKI, where the key is generated on the agent and stays there.
It follows that if the portal is unreachable, the keys are unusable. For occasional signing that is a failed job you retry; it is another reason not to put a web server's certificate here.
Key types
| Kind | Algorithms | Used for |
|---|---|---|
| Asymmetric | RSA 2048 / 3072 / 4096 | Signing, decryption, or both |
| Asymmetric | EC P-256 / P-384 / P-521 | Signing only — a curve key cannot decrypt |
| Post-quantum | ML-DSA-44 / 65 / 87 | Signing only — see below |
| Symmetric | AES 128 / 256 | Wrapping other keys, and encrypting small payloads |
| Hashing | HMAC SHA-256 / 384 / 512 | Message authentication — webhook signatures, API request signing |
Post-quantum signatures use ML-DSA (FIPS 204), the NIST standard for signatures that stay secure against a quantum computer. Three strengths are offered; ML-DSA-65 is the usual choice. Two differences from RSA and EC are worth planning for. ML-DSA signs only — it is a signature scheme and cannot decrypt, so replacing an RSA key that does both means two keys. And it signs the message itself rather than a digest of it, so the whole message travels to the portal and is capped at 1 MB: it suits documents, manifests, tokens and attestations rather than firmware images or container layers. Signatures are also much larger — 2.4, 3.3 or 4.6 KB — so check that whatever stores or transmits them has room.
The signing application has to support ML-DSA through PKCS#11 as well. The mechanism comes from the 3.2 revision of the standard, which is newer than most tools; if yours does not offer it, an EC key remains the safe choice today.
Older digests. SHA-1 and MD5 signatures are accepted for interoperating with systems that cannot be changed — an old signing chain, an appliance, a protocol that predates SHA-2. Neither is safe against anyone who can influence what is being signed, and neither should be chosen for anything new. They are allowed here rather than pushing you to a tool outside the platform, because every use is recorded on the Activity tab — so “what still signs with MD5” is a question you can actually answer. Note that RHEL-family servers block SHA-1 signatures at the operating-system level, so an application there may refuse one even though the portal produced it.
A symmetric key here is a key-encryption key, not a data-encryption key. The case it exists for is wrapping: generate a data key on the host, have the portal-held key wrap it, and store the wrapped blob beside the data — so the key that protects everything else never exists outside the portal. Symmetric operations are capped at 64 KB, because every byte crosses the network twice and bulk encryption through this path would be a misuse rather than merely a slow one.
Keys and clients
Two things are managed on the Keystore page, and they are many-to-many:
- A key is the key material. It has a handle — the short name an application puts in its own configuration — which is fixed for the life of the key, because renaming it stops every consumer finding it.
- A client is one application on one agent: nginx, a JVM, a signing script. Each has its own credential and its own list of Unix accounts allowed to use it, so two programs on the same machine are never interchangeable.
You then grant a key to a client. A key with no clients exists but nothing can use it; a client is reused across every key it holds, which is why it is created on its own tab rather than inside a key.
How an application is authorised
Two independent things must agree before a key can be used:
- The credential — the PKCS#11 PIN, held in the application's own configuration. It is shown once when the client is created or rotated and never again; only a hash is stored.
- The calling process's account — read by the agent from the kernel, not claimed by the application. This one is optional per client: leave the allowlist empty and the credential alone authorises, fill it in and it is enforced strictly. Available on Linux agents only.
The credential is bound to the hosts that carry that client. Copied out of one machine's configuration it works on those and nowhere else — a client created on its own has a credential unique to it, and a client copied onto other hosts shares one with its copies, which is the point of copying: one application deployed to a fleet is one secret in your configuration management. Revoking a shared credential means rotating each copy; rotating any one of them gives that copy a new secret and leaves the others alone.
Every refusal reaches the application as an undifferentiated error — it is never told why, so an application that can reach the socket cannot map out which credentials exist or which account would have worked. The real reason is on the Usage tab — expand a line with refusals to read what the caller was not told.
Setting one up
- Turn the feature on under Settings → Optional Features, and grant the Keystore permission to whoever should manage it.
- On the Keystore page choose Add Key: name it, pick an algorithm, and check the handle it will be known by.
- Choose Add Client: pick the agent, name the application, and on a Linux agent optionally list the accounts allowed to use it. Copy the credential — it is shown once.
- Open the key and Grant to a client.
- Point the application at the module. The agent installs it at
/opt/managelm/pkcs11/managelm-p11.so, fetching it from the portal the first time a key is granted on that host. - If the application needs a certificate — anything on the JVM, and the code-signing tools do — create a CSR from the key, have it signed, and upload the answer. See Certificates below.
Configuring an application
The token is ManageLM Keystore, the PIN is the client's credential, and the object label is the key's handle.
# What this application may use
pkcs11-tool --module /opt/managelm/pkcs11/managelm-p11.so -O --login

# OpenSSL 3, through pkcs11-provider
openssl dgst -sha256 -sign "pkcs11:object=release-signing;type=private?pin-value=$PIN" file
Java's SunPKCS11 takes the same module path and the credential as its PIN. Supported mechanisms are RSA PKCS#1 v1.5 (raw and with SHA-256/384/512), RSA OAEP, ECDSA (raw and hashed), AES-GCM, AES key wrap and HMAC. Key generation, wrapping to new token objects and symmetric key creation are deliberately absent — those happen in the portal, where there is an operator, a policy and an audit trail.
How many keys you can hold
The number of keys per account is limited by your plan (Free: 10, Pro: 25, Business: 50, Enterprise: unlimited). The Keystore page shows your usage against the limit, and the Add Key button is disabled when the limit is reached. Only keys count — applications and grants are unlimited, since a grant simply gives an application access to a key that already occupies a slot. Self-hosted installs are uncapped: the keys live in your own database.
Who can see and change them
Every member can read the Keystore page — keys, applications, grants and usage — the same as Credentials, Monitors and Certificates. That is safe because no key material and no credential can be read back by any route. The keystore permission unlocks the buttons: creating, editing and deleting keys and clients, granting, and rotating credentials. API keys are stricter and need the permission even to read.
Revoking access
Four levels, each taking effect on the very next operation because nothing is cached:
- Suspend a grant — that client loses that key, keeping the rest.
- Disable a key — every application loses it at once, and it stops being listed at all. The key itself is untouched, so switching it back on restores exactly what was there.
- Disable a client — that application loses every key on that host, while its configuration survives for when the incident is over.
- Rotate its credential — the old one stops working immediately and every application using it needs updating.
Prefer any of these to deletion during an incident: all four are reversible with one click, and none of them loses configuration.
Deleting a key is final. It cannot be exported, recovered or regenerated — anything it signed can still be verified, but nothing new can be signed with it.
Usage
The Usage tab shows what every key was used for and what was refused, counted per key, per application, per mechanism, per day. Each line carries how many operations succeeded and how many were turned down; a line with refusals expands to show the most recent reason, the Unix account that asked and when — the reason the application itself was never told.
Counts rather than a line per signature, deliberately. A key signing a million times a day costs the same single row as one signing twice, so the record cannot grow with your traffic and a busy application cannot crowd out the rest of the history. It also means the numbers stay useful far longer: usage is kept for a year.
What you give up is the individual event — you can see that a key signed 4,312 times on Tuesday from one host, not the timestamp of each. If you need a per-signature trail for compliance, stream it to your own SIEM under Webhooks. Deleting a key or an application also removes its usage, so the record only ever describes things that still exist; the deletion itself stays in the Audit Log. Two events can be pushed off the portal — a refused access and a deleted key — under the Keystore category in Webhooks and notifications.
Certificates
A key can sign on its own, but most consumers will not use one without a certificate saying who the signature belongs to. Java's SunPKCS11 will not present the key at all, and the code-signing tools need the chain to build a signature. Each key holds one certificate chain, shown on its row.
- Expand the key and choose Create CSR. Fill in the subject — for code signing the common name is your organisation's legal name, exactly as your CA has it — and send the request to your CA.
- When the certificate comes back, choose Upload certificate. PEM, DER, PKCS#7 (
.p7b) and PKCS#12 are all accepted, and you can send the whole chain: the root is dropped, the rest is put in order, and the certificate is checked against the key it claims to belong to. One for a different key is refused.
The key row then shows the certificate's state at a glance — valid, expiring within 30 days, or expired — and expanding it shows the chain, the expiry and downloads. Replace installs a renewal; applications read the token when they start, so a long-running one picks up a replaced certificate at its next restart.
System Backups
End-to-end encrypted filesystem backups from your agents to your own S3 storage. ManageLM never sees your data — the agent encrypts every archive locally before uploading, and only the ciphertext transits via your S3 bucket. Restore to any online agent at any time.
Providers
The S3 bucket is configured once per account in Settings → Account & LLM → S3 Storage, and is used for both backups and session recordings. Provider-agnostic — one set of credentials, any S3-compatible storage:
- OVH Object Storage (recommended for EU-based data residency)
- Amazon S3
- Cloudflare R2 (no egress fees)
- Backblaze B2
- Exoscale SOS
- Wasabi
- Scaleway Object Storage
- Hetzner Object Storage
- DigitalOcean Spaces
- Google Cloud Storage (S3 interoperability / HMAC keys)
- Infomaniak Public Cloud
- MinIO / Ceph (self-hosted S3)
The list is a convenience, not a limit: a preset only pre-fills the endpoint URL and region, so any other S3-compatible endpoint works by picking Custom / Other. The Test button validates credentials via HeadBucket before saving. Secret keys are stored AES-256-GCM encrypted at rest.
Encryption
Every backup has its own randomly generated 32-byte master key, stored wrapped server-side. Before each run, the portal sends the key to the agent over the existing mTLS WebSocket channel — never over HTTP, never logged.
- AES-256-CBC + HMAC-SHA256 — encrypt-then-MAC pattern, industry standard.
- Domain-separated subkeys — encryption key =
SHA256(master || "enc"), MAC key =SHA256(master || "mac"). - Wire format —
IV (16 bytes) || ciphertext || HMAC tag (32 bytes). - Restore-time verification — the HMAC is checked at end-of-file using a rolling-window stream; mismatch destroys the download stream so the browser sees a broken file instead of partial/corrupt bytes.
Pure-Python implementation on the agent via oscrypto — no cryptography package, no native build dependencies.
Schedule & Retention
Each backup has its own cadence and retention:
| Schedule | Configurable Fields |
|---|---|
| Every hour | — |
| Every 6 hours | — |
| Daily | Run time (HH:MM, agent-local) |
| Weekly | Day of week + run time |
| Monthly | Day of month (1–31, clamped) + run time |
FIFO retention — specify how many snapshots to keep (1–90). Older snapshots are automatically rotated out by the cleanup cron, which best-effort deletes the S3 object then the DB row.
Quiesce services during backup
For a consistent snapshot of databases and stateful apps, list one or more services to stop during the backup (comma-separated, e.g. postgresql, docker:redis). The agent:
- Stops each listed service via
systemctl stop(Linux) ornet stop(Windows) — ordocker stopfor an entry writtendocker:name, which stops that container instead. 30-second timeout per entry. - Runs the tar → encrypt → upload pipeline.
- Restarts every service that was successfully stopped — in a
try/finallyso a backup failure (or the agent being killed mid-run) never leaves services down.
Run flow
- Agent requests a presigned
PUTURL from the portal; portal pre-inserts apendingsnapshot row. - Agent tars the source path (with optional excludes), encrypts the archive, uploads directly to S3 — never through the portal.
- Agent reports size, file count, duration, SHA-256 via
backup_status. - Portal flips the snapshot to
ok/failed; the cleanup cron reaps stuckpendingrows after 6 hours.
Download & Restore
- Download decrypted
.tar.gz— mints a one-shot Redis token (5 min TTL) then triggers a native browser download. The portal streams S3 bytes through a rolling-window HMAC/decrypt pipeline; the save dialog opens immediately and the progress bar fills as the archive arrives. - Restore to any agent — pick a target agent and target path in the Restore modal. The agent downloads, verifies the HMAC before touching disk, strips the top-level source directory, and extracts with a path-traversal guard. You can restore to the original agent or any other online agent — the backup is portable.
- Abort a running backup — cancel a stuck upload and reclaim the snapshot slot.
Detach on agent delete
When you delete an agent that has backups, the backups are not deleted — their agent_id is cleared instead. The S3 data and snapshot history survive the hardware replacement. A purple Reassign button appears in the backup row; clicking it opens the edit modal with an Agent picker so you can attach the backup to a new agent and continue the schedule. The UI also warns you about the detached count before confirming the agent deletion.
S3 orphan cleanup
The S3 Cleanup button in Settings → S3 Backups scans your bucket under the account prefix and deletes objects that have no matching snapshot row in the portal. Useful when the bucket was deleted externally, credentials were rotated mid-run, or you want to reclaim storage after manually removing backups.
Alerting
Per-backup toggle for alert-on-failure emails. ManageLM also detects stalled backups: if a scheduled backup is missed because its agent is offline, you receive a single consolidated alert per agent rather than one alert per missed run.
Permissions
- Read access — all authenticated users can view the Backups page, snapshot counts, and last-run status.
- Backups Admin (
perm_backups) — required to create, edit, delete, run-now, reassign detached backups, download decrypted snapshots, restore, and configure account S3 settings. - Owners and admins bypass the permission check.
Per-Plan Limits
The number of backups per account is limited by your plan (Free: 20, Pro: 100, Business: 200, Enterprise: unlimited). Detached backups still occupy a slot — delete them explicitly to free the slot.
Constraints
- Each snapshot is held fully in memory during encrypt/decrypt on the agent (oscrypto one-shot API). Practical upper bound: 4 GB archive size. For larger datasets, split into smaller backups.
- You must configure S3 storage before creating your first backup.
- Restoring to a detached backup requires explicitly picking a target agent.
Pentests
ManageLM includes automated penetration testing for your public-facing agents. Pentests scan your servers from the outside — testing what an attacker would see. Available on Pro and Business plans.
How it works
- Select — Open the Pentests page and click New Pentest. Choose one or more public agents, select the tests to run, and optionally add target URLs.
- Validate — The portal sends a one-time token to the agent. The agent validates with the pentest service from its public IP, proving it controls the target.
- Scan — The pentest service runs tools sequentially: nmap (port discovery), nuclei (vulnerability scanning), testssl.sh (TLS audit), and more depending on selected tests.
- Report — An LLM generates a human-readable report with findings, severity ratings, and a security score (0–100). Results appear in the Agent Assets audit modal (Pentest tab) and the Pentests dashboard.
Available tests
| Test | What it scans | Credits |
|---|---|---|
| Basic Scan | Port discovery (nmap), vulnerability scan (nuclei), TLS quick check (testssl) | 3 |
| Full Port Scan | All 65,535 TCP ports | 3 |
| Vulnerability Scan | Extended nuclei templates (critical/high/medium) | 3 |
| SSL/TLS Audit | Full testssl.sh analysis (per URL) | 1 |
| Web App Scan | Nuclei web templates (per URL) | 3 |
| DNS Audit | SPF, DMARC, DKIM, MX records (per URL) | 1 |
| HTTP Headers | Security headers analysis (per URL) | 1 |
| Directory Scan | Common path discovery with ffuf (per URL) | 2 |
| Subdomain Enum | Subdomain discovery with subfinder (per URL) | 1 |
URL-based tests run once per target URL. Credit cost is calculated as: IP-based test credits + (URL-based test credits × number of URLs).
Credits
Pentests consume credits. Credits are deducted after a successful scan — failed scans are not charged.
- Bundled credits — Pro and Business plans include credits when you first subscribe.
- Purchase more — Click Add Credits in the Pentests page or Settings > Account to buy additional credit packs.
- Balance — Your remaining credits are shown in the Pentests dashboard and in Settings > Account.
Domain verification
Before scanning URLs, you must verify domain ownership. The pentest service generates a DNS TXT record that you add to your domain. Once verified, the domain stays valid for 24 hours before requiring re-verification.
Compliance integration
Pentest results automatically feed into the Compliance page. Each tool produces a pass/fail rule that maps to framework controls (CIS, PCI-DSS, SOC 2, ISO 27001, NIS2, NIST CSF, HIPAA). Pentest rules appear alongside security audit rules in framework coverage views.
Constraints
- Only public agents (internet-facing) can be pentested — the service scans from the outside.
- One pentest per agent at a time.
- Target URLs must DNS-resolve to the agent's public IP.
- The agent must be online to validate the scan token.
- Requires a Pro or Business plan with sufficient credits.
Compliance & Frameworks
The Compliance page maps your security audit results to industry compliance frameworks. ManageLM evaluates your fleet against each framework's controls and shows which pass, fail, or are not covered by the current rule set.
Supported frameworks
| Framework | Version | Description |
|---|---|---|
| CIS Level 1 | v8.0 | Center for Internet Security — essential security hygiene for servers |
| CIS Docker | v1.6 | CIS Docker Benchmark — container runtime security |
| SOC 2 | 2017 | Trust Services Criteria — Security principle technical controls |
| PCI DSS | v4.0 | Payment Card Industry Data Security Standard |
| ISO 27001 | 2022 | ISO/IEC 27001 Annex A — information security controls |
| NIS2 Directive | 2022 | EU Directive 2022/2555 — network and information security measures |
| NIST CSF | v2.0 | NIST Cybersecurity Framework — Protect, Detect, Identify functions |
| HIPAA Security Rule | 2013 | 45 CFR §164.312 — technical safeguards for protected health information |
How controls are evaluated
Each framework control is backed by one or more checks from security audits, pentests, and vulnerability scans. A control passes only when every backing check passes on every agent. If any check fails on any agent, the control fails. Controls with no data yet (no agents scanned) show as not covered.
Compliance dashboard
The Compliance page has two tabs:
Agents tab
- Fleet score — Average compliance score across all agents, with trend charts.
- Issue breakdown — Critical, high, medium, low counts with stacked area chart over time.
- Drift detection — Rules that changed from pass to fail between scans (shown as an alert at the top).
- Per-agent detail — Expand any agent row to see score history, rule results by category, raw check output, and a history slider to compare past states.
- Re-scan — Trigger audits per agent or fleet-wide with the Scan All button (requires reports permission).
Frameworks tab
- Framework list — All frameworks with compliance percentage, progress bar, and icon badge.
- Expand a framework — Shows each control with pass/fail status, reference number, description, and website link.
- Expand a control — Shows the underlying technical checks with fleet-wide pass/fail counts.
- Evidence PDF — Download button on each framework (enabled at ≥ 50% compliance).
Security drift notifications
When a security audit completes and a rule that previously passed now fails, ManageLM detects this as drift. Drift is shown in the Compliance dashboard as an alert. Optionally, admins can enable the Security Drift email notification in Settings > Email Notifications to receive an email with the new issues.
Drift detection only triggers when there is audit history — the first scan for an agent never generates drift alerts.
Evidence PDF export
Each framework has an Evidence PDF button (enabled when compliance is ≥ 50%). The generated PDF is designed for auditors and includes:
- Cover page — Framework name, version, compliance percentage, agent count.
- Scope & methodology — Assessment date, server count, evaluation method, reference URL.
- Control evidence — Each control as a card with status badge, description, technical checks table (pass/fail per check with fleet-wide counts), and for failing controls: per-agent findings with remediation guidance and raw command output as evidence.
- Assessed infrastructure — Table of all servers with compliance score, exposure level (public/private), and last audit date.
- Disclaimer — Technical controls only, not a compliance certification.
The fleet-wide Export PDF button on the Compliance page generates a summary report covering all frameworks.
Adding custom frameworks
Self-hosted operators can add a custom framework by dropping a JSON file into the install's frameworks/ directory and restarting the portal — the file lists which existing rule slugs map to each control.
System Inventory
ManageLM discovers all running services, installed packages, and system components on your agents. Checks are read-only and no skill assignment is required.
How it works
- Trigger — Open an agent's detail panel on the Agent Assets page. Click the clipboard icon to open the System Inventory modal, then click Run Inventory.
- Scan — The agent collects information about the system using a read-only set of checks.
- Structure — The portal turns the collected output into inventory items, categorising each one and joining service names to their installed package versions. No LLM is involved, so the result is the same on every run and does not depend on your model configuration.
- Results — Inventory items appear in the modal, grouped by category.
What is collected
| Check | What it inspects |
|---|---|
| System Info | OS, kernel, uptime, CPU count, memory, disk usage |
| Running Services | All active services (systemd on Linux, Windows Services on Windows) |
| Enabled Services | Services enabled at boot |
| Listening Ports | TCP listening sockets with associated processes |
| Installed Packages | Package list from rpm or dpkg (Linux), or installed programs list (Windows) |
| Package Versions | Explicit version extraction for common packages (nginx, PostgreSQL, Redis, Docker, etc.) |
| Containers | Docker/Podman containers with image, status, and ports |
| Cron Jobs | System and per-user cron jobs |
| Network Interfaces | All network interfaces with addresses |
| Mounted Filesystems | Non-virtual mounted filesystems |
| Hardware Info | CPU model, memory, disks |
| Web Servers | Running web servers (nginx, Apache, Caddy, HAProxy) |
| Databases | Running databases (PostgreSQL, MySQL, MongoDB, Redis, Valkey, Memcached, Elasticsearch) |
| Login Users | Non-system user accounts with shell and group membership |
Categories
Each inventory item is classified into one of these categories:
| Category | Examples |
|---|---|
system | OS version, kernel, CPU, memory, disk |
web | Nginx, Apache, Caddy, HAProxy |
database | PostgreSQL, MySQL, Redis, Valkey, MongoDB, Elasticsearch |
mail | Postfix, Dovecot, OpenDKIM |
container | Docker containers, Podman containers |
network | Network interfaces, listening ports |
storage | Mounted filesystems, disks |
security | Fail2ban, SELinux, firewall |
monitoring | Monitoring agents, metrics collectors |
log | Rsyslog, journald, logrotate |
user | Login user accounts |
scheduler | Cron jobs, systemd timers |
PDF export
Click the Inventory button at the top of the Agent Assets page to download a fleet-wide inventory report covering all agents with completed inventories. The PDF includes categorized service lists with versions and status for each server.
Like security reports, use the Scheduled Tasks popover to set the inventory scan schedule across all agents at once.
Scheduled inventories
You can configure automatic recurring inventories per agent. Open the System Inventory modal and use the schedule selector in the top-right corner to choose a frequency:
- Manual only — No automatic scans (default).
- Daily — Runs once every 24 hours.
- Weekly — Runs once every 7 days.
- Monthly — Runs once every 30 days.
The scheduler checks every 15 minutes and triggers inventories for agents that are overdue. A yellow badge (D, W, or M) appears on the agent card to indicate an active schedule.
Constraints
- Only one inventory can run per agent at a time.
- Each agent stores only its latest inventory result (previous results are overwritten).
- The agent must be online to start an inventory (manual or scheduled).
- The
agentspermission is required to start inventories and change the schedule. All authenticated users can view results.
SSH & Sudo Access
ManageLM includes a built-in access scanner that discovers SSH authorized keys and sudo privileges across your infrastructure. Checks are read-only and run on the agent — fully deterministic, no LLM involved. Discovered SSH key fingerprints are matched against ManageLM user profiles for identity resolution.
How it works
- Trigger — Open an agent's detail panel on the Agent Assets page. Click the SSH & Sudo button to open the access scan modal, then click Scan Access.
- Collect — The agent enumerates each user's authorized SSH keys (with SHA256 fingerprints) and parses sudoers files, including group-based rules. No LLM is involved.
- Results — The combined data is returned to the portal and displayed in the modal. SSH key fingerprints are matched against public keys registered in ManageLM user profiles (Settings → Security → SSH Public Keys) — matched keys show the user's name in a green badge, unmatched keys show as "Unknown".
What is collected
| Data | Source | Details |
|---|---|---|
| SSH authorized keys | ~/.ssh/authorized_keys | Key type, SHA256 fingerprint, comment, full public key, line number |
| Sudo user rules | /etc/sudoers | Target host, runas user, commands, NOPASSWD flag, source file |
| Sudo group rules | /etc/sudoers + /etc/group | Group rules (e.g. %wheel) expanded to individual users via group membership |
Identity mapping
ManageLM users can register their SSH public keys in Settings → Security → SSH Public Keys. When the access scan discovers a key on a server, its SHA256 fingerprint is matched against registered keys to identify the owner. This creates a complete map of who has access to what and what they can do (SSH + sudo).
- Green badge — Key matched to a ManageLM user profile.
- Gray "Unknown" badge — Key not registered by any ManageLM user.
Sudo rules with NOPASSWD are highlighted in red as a security concern.
user@host comment in authorized_keys is unreliable — identity is resolved exclusively via SHA256 fingerprint matching against registered profiles.
MCP integration
The access scan powers natural-language access management via Claude:
search_ssh_keys— Search SSH keys across your infrastructure. Combines two data sources: registered keys from ManageLM user profiles (with full public key content) and deployed keys found by access scans on servers. Examples: "Who has SSH access to pocmail?", "Get Charly's SSH key", "List unknown SSH keys".search_sudo_rules— Search sudo privileges from access scan results. Examples: "Show me Charly's sudo authorizations", "List all NOPASSWD sudo rules on production".list_team_members— List ManageLM users with their roles, permissions, and registered SSH public keys. Used to look up a team member's key before granting access.run_access_scan— Trigger a fresh scan and wait for results.- Combined with the
usersskill (ssh_key+sudooperations): "Give Charly SSH access to pocmail", "Add authorization for Charly to reboot all production servers", "Remove all access for Yoann". Claude automatically looks up the team member's registered SSH key viasearch_ssh_keysbefore dispatching the task.
PDF export
Click the SSH & Sudo button at the top of the Agent Assets page to download a fleet-wide access report. The PDF includes SSH keys and sudo rules per user per server, with NOPASSWD rules highlighted.
Scheduled scans
Configure automatic recurring scans per agent via the schedule selector in the modal header, or for all agents via the Scheduled Tasks popover in the Agent Assets toolbar. Frequencies: Manual / Daily / Weekly / Monthly.
Constraints
- Only one scan can run per agent at a time.
- Each agent stores only its latest scan result (previous results are overwritten).
- The agent must be online to start a scan.
- The
reportspermission is required to start scans and change schedules. All authenticated users can view results.
Certificate Discovery
ManageLM includes a built-in certificate scanner that discovers the x509/TLS certificates already installed on each host — in system stores, web-server config directories, Let's Encrypt live directories, and other well-known locations. Checks are read-only and run on the agent (fully deterministic, no LLM involved), and only public certificate metadata is collected — private key material is never read, transmitted, or stored. Discovered certificates are cross-referenced against the certificates ManageLM itself issues (see Certificates & PKI) so you can tell at a glance which are already managed.
How it works
- Trigger — Open an agent's detail panel on the Agent Assets page. Click the Certificates button to open the discovery modal, then click Scan Certificates.
- Collect — The agent walks the known certificate locations, parses each certificate's metadata (no key material), and returns it to the portal.
- Results — Each certificate is shown with its subject, issuer, expiry, key type/size, and signature algorithm. Health flags surface certs that are expired, expiring soon (≤ 30 days), weak (RSA < 2048 or SHA-1/MD5 signature), or self-signed. Certs whose fingerprint matches a ManageLM-issued certificate show a green Managed badge.
What is collected
| Data | Details |
|---|---|
| Certificate metadata | Subject (CN + full DN), issuer, SANs, validity dates, serial, SHA-256 fingerprint |
| Key & signature | Key type (RSA / EC), key size, signature algorithm; CA vs leaf |
| Location | File path (Linux) or store name (Windows) |
| Private-key hygiene | Whether a matching key file sits beside the cert, and whether its file mode is world-readable — a serious misconfiguration. The key contents are never read. |
Trust-store bundles (hundreds of public root CAs) are excluded, so results focus on the server certificates actually deployed on the host. Linux discovery covers /etc/ssl, /etc/pki, and the config directories of nginx, Apache, HAProxy, Postfix, Dovecot, and others; Windows discovery reads the LocalMachine\My and WebHosting certificate stores.
MCP integration
The certificate scan powers natural-language certificate auditing via Claude:
search_certificates— Search certificates discovered on host disks (managed or not). Examples: "Which certs on our servers expire in the next 30 days?", "Find self-signed certs under /etc/ssl", "List certificates not managed by ManageLM". Distinct fromsearch_pki, which lists the certificates ManageLM issues.run_certificate_scan— Trigger a fresh scan on one or more agents and wait for results.
PDF export
Click the Certificates button at the top of the Agent Assets page to download a fleet-wide certificate report, grouped per server with expiry, health flags, and managed status.
Scheduled scans
Configure automatic recurring scans per agent via the schedule selector in the modal header, or for all agents via the Scheduled Tasks popover in the Agent Assets toolbar. Frequencies: Manual / Daily / Weekly / Monthly.
Constraints
- Only one scan can run per agent at a time.
- Each agent stores only its latest scan result (previous results are overwritten).
- The agent must be online to start a scan.
- The
reportspermission is required to start scans and change schedules. All authenticated users can view results.
SSH Key & Sudo Sync
Push a user's stored SSH public keys to managed Linux and Windows hosts so they can log in directly with their keys — no manual editing of ~/.ssh/authorized_keys (or administrators_authorized_keys on Windows) on each server. On Linux, separate grants can also put a user's keys in /root/.ssh or give their account passwordless sudo. Sync is event-driven: every relevant change (toggle flip, new key uploaded, user removed, group membership change) immediately updates the affected agents.
How It Works
Three things can be turned on, and they are independent of one another. Only the first has a master switch:
- Keys into each user's own account — the "Sync Admin SSH Keys" master switch on the agent (and on the group). If it is on at the agent or on any group it belongs to, every assigned user with a System Username gets their keys pushed to that local account — most-permissive wins. There is no per-user toggle for this one: the System Username field is itself the participation flag, since admin-set targeting is what makes the push safe. With every switch off, the agent strips those managed blocks.
- SSH Root — a per-user grant, set on a direct assignment or on a group membership; if either grants it, the user has it. Puts the user's keys in
/root/.ssh/authorized_keys. It needs no System Username and does not consult the master switch: root's file is nobody's account, so there is nothing to map, and the host's consent to fill people's own accounts has no bearing on it. A user with no key on file simply contributes nothing. - Sudo Root — a per-user grant with the same OR-union rule. Writes a passwordless
NOPASSWD: ALLline for the user's local account into a managed/etc/sudoers.d/managelmdrop-in. It does need a System Username, because the sudoers line names an account — but it does not consult the master switch either. A sudoers rule works for any login method (AD, Kerberos, a password, a jump host) and never needed a key to exist.
All three are orthogonal: a user can have their own keys pushed, root-key access, sudo-to-root, any combination, or none.
/root/.ssh managed if it was also having keys written into its users' own accounts. That excluded ordinary cases — a host whose people sign in through AD and wants sudo managed but authorized_keys untouched, or an operator who should hold root on a box where they have no account of their own. Existing grants keep working; the switch now means only what its name says.
Local-Account Matching: System Username
To participate at all, a user must have a System Username set on their profile (e.g. charly). This is the local account name on managed hosts. On Linux, LDAP / SSSD / NIS-managed accounts are visible alongside /etc/passwd. On Windows, local accounts are supported (domain-only accounts are not yet).
The field is admin-set: regular members can't change their own System Username (or anyone else's), but admins and owners can edit theirs and others'. This prevents a member from redirecting their own keys onto another local account by relabeling themselves. Configure it in Users & Roles → (member) → System Username, or at invite time via the optional field on the invite modal.
Sudo Root (Linux only) requires System Username — the sudoers line has to name a local account. SSH Root does not: those keys go to root's own file, so there is no account to map, and an operator can hold root on a host where they have no login of their own. What SSH Root does need is a key on file, since without one there is nothing to push. Either way, a grant whose prerequisite is missing shows as a disabled switch that still reflects what is stored, with the reason on hover — it is never silently hidden or flipped off.
Where to Toggle
- Agent edit page → Configuration → Sync Admin SSH Keys master switch (above Auto Update). Available on both Linux and Windows agents. Greyed with a (via group: <name>) tooltip when inherited from a group — flip it on the group page to change inherited state.
- Agent edit page → Assigned Users → a Console, SSH Root and Sudo Root switch per row, labelled once in the column header. Console applies on every platform; the two Linux-only columns are not drawn at all on a Windows agent. Each is disabled, showing its stored value with the reason on hover, when its prerequisite is missing or when a group has it locked on.
- Group edit page → Configuration → Sync Admin SSH Keys master switch (cascades to every Linux and Windows agent in the group).
- Group edit page → Members → the same three switches per member. Console cascades to every agent in the group; SSH Root and Sudo Root cascade only to the Linux ones, and Windows agents in the group ignore them.
How the Agent Reconciles
SSH keys (Linux). The agent maintains a managed block inside each user's authorized_keys. Lines outside that block are preserved verbatim — existing keys aren't touched. Updates are safe against partial writes and against symlink tricks. Accounts that drop out of coverage (user removed from the agent, sync toggle off, user deleted) get their managed block stripped on the next reconcile.
SSH keys (Windows). Windows OpenSSH treats accounts in the local Administrators group specially — it reads their authorized keys from a single shared file (%PROGRAMDATA%\ssh\administrators_authorized_keys) instead of the per-user ~\.ssh\authorized_keys. The agent picks the right file automatically per user based on live group membership: per-user file for non-admins, shared admin file for accounts in Administrators. Be aware that any key in the shared admin file authenticates as any admin account on the host — this is a Windows OpenSSH default, not something we introduce; operators who need stricter scoping must customise their sshd_config. SSH Root and Sudo Root have no Windows analog — there is no /root and no sudoers — so those two columns are not drawn on a Windows agent at all. Console is, and works there — and on Windows the same Console grant also provides the graphical desktop, so a Windows host shows both a terminal and a desktop icon.
Sudo grants (Linux only). The agent owns /etc/sudoers.d/managelm end-to-end and writes one passwordless NOPASSWD: ALL line per granted user. Each update is syntax-validated before being installed; if validation fails, the previous file stays in place — a broken sudoers can never lock you out. When the grant list is empty, the file is removed entirely — clearing every grant is how you turn sudo management off on a host, since it has no master switch of its own.
FIDO / Hardware-Backed Keys
SSH FIDO keys generated with ssh-keygen -t ed25519-sk are accepted at upload time and synced just like any other key. sshd will require a physical touch on the YubiKey at login time. This is a separate credential from any passkey you've registered for portal MFA — same hardware, different credentials.
Triggers
The portal updates affected agents immediately whenever the effective state changes. A single update covers both SSH keys and sudo grants. Triggers include:
- Master switch flipped on the agent or any group it belongs to.
- SSH Root or Sudo Root flipped on a direct assignment or group membership. (The Console grant is decided by the portal when a console is opened and is never pushed to the agent, so flipping it triggers nothing here.)
- SSH key added or deleted in a user profile.
- User assignment added or removed on an agent.
- Group attached or detached from an agent, or user added/removed from a group.
- System Username changed on a user (admin edit).
- User deleted — the managed key block and any sudoers grant are removed from every agent that previously covered them.
- Agent reconnect — the agent receives the current state on connect.
Safety Notes
- The agent never deletes lines outside its managed
authorized_keysblock, so manual edits aren't clobbered. - The managed sudoers file is owned end-to-end by the agent — manual edits to
/etc/sudoers.d/managelmare overwritten on the next reconcile. Add unrelated rules in a different drop-in file. - Sudoers updates are syntax-validated before replacement; a malformed render is rejected and the previous working file stays in place.
- If the agent loses portal connectivity, the last-synced state stays in place; sshd and sudo keep working off the local files.
- Turning off the master switch (or removing all assignments / clearing System Username) strips the user's managed entries and sudo grants on next reconcile — no manual cleanup needed.
Activity Audit
ManageLM includes a built-in activity audit that tracks user activity on your servers. The audit collects login history, sudo activity, file changes, and package events on the agent in a read-only scan. On Linux it works without any extra dependencies (no auditd needed); on Windows it uses the Windows Event Log. Fully deterministic, no LLM needed.
How it works
- Trigger — Click the Activity tab on an agent card in the Agent Assets page, then click Run Activity Audit.
- Scan — The agent collects activity for the configured time window.
- Parse — Events are normalized, deduplicated, and system accounts are filtered out.
- Identity — Full names (including LDAP/SSSD users) are matched against ManageLM users — matched users appear as green badges.
- Results — Displayed in the Activity Audit modal with dashboard cards and detail tables.
What the report shows
- Login Success — Successful SSH/console logins with user, timestamp, and source IP.
- Login Failed — Failed login attempts with user, timestamp, and source IP.
- Sudo / Elevated Commands — Linux: all commands run via
sudo(always shows the real user, even aftersudo su -; supports compressed rotated log files). Windows: elevated PowerShell sessions from Windows Event Log. - Files Changed — Config files modified under
/etcand/var/spool/cron, detected by modification time. Common system noise files are filtered. - Package Changes — Packages installed, updated, or removed (covers both RPM- and DEB-based distros, and Windows package logs).
- Service Changes — Services started, stopped, or failed (from systemd journal on Linux, Windows Event Log on Windows).
- Reboots — System reboot events with kernel version.
Time windows
Each audit collects data for a rolling time window:
- Manual runs — last 24 hours
- Daily schedule — last 24 hours
- Weekly schedule — last 7 days
- Monthly schedule — last 30 days
PDF export
Click the Activity button at the top of the Agent Assets page to download a fleet-wide activity audit report as PDF. Use the Scheduled Tasks popover to set the audit schedule across all agents.
Constraints
- Only one audit can run per agent at a time.
- Each agent stores only its latest audit result.
- The agent must be online.
- The
reportspermission is required to start audits and change schedules.
Threat Detection
Continuous, LLM-narrated runtime threat detection on Linux hosts. The agent watches what's happening on the host in real time and the LLM turns anything that looks compromising into a human-readable alert in the portal — with a severity rating, a plain-English explanation of what happened, and one-click actions to stop it.
Two independent modes — one for services and daemons, one for human login sessions — can be enabled together or separately, per agent or per group. Both toggles are Linux only and can cascade from a group to every Linux agent in it (same model as Sync Admin SSH Keys).
Service Threat Detection
Watches services, daemons, and workloads — non-human activity. Related events are correlated before a verdict is formed, so an incident produces one alert with a short explanation of why the activity matters — not a stream of disconnected ones. Examples of what gets caught:
- Web-server compromise — a web server behaving like an interactive shell, the classic remote-code-execution footprint.
- Database compromise — a database process running commands it has no business running.
- Credential theft — a service reaching for password, key or secret material it never normally touches.
- Reverse shells — a service opening an interactive channel back out to an external host.
- Persistence installation — a service quietly arranging to survive a reboot or regain access later.
- Privilege escalation prep — a service weakening the host's own protections.
- Supply-chain payload staging — remote content fetched and run in a single step.
- Unexpected outbound connections — workloads reaching the internet with no reason to (typical exfiltration / command-and-control footprint).
The LLM judges each batch against the host's installed skills — the same skills you assigned to the agent (e.g. Web Server Management, Database Management, Email Server Management). Behavior that fits the host's role is dismissed silently (a PHP site making outbound HTTP on a web-server host is normal; the same behavior on a host with no web role is flagged). Batching also means a flapping service can't storm the inbox — one alert per incident, not one per event.
Session Threat Detection
Watches interactive SSH and sudo sessions for the ManageLM users that map to local accounts on the host. The LLM gets the user's permitted scope — built from the skills they're allowed to use on that host plus their optional free-text role description — together with a structured transcript of what they did, and decides whether the activity fits that scope. A session is judged as activity builds up, again when the user logs out, and after 10 min of inactivity — so a risky session can be flagged (and stopped) while the user is still connected, not only after they leave.
This isn't a fixed rule-list — the LLM judges holistically against the user's scope. Examples of what typically gets flagged:
- A database administrator suddenly editing
sshd_configor web-server configuration. - A web admin reading
/etc/shadow, dumping audit logs, or running network reconnaissance. - Anyone deleting their own bash history before logging out.
- Anyone installing kernel modules, planting cron entries, or modifying systemd units outside their scope.
- Outbound connections to unexpected destinations from inside the session.
- Sudo escalations to operations the user's skills and role don't cover.
Activity that the user explicitly reverses (stop a service, work on it, restart it) is not flagged — the LLM evaluates the whole session arc, not isolated events. Every mapped user is monitored — there is no per-user opt-out. A user with no assigned skills and no role description is judged as a standard, non-privileged account, so administrative actions (installing packages, editing auth files, changing services) will be flagged. A login whose user doesn't map to a ManageLM user is skipped, and the full session content never leaves the host.
Alert Severity
The LLM grades every batch on three levels; only the top two ever reach you:
- High — clear indicator of compromise or behavior wholly outside the user's permitted scope. Investigate immediately.
- Medium — unusual or noteworthy but plausibly legitimate. Worth a quick human glance.
- Benign — no alert raised. Activity that's consistent with the host's installed skills (for service threats) or the user's permitted scope (for session threats) is dismissed silently and recorded only in the agent log. This is what keeps the inbox quiet on hosts running PHP apps, databases, mail servers, or any other declared role.
Where to Toggle
- Agent edit page → Configuration → Service Threat Detection and Session Threat Detection (right below Sync Admin SSH Keys). Linux only — the toggles are hidden on Windows agents.
- Group edit page → Configuration → same two toggles. Cascades to every Linux agent in the group; per-agent toggle becomes greyed with a (via group: <name>) tooltip when inherited.
Roles & Skills
Session Threat Detection judges every mapped user. What counts as “in scope” for a user is built from two things:
- Assigned skills — the operations the user is permitted to perform on the host. An unrestricted user (and every owner/admin) gets the host's full skill set; a member with a per-user skill restriction gets only their allow-listed skills. These define what the LLM treats as expected activity.
- Role Description (optional) — free text, up to 4 KB, layered on top of the skills to give the LLM extra context. Set under Users & Roles → (user) → Role Description; admins and owners can edit their own under Settings → Profile (members see their own read-only). Example: "Database administrator for production PostgreSQL. Performs schema migrations, backups, user provisioning. Should not touch the web tier or auth systems."
A user with neither skills nor a role description is treated as a standard, non-privileged account — routine work is fine, but administrative or privileged actions are out of scope and will alert. Linux sessions are matched to ManageLM users via the same System Username field used by SSH Key Sync; a login that doesn't map to a ManageLM user is skipped.
Where to See Alerts
Audit Logs → Threat Alerts tab. The row+expand layout matches the other Audit Logs tabs (Agent Activity, Admin Actions, Geolocation) and respects the same shared From / To pickers and global Site selector. Each row shows the time, the actor (the user for session alerts, or the offending process/daemon for service alerts), agent, kind, severity, the rule that fired, and a status badge (Unhandled, Discarded, Stopped, or Ended). Clicking expands the row in place to show the full event context, the role description used for judgment, and any action history — and, for admins on unhandled alerts, the same Kill / Discard actions offered in the alert email (below).
Email & One-Click Actions
Each alert offers these actions — from the alert email, and inline on unhandled alerts in the portal (admins):
| Alert kind | Action button | What it does |
|---|---|---|
| Session | Kill Session | The agent terminates the flagged user's login session on the host. |
| Both | Discard Alert | Marks the alert a false positive and tells the agent to stop alerting on this same activity (rule + service/user) on that host. |
Email actions go through a mandatory confirmation screen, and each link expires in one hour and can be used once; in-portal actions are admin-only and confirm in a dialog. Critical system processes (init, sshd, the agent itself, container runtimes) are never affected regardless of what the alert says.
Service alerts cover a batch of events from potentially several processes, so they don't carry a single process to kill — only Discard Alert is offered. Session alerts offer Kill Session only while the login is still active; once the user has logged out, only Discard remains.
Email Recipients
- Service alerts — ManageLM admins and owners, plus members with access to the affected agent. Service and daemon threats are operational, so the agent's operators are notified.
- Session alerts — ManageLM admins and owners only. These are behavioral judgments that may concern assigned members of the agent, so visibility is restricted to platform admins to avoid users seeing reviews of their own activity (or tipping off a malicious insider).
Privacy
For Session Threat Detection, the session details — commands, file paths, network destinations — stay on the host. Only the LLM's verdict and a short excerpt are stored in the portal alert. Where the LLM call itself runs depends on your deployment:
| Deployment mode | LLM call destination | Recommended for sensitive workloads |
|---|---|---|
| SaaS | Trial LLM (Anthropic) | Acceptable under the standard SaaS terms. |
| Self-hosted, proxied LLM | ManageLM proxy → configured upstream | Same exposure as the SaaS path. |
| Self-hosted, local LLM | Stays on the customer host | Recommended. Session content never leaves your infrastructure. |
Service Dependencies
The Service Dependencies scan discovers cross-server service dependencies across your infrastructure. It shows what each server provides, what it depends on, and highlights connections between managed agents.
How it works
- Trigger — Click the Service Dependencies button at the top of the Agent Assets page.
- Scan — The portal triggers a scan on every online agent simultaneously. A progress modal shows each agent's scan status in real time.
-
Collect — Each agent runs a fully deterministic scan (no LLM needed):
- Provides — discovers all listening TCP services.
- Depends on — discovers outbound connections (established TCP) plus config-file parsing for intermittent dependencies.
- All hostnames are resolved to IPs locally on the agent before reporting.
- Report — The portal matches dependency IPs against known agent IPs to identify managed vs external connections, and displays a per-agent report.
What is scanned
| Source | What it finds |
|---|---|
| Established connections | All active outbound TCP connections to non-local IPs |
| Nginx configs | proxy_pass, upstreams, fastcgi_pass, uwsgi_pass, grpc_pass |
| Apache configs | ProxyPass, ProxyPassReverse, RewriteRule [P] |
| HAProxy config | Backend server definitions |
| Caddy config | reverse_proxy targets |
| .env files | DATABASE_URL, REDIS_URL, DB_HOST, SMTP_HOST, and many more |
| Docker Compose | Environment variables with connection strings |
| WordPress | DB_HOST in wp-config.php |
| Database replication | MySQL master-host, PostgreSQL primary_conninfo, Redis replicaof |
| Mail configs | Postfix relayhost and lookup tables, Dovecot auth backends |
| LDAP configs | ldap.conf, sssd.conf, nslcd.conf URI/host directives |
| NFS/CIFS mounts | Network mounts in /etc/fstab |
| Systemd units | Environment variables with connection strings in service files |
| Prometheus | Scrape targets in prometheus.yml |
| DNS resolvers | /etc/resolv.conf nameservers |
| NTP servers | ntp.conf, chrony.conf, timesyncd.conf |
| Syslog targets | Remote syslog destinations in rsyslog configs |
| SNMP traps | Trap sink destinations in snmpd.conf |
| Backup clients | Bacula, Bareos, Borg, Restic server addresses |
| Zabbix agent | Server= directive in zabbix_agentd.conf |
| Generic /etc sweep | URLs with host:port and raw IP:port patterns across all /etc files |
Report format
Each agent's section shows:
- Provides — green badges for each listening service and port.
- Depends on — each dependency with a managed badge (connection to another managed agent) or external badge (connection to an unmanaged server).
- Used by — which other managed agents connect to this server.
Constraints
- All agents must be online to participate in the scan.
- No database storage — results are computed on demand and held temporarily in Redis (2 minutes).
- The
reportspermission is required to run a dependency scan. - The scan is fully deterministic — no LLM is used.
Connectors
Connectors wire ManageLM up to external systems. They come in three kinds, selectable as tabs in the Add Connector modal:
- Hosting Integration — pull infrastructure inventory (VMs, volumes, networks, security groups) from a cloud provider or hypervisor and auto-match the VMs to your ManageLM agents.
- SIEM Integration — push task-completion events from your agents out to an external SIEM (Splunk, Elasticsearch, or a generic JSON webhook).
- Notifications & Ticketing — push platform events (monitor down, cert renewal failed, backup failed, security findings, threat alerts, ...) to Slack as chat messages, or ServiceNow / Jira as incident tickets.
All three kinds share the same permission (perm_connectors), the same encryption-at-rest (AES-256-GCM, requires ENCRYPTION_KEY), the same storage table, and the same CRUD pages. What differs is the data flow: hosting connectors pull on a schedule, SIEM connectors push task events from each agent, notification connectors push platform events from the portal.
Hosting Integration
Sync your hosting resources (VMs, volumes, networks, security groups) from cloud providers and hypervisors, and auto-match them to ManageLM agents by IP address and hostname.
Supported providers
- Microsoft Azure — Service principal auth (tenant ID, client ID, client secret, subscription ID)
- Amazon AWS — Access key auth (access key ID, secret access key, region)
- Google Cloud — Service account auth (project ID, service account JSON key)
- VMware vSphere — Session auth (vCenter URL, username, password). Requires vSphere 7.0+
- Proxmox VE — API token auth (API URL, token ID, token secret)
- OpenStack — Keystone v3 password auth (auth URL, username, password, project, domain, region). Defaults to OVH endpoint
How it works
- Go to Connectors in the sidebar and click Add Connector.
- On the Hosting tab, select a provider, enter a name, and fill in your credentials.
- Click Save — the connector syncs automatically on creation.
- Expanding a connector shows what depends on it: a cloud connector lists the resources it discovered, a SIEM the agents forwarding to it, and a directory, database or vault the credentials it is part of — the accounts rotated there, or the items each rotation writes into.
- Test is available while you are still filling the form, not only after saving, and it checks what is on screen rather than what was last saved — so you can try a different URL or turn off certificate verification for a self-signed server and see the result before committing to it. Nothing is written until you save. When editing, a password you do not retype is taken from the stored connector.
- Hosting resources appear in the connector's expanded view and on agent cards in the Agent Assets page.
What is synced
- VMs / Instances — name, status, IPs, instance type, availability zone, security groups, tags
- Volumes / Disks — name, size, type, encryption, attachment
- Networks — VPCs, subnets, CIDRs
- Security Groups / Firewalls — rules with direction, protocol, ports, source/destination
Agent matching
After each sync, ManageLM automatically matches hosting VMs to agents by comparing IP addresses and hostnames. Matched agents show a provider badge (e.g. AWS, Azure) on their card in the Agent Assets page. Expanding an agent card shows the full provider metadata (instance type, zone, IPs, disks, security groups, tags).
Reaching a private endpoint (hosted platform)
Public cloud APIs (AWS, Azure, GCP) are reachable from the portal directly. An on-premises Proxmox or vCenter usually is not — and publishing a hypervisor API to the Internet just to use ManageLM is not a reasonable ask. On the hosted platform you can instead point the connector at one of your agents: it makes the API call on your own network and returns the result over the connection it already holds open. No inbound firewall rule, no VPN.
- Set API Access to Through an agent on the connector.
- Pick the relay agent — any agent that can reach the hypervisor endpoint.
- Save. Sync and any write actions now travel through that agent.
The relay is scoped to the connector's own endpoint: the agent refuses any URL outside it, only permits standard HTTP methods, never follows redirects, and caps response size. Every relayed call is logged on the agent so the machine's owner can audit what it was asked to reach. Because a self-hosted portal already runs inside your network, it connects directly and the option is not offered there.
Write mode — acting on VMs
A connector is read-only until you say otherwise. Turning on Write Mode lets the portal (and Claude) act on the VMs it discovered:
| Mode | What it allows |
|---|---|
Read only | Inventory sync only. The default. |
Safe actions | Start a VM, create a snapshot — nothing that interrupts a running workload. |
Full actions | Also shut down, force stop, reboot, and roll back to a snapshot. |
Deleting VMs, disks and snapshots is not reachable from either mode.
Four independent gates apply to every action, and all of them must pass:
- The user needs the Hosting permission. It is separate from Connectors, which only covers configuring the integration — storing a credential and powering off a production VM are different levels of trust.
- The connector's write mode must allow that action's risk tier.
- An optional per-connector allowlist can narrow things further to specific actions.
- The action must exist in the provider's fixed catalog. An action Claude invents cannot reach your hypervisor.
Actions run from the connector's expanded view in Connectors, on each discovered VM. Disruptive ones ask for confirmation first. Proxmox actions are asynchronous on the hypervisor side, so ManageLM waits for the underlying task to finish and reports its real outcome — an action that was accepted but has not completed yet is reported as still running rather than as a success.
Proxmox API token permissions: a token that syncs fine can still be refused for writes. Power actions need VM.PowerMgmt and snapshots need VM.Snapshot, plus an ACL granting them unless privilege separation is disabled on the token.
Action history
Every write attempt is recorded — who ran it, from the portal or from Claude, the resource, the outcome, and the state before and after. Refused attempts are recorded too, so “who tried to stop that VM, and were they allowed to?” is answerable and not just “who succeeded”. Open Action history at the bottom of the connector's expanded view. Entries are kept for 180 days.
MCP integration
Claude can query your hosting inventory using three built-in tools:
list_connectors— list configured hosting connectors with sync status and resource countssearch_cloud— search VMs, volumes, networks, security groups across all providersget_cloud_info— detailed info for a single hosting resource with linked agent data, including the actions currently permitted on itcloud_action— perform one action on a VM (start, shut down, stop, reboot, snapshot, roll back)
The read tools are hidden until at least one hosting connector exists — a SIEM-only tenant will not see them in Claude's tool catalog. cloud_action is hidden further, until a connector actually has write mode enabled.
When Claude uses cloud_action it must name exactly one VM — if the name matches several, it is told to ask you which rather than choose — and any disruptive action requires an explicit confirmation before it will run.
Sync schedule
Each connector syncs on a configurable interval: every 1 hour, 6 hours, 12 hours, or 24 hours. Manual sync is available from the connector list (refresh icon). Syncs are distributed across portal instances using Redis locks to prevent duplicates.
Security
- Connector credentials are AES-256-GCM encrypted at rest (requires
ENCRYPTION_KEYenv var). - Non-secret fields (region, project ID, URLs) are stored separately and visible when editing.
- All cloud API calls have 30-second timeouts and SSRF protection (private IP ranges blocked).
- Error messages are sanitized to prevent credential leakage in logs or UI.
SIEM Integration
Forward task-completion events from your agents directly to an external SIEM. Useful for compliance, centralized security monitoring, and audit trails outside ManageLM's own database. Forwarding is additive — the portal's own task log and audit trail are unchanged.
Supported destinations
- Splunk HEC — HTTP Event Collector. Needs the HEC URL and a token. Optional Splunk
indexandsourcetype. Pasted tokens may include aSplunkprefix — ManageLM strips it automatically. - Elasticsearch (
_bulk) — needs the cluster URL, an index name, and a base64-encoded API key. TheApiKeyprefix is stripped if pasted in. - Generic JSON Webhook — POSTs the event envelope as JSON to any URL. Optional raw
Authorizationheader (e.g.Bearer <token>) and optional HMAC-SHA256 secret (agent signs the raw body; digest sent inX-ManageLM-Signature: sha256=<hex>so you can verify integrity on the receiving end).
What gets forwarded
One event per completed task — the same rows you see in the Command History panel of an Agent's detail page. Nothing else is forwarded: no heartbeats, no config pushes, no LLM traffic.
{
  "ts": "2026-04-17T14:23:11Z",
  "agent": { "hostname": "prod-web-01" },
  "task": {
    "id": "...",
    "skill": "firewall",
    "instruction": "block 1.2.3.4",
    "status": "completed",
    "output": "...",
    "error": null,
    "files_changed": ["/etc/nftables.conf"]
  }
}
Splunk wraps this in {"event": <envelope>, "sourcetype": "...", "index": "...", "host": "..."}. Elasticsearch sends it as an NDJSON _bulk body (action line + doc line). Webhook sends a JSON array of envelopes per batch.
How it works
- Go to Connectors in the sidebar and click Add Connector.
- Switch to the SIEM Integration tab, pick a type, enter a name, fill in the endpoint and credentials, and save. A Test Connection runs automatically on create.
- Open an Agent detail page — or a Server Group — and pick the new SIEM from the SIEM Forwarding dropdown.
- From that point on, every task completed by that agent fires a POST to the SIEM, in parallel with the normal task-result report to the portal.
Assignment and inheritance
Each agent has at most one SIEM destination. It resolves as:
- If the agent itself has a direct override → that destination wins.
- Else if its group(s) point at a single destination → inherit that one.
- Else → no forwarding.
If an agent belongs to several groups whose SIEM settings differ, the portal refuses to guess — the agent gets a red SIEM CONFLICT badge on the Agent Assets list until you set an explicit per-agent override to resolve the conflict.
Agent groups show their SIEM destination as a small → <connector name> pill on the group card (read-only view).
Transport and reliability
- Fire-and-forget. The agent enqueues the event into a bounded in-memory queue (512 events) and a background worker POSTs it. Task execution never blocks on SIEM delivery.
- Circuit breaker. After 5 consecutive failures the agent backs off for 60s before retrying — a down SIEM does not get hammered.
- No persistence. If the agent is restarted while the queue has events, those events are dropped. The portal's own task log always has the same data — SIEM forwarding is a fan-out, not a queue-of-record.
- Config changes flush the queue. Reassigning an agent from Splunk A to Splunk B discards events still destined for A, preventing cross-tenant leakage.
Security
- SIEM tokens and HMAC secrets are AES-256-GCM encrypted at rest, decrypted only to build the per-agent config. They are never logged.
- The Test Connection button runs from the portal — private SIEMs behind NAT will therefore fail the portal-side test even if agents can reach them; the actual forwarding still works. (A future iteration may route the test through a chosen agent.)
- The generic webhook supports HMAC-SHA256 signing so your receiver can drop unsigned or tampered events.
- Because events travel agent → SIEM directly (not via the portal), customer event data never transits the ManageLM SaaS — relevant for data-residency and compliance requirements.
Permissions
Creating, editing, or deleting a SIEM connector requires the Connectors permission (perm_connectors) — the same gate as hosting connectors. Assigning a SIEM destination to an agent also requires the Agents permission; assigning one to a group requires the Groups permission.
Notifications & Ticketing
Route platform events to Slack, ServiceNow, or Jira so the people who need to know are paged in the channels they already watch — without writing custom webhook receivers. Notifications are an additive fan-out: in-app notifications, email, user webhooks, and SIEM forwarding all continue to work unchanged.
Supported destinations
- Slack — posts a Block Kit message with severity-colored stripe, agent context, and an "Open in portal" button. Setup: create an Incoming Webhook integration on the Slack channel you want alerts in, then paste the resulting
https://hooks.slack.com/services/...URL into the connector. The channel is fixed at the Slack side — one Slack connector = one channel. - ServiceNow — opens incidents via the Table API. Setup: create a dedicated integration user with the
itilrole (or any role that grants create/read on the target table), then enter your instance URL, username, password, and optional table (defaults toincident), assignment group sys_id, and caller sys_id. - Jira — opens issues via the Jira Cloud REST API. Setup: create an API token for an account that can create issues in the target project, then enter your site URL (
https://your-domain.atlassian.net), account email, API token, project key, and optional issue type (defaults toTask). Severity and the correlation id are attached as issue labels (managelm,managelm-severity-*).
Adding a new destination type (PagerDuty, Teams, Zendesk, ...) is a single-file extension — the dispatcher and call sites are provider-agnostic, and the dispatcher discovers new providers from the connector schema automatically.
What gets forwarded
Every platform event that fires a webhook today is also eligible to fire a notification, plus two channels that webhooks do not carry: threat alerts and security drift. The complete category list:
- Monitors —
monitor.down/monitor.up/monitor.stalled/monitor.created/monitor.deleted - Certificates —
cert.issued/cert.renewed/cert.renewal_failed/cert.revoked/cert.reactivated/cert.deleted - Backups —
backup.completed/backup.failed - Security findings —
security.drift(a previously-passing rule now fails) - Threat alerts —
threat.alert.red/threat.alert.yellow - Reports —
report.completed/report.failed/report.stalled(security audit, system inventory, SSH keys scan, activity audit) - Pentests —
pentest.completed/pentest.failed - Agent lifecycle —
agent.enrolled/agent.approved/agent.online/agent.offline - Tasks —
task.completed/task.failed/task.needs_input
Subscription routing
Each connector has its own per-category routing, configured in the expanded view on the Connectors page. The column adapts to what the destination can do:
- Notify (Slack) — tick the event categories this destination should receive as messages.
- Open ticket (ServiceNow / Jira) — these are ticket-only destinations, so ticking a category opens a ticket for it. There is no separate "just message" option — a subscription is a ticket subscription.
Either way, untouched = no events (safe default: a new connector ships nothing until you opt in). One Slack connector for chatty ops alerts and a separate ServiceNow or Jira connector for ticket-worthy events is a common shape — tick all categories on Slack, tick only critical categories on the ticketing destination.
Severity and tickets
The dispatcher assigns a default severity (info / warn / critical) and a default ticket flag to every event. Sensible starting points:
monitor.down,cert.renewal_failed,backup.failed,security.drift,threat.alert.red— critical, ticket on by defaultmonitor.stalled,cert.revoked,threat.alert.yellow,report.failed,pentest.failed,agent.offline— warnmonitor.up,backup.completed,report.completed,agent.online,task.completed— info, no ticket
For Slack, the severity default decides whether an event renders as a plain message or a ticket-styled one. For ticket-only destinations (ServiceNow / Jira), every event in a subscribed category opens a ticket regardless of its default severity.
Correlation id
Every ticket carries a stable correlation_id derived from the event name + the most-identifying payload fields — for example managelm:monitor.down:<monitor_slug>:<agent_id>, so the same monitor flapping on the same agent shares one trackable id while different monitors stay separate (ServiceNow stores it in the correlation_id field; Jira attaches it as a label). Note: in this version ManageLM does not itself de-duplicate — each fire opens a new ticket. The id is provided so you can collapse re-fires on your side (a ServiceNow business rule / transform-map coalesce, or a Jira automation rule), and so a future release can add update-in-place.
Transport and reliability
- Fire-and-forget. The dispatcher kicks off deliveries in parallel; portal event-firing code never blocks on the destination.
- Retry with backoff. Each delivery is attempted up to 3 times with exponential backoff (~2s, ~4s) before giving up on this event — matches the user-webhook retry shape.
- Auto-disable. After 10 consecutive failed deliveries, the connector flips to
disabledand stops receiving events until the user re-tests. The Connectors page renders this state with an orange badge and the last error message. A successful delivery — or a passing Test Connection — resets the failure counter and flips the row back toactive. - Feature-gated. Events under a disabled per-account feature (monitors, certificates, backups, pentests) are dropped before delivery — same gate as user webhooks.
- Load-balanced safe. The dispatcher caches active connectors per account (60s TTL) with Redis pub/sub invalidation across portal instances. The failure counter is incremented atomically in SQL so two portals racing on the same connector cannot double-write or stall the auto-disable threshold.
Security
- Slack webhook URLs, ServiceNow credentials, and Jira API tokens are AES-256-GCM encrypted at rest, decrypted only inside the dispatcher.
- All outbound POSTs go through
safeFetchwith 10–15s timeouts and the same private-IP SSRF block-list as cloud and SIEM connectors. - The Slack provider validates that the URL host is exactly
hooks.slack.comon save. - Test Connection verifies the destination is actually deliverable, not just reachable: ServiceNow probes the configured target table (
sysparm_limit=1) so a wrong table or missing ACL is caught up front; Jira confirms the account and that the target project is visible. Neither creates any user-visible data.
Permissions
Creating, editing, or deleting a notification connector requires the Connectors permission (perm_connectors) — the same gate as cloud and SIEM connectors.
Permissions (shared)
The Connectors permission (perm_connectors) covers both kinds. Owners and admins have full access. Members need the permission toggled on in Users & Roles.
Change Tracking
ManageLM automatically tracks file changes made by every mutating task. Each agent maintains a local git repository that snapshots tracked directories before and after task execution, producing a precise record of what changed, when, and by which task.
How it works
- Pre-snapshot — Before a task executes, the agent syncs all tracked files into its local git repo and commits a baseline.
- Task execution — The task runs normally (LLM-driven commands).
- Post-snapshot — After the task completes, the agent syncs again, commits the delta, and computes the list of changed files.
- Report — Changeset metadata (files changed, commit hashes, summary) is sent to the portal and stored in the database. The full diff stays in the agent’s local repo.
What is tracked
| Aspect | Detail |
|---|---|
| Tracked directories | /etc/ — covers SSH, nginx, firewall, cron, sudoers, sysctl, network config, and more |
| Skipped content | Binary files, files > 512 KB, symlinks, and noisy directories (ssl/certs, pki/ca-trust, firmware, kernel, selinux/targeted/policy) |
| Git implementation | dulwich (pure Python) — no git CLI needed on the host |
| Repo location | /opt/managelm/git/ on each agent |
| Retention | 30 days — older commits are automatically pruned daily |
Viewing changes
When a task modifies tracked files, a changeset badge appears on the task in the task log (in the Agent Detail page and the MCP Log). The badge shows the number of files changed.
With MCP (Claude), use the built-in get_task_changes tool to inspect what a task modified:
get_task_changes(task_id="...", full_diff=true)
This returns:
- List of changed file paths
- A summary (e.g. “Modified 3 files in /etc/nginx/, /etc/ssh/”)
- Optionally, the full unified diff (when
full_diff=true) — fetched on demand from the agent’s local repo
Reverting changes
If a task made unwanted changes, you can revert them to restore the previous file state. Expand the task — in a server’s own task list or in the Agent Log — and the files it changed are listed with two buttons: View diff fetches the change from the agent and shows it inline, and Revert puts the files back after confirming. The revert is itself recorded, so it can be undone in turn.
Reverting needs the Agents permission; viewing a diff does not. The same thing is available to an MCP client as the revert_task tool:
revert_task(task_id="...")
This fetches the diff from the agent’s local git repo and applies a reverse patch, restoring the files to their pre-task state. The revert is tracked as a separate changeset.
Non-mutating tasks
Tasks classified as read-only (non-mutating) by the LLM skip the snapshot process entirely — no changeset is created. This keeps the git history clean and avoids unnecessary I/O for read-only operations like status checks and log queries.
Audit Log
The Audit Log gives you a single chronological view of everything that happened in your account — both who ran what on which agent, and who changed which setting in the portal. Open it from the Audit Logs entry in the sidebar.
The page is organised into five tabs, all sharing one From / To date picker and one site-scope filter:
Agent Activity tab
Every task executed against an agent — from the portal, MCP, or shell. Each row shows when it ran, who submitted it, which agent and skill, and the outcome. The expanded row carries the full operation detail, including:
- AI Report — a short narrative auto-generated by the agent's LLM after completing the task, so you can scan results without reading raw command output.
- Command — the original request as it was submitted.
- Output — the raw stdout/stderr the agent returned.
- Files changed — when the task wrote to disk, the list of affected paths.
- IP & Location — the operator's IP and geo-resolved city/country (when
GEOIP_DATABASEis configured). MCP-submitted tasks are flagged with a "MCP connector" badge so the IP isn't mistaken for the user's location.
The toolbar adds two Agent-Activity-only controls when the tab is active:
- Changes only (on by default) — restricts the list to mutating operations, hiding read-only status checks and log queries. Toggle off to see everything.
- Export PDF — downloads a printable report covering the current From / To window and the Changes-only setting. The filename carries both, so two consecutive exports with different filters don't collide.
Threat Alerts tab
Alerts from the agent's Threat Detection layer (Linux only). Both Service alerts (a batched LLM verdict over a window of daemon behaviour, judged against the host's installed skills) and Session alerts (LLM judgement of admin SSH/sudo sessions against the user's permitted scope) land here.
Console Sessions tab
Recorded terminal, desktop and SSH sessions — who, on which server, as which account, how long and how big — each expanding into a player you can replay in place or open in its own window. See Admin Sessions for how to turn recording on and how long recordings are kept. Admins also get an S3 Cleanup button here, which removes recording files from the bucket that no longer have a session in ManageLM.
Admin Actions tab
Every administrative change in the portal:
| Category | Actions |
|---|---|
| Authentication | Login, logout |
| Users | Invite, update role/permissions, delete, transfer ownership |
| Agents | Approve, delete, update settings, bulk actions |
| Skills | Create, import, update, delete, document upload/delete |
| Groups | Create, update, delete, member changes |
| Webhooks | Create, update, delete |
| API Keys | Create, delete |
| MCP | Configuration changes (IP whitelist, etc.) |
| Account | Settings changes, license activation/removal |
Each entry records timestamp (in your timezone), user (name and email), action type (e.g. agent.approved, skill.created), target resource, and the client IP.
Geolocation tab
World map of admin connection origins with numbered pins linked to a side legend. Appears when GEOIP_DATABASE is configured on the portal.
Access control
- Owners and admins see everything across the account.
- Members with the
logspermission also see everything — this is the permission that grants full account-wide visibility for the agent activity log and its PDF export. - Members without
logssee Agent Activity and Threat Alerts scoped to agents they are assigned to (directly or via a group); Admin Actions is limited to their own actions. perm_reportsdoes not gate the Audit Log — it is reserved for security audit, inventory, SSH-keys, and activity report generation + scheduling in Agent Assets.
Webhooks
Get notified when things happen in your account.
Available events
| Event | Fires when |
|---|---|
agent.enrolled | A new agent requests enrollment |
agent.approved | An agent is approved |
agent.online | An agent connects |
agent.offline | An agent disconnects |
task.completed | A task finishes successfully |
task.failed | A task fails |
report.completed | A security audit or inventory scan completes |
report.failed | A security audit or inventory scan fails |
monitor.down | A service monitor goes down (after consecutive failure threshold) |
monitor.up | A service monitor recovers from down |
cert.issued | A new certificate is issued and deployed to an agent |
cert.revoked | A certificate is revoked (CRL updated, LE notified for LE certs) |
cert.renewed | A certificate is automatically renewed by the daily sweep |
cert.renewal_failed | Automatic certificate renewal failed |
cert.reactivated | A revoked certificate is reactivated (internal CA only) |
cert.deleted | A certificate is soft-deleted from the portal |
Configure webhooks from Settings → MCP & API. Enter a URL, select events, and optionally provide an HMAC secret. Payloads are signed with HMAC-SHA256 via the X-Webhook-Signature header when a secret is configured.
Delivery retries up to 3 times with exponential backoff. After 10 consecutive failures, the webhook is automatically disabled. Re-enabling it resets the counter. Maximum 25 webhooks per account.
In-App Notifications
The portal includes a real-time notification system accessible from the Notifications bell in the sidebar. Notifications are delivered alongside email alerts for key events.
Notification triggers
- Agent enrolled — A new agent requests approval (account-wide, visible to all admins).
- Agent approved — An agent is approved (account-wide).
- Agent updated — An agent applied an auto-update (account-wide).
- Task failed — A security audit, access scan, activity audit, certificate scan, system inventory, pentest or credential rotation reported a failure, with the reason the agent gave.
How it works
- An unread count badge appears on the notification bell when new notifications arrive.
- Click the bell to open the dropdown panel. All unread notifications are marked as read automatically.
- Notifications link to the relevant page (e.g. agent detail, request log).
- The bell polls for new notifications every 30 seconds.
- Use the clear button to remove read notifications from the list.
Deployment & .env
The portal is configured via environment variables in a .env file. Below is a reference of all available settings.
Core
| Variable | Required | Default | Description |
|---|---|---|---|
DATABASE_URL | Yes | — | PostgreSQL connection string |
SERVER_PORT | No | 3000 | HTTP listen port |
SERVER_URL | Yes | — | Full public URL (e.g. https://portal.example.com) |
ACCESS_TOKEN_TTL | No | 86400 | Access token lifetime in seconds (24h). Tokens are opaque random strings stored in Redis — no signing secret. |
REFRESH_TOKEN_TTL | No | 2592000 | Refresh token lifetime in seconds (30d). |
DEFAULT_TIMEZONE | No | UTC | Default timezone for new users |
TASK_TIMEOUT_SECONDS | No | 300 | Max duration for synchronous task execution (seconds) |
FILE_TRANSFER_MAX_BYTES | No | 26214400 | Max file transfer size (default 25 MB) |
LOG_LEVEL | No | info | Log verbosity: trace, debug, info, warn, error, fatal, silent |
CLUSTER_WORKERS | No | 2 | Number of Node.js cluster workers. Set to 1 to disable clustering. |
SERVER_MODE | No | selfhosted | saas = hosted SaaS (trial LLM available), selfhosted = Docker/on-prem (proxied LLM available). |
NOTIFY_EMAIL | No | — | Email address for platform operator alerts (account created/deleted notifications). |
ENCRYPTION_KEY | No | — | AES-256 master key for every secret stored at rest — connector credentials, agent signing keys, LLM API keys, SMTP and S3 passwords, PKI private keys. Required to use Connectors. 64-character hex string; generate with openssl rand -hex 32. See Encryption at Rest. |
ENCRYPTION_OLD | No | — | Previous encryption key(s), comma-separated — decrypt-only. Set while rotating ENCRYPTION_KEY, remove once the rotation is finished. |
SMTP & DKIM
| Variable | Required | Default | Description |
|---|---|---|---|
SMTP_HOST | No | — | SMTP server hostname. When empty, emails are sent directly to recipient MX servers (no mail server required). |
SMTP_PORT | No | 25 | SMTP server port |
SMTP_FROM | Yes | — | From address for all emails |
SMTP_SECURE | No | none | none = plain (localhost:25), starttls = upgrade via STARTTLS (587), tls = implicit TLS (465) |
SMTP_USER | No | — | SMTP auth username (for external relays) |
SMTP_PASS | No | — | SMTP auth password |
DKIM_DOMAIN | No | — | Domain for DKIM signing (e.g. example.com) |
DKIM_SELECTOR | No | default | DKIM selector (matches DNS TXT record) |
DKIM_PRIVATE_KEY_PATH | No | — | Path to PEM private key file |
DKIM_PRIVATE_KEY | No | — | Inline PEM private key (use \n for newlines) |
DKIM_DOMAIN and a private key are set, all outgoing emails are signed with DKIM (RSA-SHA256). You also need to publish a DNS TXT record at {selector}._domainkey.{domain} with the matching public key.
Redis (required)
| Variable | Required | Default | Description |
|---|---|---|---|
REDIS_URL | Yes | — | Redis connection URL (e.g. redis://localhost:6379). Supports redis://, rediss://, valkey://, valkeys:// schemes. |
REDIS_TLS | No | auto | auto = TLS if URL uses rediss:// or valkeys://, on = force TLS, off = no TLS |
REDIS_DB | No | 0 | Logical database number (0–15). Useful when sharing a Redis instance. |
Redis is a mandatory component used for:
- MCP session persistence — sessions survive portal restarts.
- Cross-instance messaging — pub/sub for cache invalidation, agent updates, and tool change notifications.
- In-app notifications — ephemeral per-user notification storage.
- Distributed locks — ensures background maintenance runs on only one instance.
- Horizontal scaling — multiple portal instances share state.
Database
| Variable | Required | Default | Description |
|---|---|---|---|
DB_POOL_MAX | No | 20 | Max PostgreSQL connection pool size |
DB_SSL | No | none | none = no SSL, require = SSL (skip cert verify), verify = full CA verification, verify-ca = custom CA cert |
DB_SSL_CA | No | — | Path to CA certificate file (used with DB_SSL=verify-ca) |
TASK_LOG_RETENTION_DAYS | No | 30 | Days to keep task log entries |
AUDIT_LOG_RETENTION_DAYS | No | 90 | Days to keep audit log entries |
TASK_LOG_MAX_PER_ACCOUNT | No | 5000 | Max task log entries per account |
AUDIT_LOG_MAX_PER_ACCOUNT | No | 10000 | Max audit log entries per account |
LOGIN_SESSION_RETENTION_DAYS | No | 30 | Days before inactive sign-in sessions are deleted (was SESSION_RETENTION_DAYS, still honoured) |
PENDING_AGENT_RETENTION_DAYS | No | 14 | Days before unapproved agent enrollments are deleted |
EMAIL_VERIFY_RETENTION_DAYS | No | 7 | Days before stale email verification tokens are cleared |
MONITOR_RETENTION_DAYS | No | 90 | Days to keep monitor events. Rollups are kept 4× longer for trend charts. |
CREDENTIAL_RETENTION_DAYS | No | 90 | Days to keep credential rotation history. Outcomes only — a rotation record never holds the value. |
Performance notes
The portal includes several built-in performance optimizations for high-load deployments:
- MCP tool caching — Generated tool lists are cached per account (60s TTL), automatically invalidated when skills are created, modified, or deleted. Assigning or removing skills from agents/groups does not change the MCP tool list.
- Auth caching — MCP authentication results are cached (30s TTL) to avoid repeated DB lookups.
- Batched heartbeats — Agent heartbeat writes are batched and flushed every 5 seconds instead of one DB write per heartbeat.
- Webhook caching — Webhook configurations are cached per account (60s TTL).
- Optimized queries — MCP tool calls use a single combined query instead of multiple sequential lookups.
- Database indexes — Indexes on hot-path columns (token hashes, access control tables, agent lookups).
For high-traffic deployments, increase DB_POOL_MAX and configure REDIS_URL for session persistence and horizontal scaling.
Account Migration
Move an entire account between deployments — for example from the hosted SaaS to a self-hosted install, or between two self-hosted servers — without re-creating everything by hand. The owner exports one encrypted file and imports it on the destination.
From Settings → Account → Account Migration (owner only):
- Export (available on SaaS and self-hosted): choose a passphrase and download
managelm-account-<name>-<date>.json. The payload is encrypted with your passphrase (scrypt + AES-256-GCM). Keep both the file and the passphrase safe — the file contains your account's secrets (LLM keys, connector credentials, agent credentials). - Import (self-hosted only): register a fresh account on the destination portal, then upload the file and enter the same passphrase. Your current login becomes the owner of the imported account.
What moves: agents (with their credentials preserved), sites, agent groups, skills and their uploaded documents, policy rulesets, connectors, rotated credentials and their delivery targets, Keystore keys with their clients and grants, webhooks, service monitors, certificates & PKI, and the whole team — users, roles, permissions and access grants, with passwords carried over. Every item keeps its identity, so all the links between them stay intact.
Keystore keys move as key material, as the internal CA's signing key does. The export is decrypted under the source's encryption key and re-encrypted under the destination's, so the plaintext exists only inside the transfer — and a key cannot be recovered any other way, so leaving them behind would destroy them.
What does not move: history and scan results (security audits, inventory, activity, monitor history, threat alerts, task logs, credential rotation history and Keystore usage — these record what happened on the source deployment), login sessions, and passkeys/MFA (these are tied to the portal's web address, so team members re-enroll on the new instance). The license is not included in the file either.
After importing: each agent only needs its SERVER_URL repointed at the new portal — it then reconnects automatically with its existing credentials and resumes work. Re-enter your license key from the same Account tab; a paid key activates on the new instance and its entitlement follows the most recently activated server (the previous instance reverts to Free).
Background Maintenance
The portal automatically cleans up stale data using three background tasks. Each runs on a distributed Redis lock, so only one portal instance executes per interval — no external cron is needed.
| Task | Interval | What it does |
|---|---|---|
| OAuth cleanup | Every 30 min | Deletes expired MCP OAuth tokens and authorization codes |
| Log purge | Every 1 hour | Age-based and count-based pruning of task history and the audit log |
| Maintenance | Every 6 hours | Cleans all other stale resources (see table below) |
| Scheduled scans | Every 15 min | Triggers security, inventory, certificate, access and activity scans for agents with a configured schedule (daily/weekly/monthly), dispatches due pentests, and purges expired audit history |
All tasks also run once on portal startup.
Maintenance targets
| Resource | Cleanup rule | Configurable |
|---|---|---|
| Login sessions | No activity in LOGIN_SESSION_RETENTION_DAYS (default 30) | Yes |
| Expired invitations | Past expires_at and not accepted | — |
| Expired API keys | Past optional expires_at | — |
| Password reset tokens | Past password_reset_expires_at | — |
| Email verification tokens | Unverified accounts older than EMAIL_VERIFY_RETENTION_DAYS (default 7) | Yes |
| WebAuthn challenges | User inactive > 6 hours (abandoned registration flow) | — |
| Pending agent enrollments | Unapproved for PENDING_AGENT_RETENTION_DAYS (default 14) | Yes |
| Monitor events | Older than MONITOR_RETENTION_DAYS (default 90) | Yes |
| Monitor rollups | Older than 4× MONITOR_RETENTION_DAYS (default 360 days) | Yes |
| PKI certificates | Soft-deleted certs after natural expiry, expired certs after 7 days, stale failed/pending after 7 days | Yes |
Configurable retention values can be set via environment variables in .env. See the Deployment & .env section for details.
Reinstalling an Agent
You can reinstall an agent without losing its configuration (skills, groups, members).
- Go to the agent's detail page.
- Click the Reinstall button.
- Copy the install command and run it on the server.
- Approve the re-enrollment when prompted.
The agent gets a fresh access token and signing key while keeping all its existing configuration intact.
Custom Skills
You can create your own skills to extend what agents can do.
- Go to Agent Skills and click Create Skill.
- Define the skill's slug, name, and description.
- Add operations (name and description for each capability).
- Set the allowed commands (and, for Windows skills, any PowerShell modules).
- Write a system prompt that guides the LLM.
Tips for custom skills
- Be specific with allowed commands. Only permit what's needed.
- Write clear system prompts. Tell the LLM what it is, what it can do, and any constraints.
- Write descriptive operations. Each operation's description helps the LLM understand the skill's capabilities.
- Test with the UI first before connecting Claude, using the Run Task button on the agent detail page.
Import / Export
Skills can be exported as JSON files and imported into other accounts. Use the export button on any skill, or import from the skills page.
Skill Documents (RAG)
You can upload reference documentation to any skill. When a task is dispatched, relevant sections are automatically retrieved and injected into the LLM prompt — giving the agent knowledge about products, tools, or APIs that the LLM wasn't trained on.
How it works
- Upload — Drop
.txt,.md,.pdf,.html,.doc, or.docxfiles onto the skill's edit form. Text is extracted automatically and chunked for indexing. - Retrieve — When a task matches, the portal searches document chunks using the task instruction and retrieves the top matching sections.
- Inject — Matching sections are supplied to the agent as reference material, ahead of the task instructions.
Uploading documents
- Go to Agent Skills and click the Edit (pencil) icon on a skill.
- Below the Detailed Description field, you'll see the Reference Documents section with a drag-and-drop zone.
- Drop one or more files (
.txt,.md,.pdf,.html,.doc,.docx), or click the zone to browse. - Each uploaded file is shown with its filename, size, chunk count, and upload date.
- To remove a document, click the trash icon next to it.
Chunking
Text is extracted from the uploaded file, then split into sections of roughly 1000–1500 characters so the most relevant parts can be retrieved:
- Markdown files are split on headings (
##). Large sections are further split at paragraph boundaries. Heading context is preserved with each chunk. - All other formats (plain text, PDF, HTML, DOC/DOCX) are split at paragraph boundaries. Short paragraphs are merged together.
Retrieval at task time
When a task is sent to an agent, the portal searches the skill's documents for the sections that match the instruction. The best matches (up to 10 sections / 30,000 characters by default) are supplied to the agent. If nothing matches, nothing is added.
Limits
| Limit | SaaS Default | Environment Variable |
|---|---|---|
| Max file size | 2 MB | SKILL_DOC_MAX_SIZE_BYTES |
| Max documents per skill | 10 | SKILL_DOC_MAX_PER_SKILL |
| Max total size per skill | 10 MB | SKILL_DOC_MAX_TOTAL_BYTES |
| Max chunks per task | 10 | RAG_MAX_CHUNKS |
| Max chars per task | 30,000 | RAG_MAX_CHARS |
The three upload limits apply to the SaaS platform only. On self-hosted installs they are unlimited by default — set the corresponding environment variable to enforce a limit. The two retrieval settings (chunks/chars per task) apply in both modes.
Use cases
- Custom application docs — Upload deployment guides, runbooks, or config references for internal tools.
- API documentation — Give agents context about APIs they need to interact with.
- Product manuals — Upload vendor documentation for products the LLM wasn't trained on.
- Compliance & procedures — Upload SOPs or checklists the agent should follow.